


Tuesday, March 8, 2011
Darling

*Click the tag to see a larger view*
You'll need a tube of choice preferably one with a closeup.
.
I am using the gorgeous art of Keith Garvey you can purchase his art to use for tags at PTE.
Tag Template 319 by Missy of Divine Intentionz here.
Font of choice
Mask Vix350 by Vix which you can get here.
Eye Candy 4000 - Gradient Glow
Xero - Fritillary
VanDerLee - Unplugged X
A kit of choice I am using a gorgeous kit free by Laura of Cinnamon Scraps called French Kiss which you can download from her blog here.
Ready?
Let's get started!
Open up the template shift + D to duplicate it close out the original.
Delete the copyright layer.
On Circle1 layer selections-select all-float-defloat add a new raster layer and flood fill with a color of choice I used a dark grey, then add some noise to make it stand out. Repeat the same steps for Raster1 layer EXCEPT do not add any noise to this layer. Close off the original layers.
Next on Circle3 layer selections-select all-float-defloat add a new layer and flood fill with a gradient of choice I used a background-foreground gradient. Then add Xero Fritillary settings shown in the screen-shot below. Close off the original layer.

On the Rounded Edges Rectangle layer seletions-select all-float-defloat add a new layer flood fill with a color of choice and close off the original layer.
On the Frame background layer selections-select all-float-defloat add a new layer and flood fill with the gradient we used earlier. Open up your close up and paste it as a new layer then go to selections-invert and hit delete make sure you are ON the tube layer when you do this. Then duplicate it go to adjust-blur-gaussian blur- 3 change the blend mode to soft light and the original layer blend mode to Luminane L. I also added VanDerLee - Unplugged X - Pattern offset, use the settings that fit your tag, on the top layer of the closeup.
On the with passion layer selections-select all-float-defloat add a new raster layer and with your paint brush and a color of choice paint the words to match the tag. Select none and close off the original layer.
On heart 1 & 2 layer add some noise.
On the 3 hearts layer selections-select all-float-defloat add a new raster layer flood fill with a color of choice to match your tag and add some noise. Close off the original layer.
Open up Ribbon Wrap 2 from the kit paste it as a new layer I rotated it and re-sized it to fit nicely around the
frame.
Open up the wordart from the kit paste it as a new layer I placed mine at the top and re-sized it so it fit nicely on the tag.
Now we're going to add our tube so open that up copy and paste it as a new layer I put it over in the cirlces. Now if you have some of the tube hanging over here is how you fix that. Go to the Circle2 layer selections-select all-float-defloat-invert then back on your tube layer and use your eraser brush to erase what is hanging over. Duplicate this layer and go to adjust-blur-gaussian blur-3 and change the blend mode to soft light and add a drop shadow. Settings shown below in the screen-shot.

Now we're going to add a mask layer to the very bottom of the tag just to add something to it so add a new layer and move it to the bottom of the layer pallette. Flood fill with the gradient from earlier and add the mask, then a little noise effect.
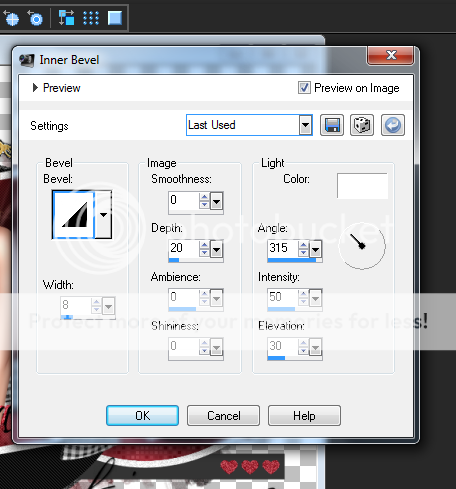
Its time to add your name in a font of choice, I also added some noise, inner bevel,gradient glow and drop shadow. Screen-shot below shows the settings for the gradient glow,inner bevel and the drop shadow the noise setting is whatever fits your tag or tastes.


Finally add your copyright and license number if applicable save as png or jpeg whichever you prefer and we're done!
I hope you enjoyed this tutorial and found it easy to follow.
Subscribe to:
Post Comments (Atom)


0 comments:
Post a Comment