


Showing posts with label PMTwS. Show all posts
Showing posts with label PMTwS. Show all posts
Monday, April 15, 2013
Spring Butterfly

*Click the tag for full view*
This tutorial was written by Brunette on April 15th 2013.
Any similarity to any other tutorial is purely coincidental.
Do not copy and paste my tutorials or claim as your own you may link to them for group challenges.
What you'll need:
You'll need a tube of choice I am using a stunning tube by Alex Prihodko.
Which you can purchase at Pics for Design HERE.
A gorgeous PTU kit by Pimp'd Designs called Secret Garden.
Which you can find out where to purchase this kit HERE.
Be sure to check out all her and the other designers awesome kits!
Fonts of choice - I am using a pixel font for the copyright and Recorda Script for the name.
Mask of choice
Ready?
Let's get started!
Open up a new canvas 700x700.
Open up frame 5 from the kit copy and paste it as a new layer. Now take your magic wand and click inside the frame then go to selections-modify-expand by 3 then open up a paper of choice I used paper 9 from the kit add a new layer then paste it INTO the selection DO NOT DESELECT YET. Open up your copy and paste it as a new image then mirror it copy and paste it as a new layer over your paper layer. Move these to layers below the frame and change the blend mode of the tube layer to soft light.
Open up the grass, tree, sign and sparkle elements from the kit. Copy and paste each item arranging them to your liking.
Now copy and paste your tube as a new layer re-size it so it fits there nicely then duplicate it and change the blend mode to soft light and go to adjust-blur-gaussian blur set to 3. Then on the bottom tube layer add a drop shadow of H 0 V 0 Opacity 50 Blur 5.00 Color Black.
Open up a different paper from the kit I used paper 1 and apply your mask merge group and make sure its under the frame layer.
Now in a font and color of choice add your name then some noise by going to adjust-add/remove noise-random checked-mononchrome checked-16%. Then go to selections-select all-float-defloat-modify-expand by 2 add a new layer and flood fill with white move that layer below the original text layer then expand by 2 again add another layer and flood fill with the original text color, move this layer to the very bottom. Apply the same drop shadow you used earlier to the bottom layer. Then merge all text layers down and change the blend mode to hard light.
Finally add your copyright and license number if applicable save as png or jpeg whichever you prefer and we're done!
This tutorial was written by Brunette on April 15th 2013.
Any similarity to any other tutorial is purely coincidental.
Do not copy and paste my tutorials or claim as your own you may link to them for group challenges.
What you'll need:
You'll need a tube of choice I am using a stunning tube by Alex Prihodko.
Which you can purchase at Pics for Design HERE.
A gorgeous PTU kit by Pimp'd Designs called Secret Garden.
Which you can find out where to purchase this kit HERE.
Be sure to check out all her and the other designers awesome kits!
Fonts of choice - I am using a pixel font for the copyright and Recorda Script for the name.
Mask of choice
Ready?
Let's get started!
Open up a new canvas 700x700.
Open up frame 5 from the kit copy and paste it as a new layer. Now take your magic wand and click inside the frame then go to selections-modify-expand by 3 then open up a paper of choice I used paper 9 from the kit add a new layer then paste it INTO the selection DO NOT DESELECT YET. Open up your copy and paste it as a new image then mirror it copy and paste it as a new layer over your paper layer. Move these to layers below the frame and change the blend mode of the tube layer to soft light.
Open up the grass, tree, sign and sparkle elements from the kit. Copy and paste each item arranging them to your liking.
Now copy and paste your tube as a new layer re-size it so it fits there nicely then duplicate it and change the blend mode to soft light and go to adjust-blur-gaussian blur set to 3. Then on the bottom tube layer add a drop shadow of H 0 V 0 Opacity 50 Blur 5.00 Color Black.
Open up a different paper from the kit I used paper 1 and apply your mask merge group and make sure its under the frame layer.
Now in a font and color of choice add your name then some noise by going to adjust-add/remove noise-random checked-mononchrome checked-16%. Then go to selections-select all-float-defloat-modify-expand by 2 add a new layer and flood fill with white move that layer below the original text layer then expand by 2 again add another layer and flood fill with the original text color, move this layer to the very bottom. Apply the same drop shadow you used earlier to the bottom layer. Then merge all text layers down and change the blend mode to hard light.
Finally add your copyright and license number if applicable save as png or jpeg whichever you prefer and we're done!
Tuesday, March 19, 2013
Snuggle Bunny
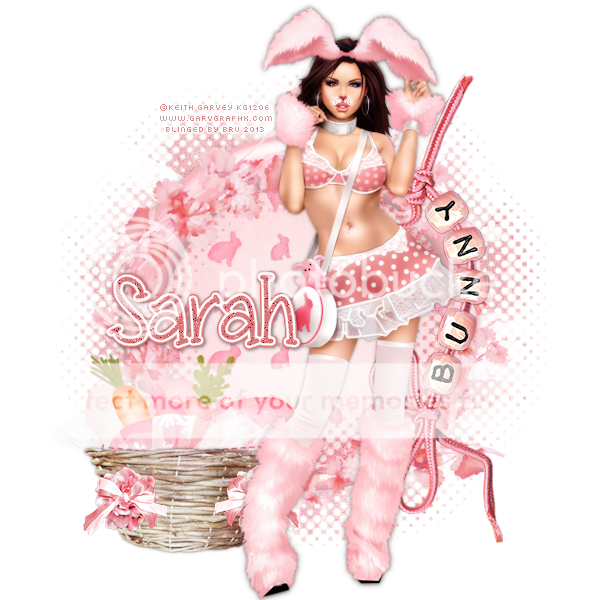
*Click the tag for full view*
This tutorial was written by Brunette on March 19th 2013.
Any similarity to any other tutorial is purely coincidental.
Do not copy and paste my tutorials or claim as your own you may link to them for group challenges.
What you'll need:
You'll need a tube of choice I am using a gorgeous tube by Keith Garvey.
Which you can purchase at his store HERE.
A gorgeous PTU kit by Designs by Sarah called Snuggle Bunny.
Which you can purchase this lovely kit HERE.
This tutorial was written by Brunette on March 19th 2013.
Any similarity to any other tutorial is purely coincidental.
Do not copy and paste my tutorials or claim as your own you may link to them for group challenges.
What you'll need:
You'll need a tube of choice I am using a gorgeous tube by Keith Garvey.
Which you can purchase at his store HERE.
A gorgeous PTU kit by Designs by Sarah called Snuggle Bunny.
Which you can purchase this lovely kit HERE.
Be sure to check out all her and the other designers awesome kits!
Eye Candy 400 - Gradient Glow
Fonts of choice - I am using a pixel font for the copyright and Miss Smarty Pants for the name.
Ready?
Let's get started!
Open up a new canvas 700x700.
Open up frame 1 from the kit copy and paste it as a new layer re-size it a little if you find it too big. Open up greenery 1 from the kit copy and paste it on top of the frame re-size it a little. Open up print 3 element from the kit copy and paste it below the frame layer. Take your magic wand and click inside the frame then go to selections-modify-expand by 3 add a new layer then copy and paste the paper INTO the selection. Select none.
Open up the bunny beads on string element copy and paste it as a new layer re-size it so it fits nicely and rotate it 90 degrees to the left and arrange it so that side on the frame.
Open up the basket element from the kit copy and paste it as a new layer re-size it so it fits nicely then arrange it near the bottom left of the tag. Now open up the lace element from the kit copy and paste it as a new layer re-size it so it fits nicely and move it below the basket layer. Keep re-sizing it so it looks like the lace is in the basket like a decoration. Open up egg 1, 2 and 3 copy and paste them as new layers re-size them so they fit in the basket move each of them below the basket layer arrange them so they show a bit outside the top part of the basket. Do the same with carrot 1 and two you can rotate them to your liking and place them where you'd like. I also used the bunny shape element.
Open up flower 4 from the kit copy and paste it as a new layer now we're going to re-size it so it fits on the basket like a decoration. Then open up bow 4 do the same but place it near the middle of the flower. Merge together then duplicate arrange this layer on the opposite side.
Copy and paste your tube as a new layer arrange and re-size to your liking. Duplicate it then change the blend mode to soft light then go to adjust-blur-gaussian blur set to 3. Add a drop shadow of H 0 V 0 Opacity 50 Blur 5.00 Color Black to the BOTTOM tube layer.
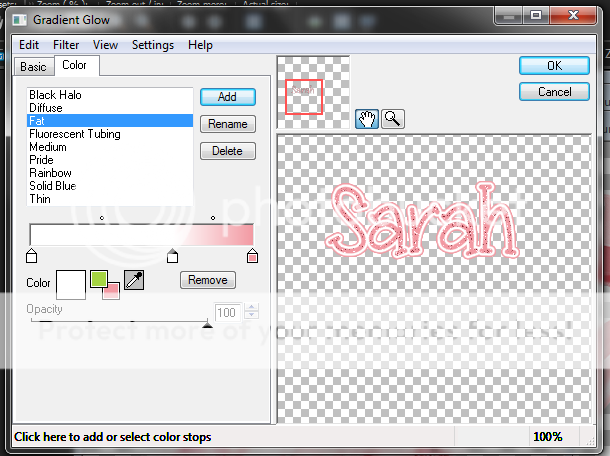
Now in a font and color of choice add your name I added some noise by going to adjust-add/remove noise-add noise then play with your settings to get something you like. I applied a gradient glow the settings that I used are shown in the screen-shot below. Now apply the same drop shadow you used earlier.
Eye Candy 400 - Gradient Glow
Fonts of choice - I am using a pixel font for the copyright and Miss Smarty Pants for the name.
Ready?
Let's get started!
Open up a new canvas 700x700.
Open up frame 1 from the kit copy and paste it as a new layer re-size it a little if you find it too big. Open up greenery 1 from the kit copy and paste it on top of the frame re-size it a little. Open up print 3 element from the kit copy and paste it below the frame layer. Take your magic wand and click inside the frame then go to selections-modify-expand by 3 add a new layer then copy and paste the paper INTO the selection. Select none.
Open up the bunny beads on string element copy and paste it as a new layer re-size it so it fits nicely and rotate it 90 degrees to the left and arrange it so that side on the frame.
Open up the basket element from the kit copy and paste it as a new layer re-size it so it fits nicely then arrange it near the bottom left of the tag. Now open up the lace element from the kit copy and paste it as a new layer re-size it so it fits nicely and move it below the basket layer. Keep re-sizing it so it looks like the lace is in the basket like a decoration. Open up egg 1, 2 and 3 copy and paste them as new layers re-size them so they fit in the basket move each of them below the basket layer arrange them so they show a bit outside the top part of the basket. Do the same with carrot 1 and two you can rotate them to your liking and place them where you'd like. I also used the bunny shape element.
Open up flower 4 from the kit copy and paste it as a new layer now we're going to re-size it so it fits on the basket like a decoration. Then open up bow 4 do the same but place it near the middle of the flower. Merge together then duplicate arrange this layer on the opposite side.
Copy and paste your tube as a new layer arrange and re-size to your liking. Duplicate it then change the blend mode to soft light then go to adjust-blur-gaussian blur set to 3. Add a drop shadow of H 0 V 0 Opacity 50 Blur 5.00 Color Black to the BOTTOM tube layer.
Now in a font and color of choice add your name I added some noise by going to adjust-add/remove noise-add noise then play with your settings to get something you like. I applied a gradient glow the settings that I used are shown in the screen-shot below. Now apply the same drop shadow you used earlier.

Finally add your copyright and license number if applicable save as png or jpeg whichever you prefer and we're done!
I hope you enjoyed this tutorial and found it easy to follow.
I would LOVE to see your results to any tutorials that you do, you can email results to me or post them on my page on face-book if you have a face-book account.
Monday, March 11, 2013
Gonna Catch me a Leprechaun!
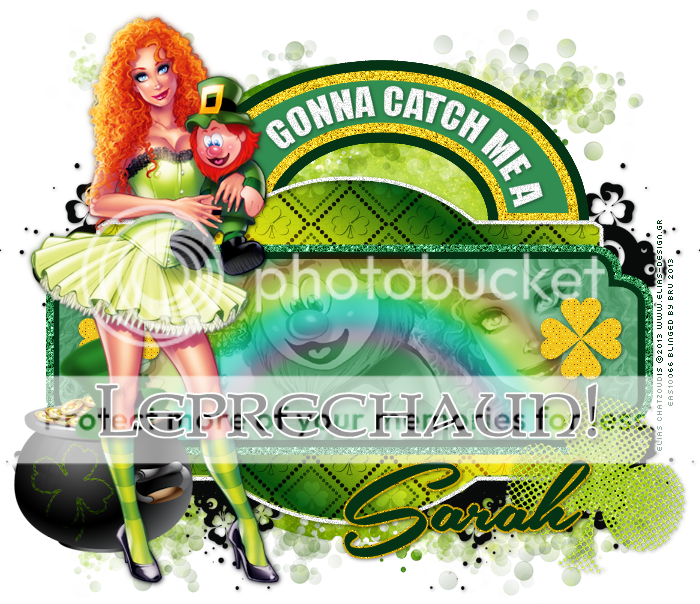
*Click the tag for full view*
This tutorial was written by Brunette on March 11th 2013.
Any similarity to any other tutorial is purely coincidental.
Do not copy and paste my tutorials or claim as your own you may link to them for group challenges.
What you'll need:
You'll need a tube of choice I am using a gorgeous tube by Elias Chatzoudis. Which you can purchase at his store HERE.
A gorgeous PTU kit by Designs by Sarah called Lucky You.
Which you can find purchase at Pimp My Tags With Scraps HERE.
Xero - Fritilary
Template by Kandi Kissez and Dees'sign depot which you can download HERE.
Leave some love when you download!
Fonts of choice - I am using a pixel font for the copyright and Southern Aire for the name.
Ready?
Let's get started!
Firstly Shift+D to duplicate the whole template then close out the original. Close off the copyright layer.
On the gold glitter arch layer add Xero Fritilary settings of your choice I just hit random until I got something that I liked. Then go to adjust-add/remove noise-add noise- random checked, Monochrome checked and percentage at 36%.
On the orange shape layer go to selections-select all-float-defloat add a new layer and flood fill with a color or gradient of choice. Then go to modify expand by 2 and copy and paste paper 2 from the kit then go to selections-invert and hit delete. Close off the original shape layer then move the paper layer below the gradient and change the blend mode of the gradient layer to Hard light.
On the center green shape go to selections-select all-float-defloat now copy and paste your tube as a new layer and do that until it fills up that shape. Then go to selections-invert and hit delete on each layer of tubes you used. Merge them together and colorize them so they're gray. Change the blend mode to soft light lower the opacity to about 82. Duplicate and change that layer to screen lower the opacity to 40. Copy and paste the rainbow element in the shape re-size so it fits nicely then change the blend mode to soft light.
Repeat the same steps for the green glitter frame that you did for the gold glitter arch.
On the Shamrocks layer add Xero Fritilary again a setting of your choice.
On the Gonna Catch Me word-art add some noise like you did earlier then a drop shadow of
H 1
V 1
Opacity 50
Blur 5.00
Color Black
Now from the kit open up the pot of gold copy and paste it as a new layer re-size so it fits nicely and move it to the left of the tag add the same drop shadow as you used above.
Open up the stitched clover copy and paste it as a new layer move it so its on the pot of gold but re-size it so it fits there nicely and arrange it to your liking. Then change the blend mode to soft light.
Open up the hat copy and paste it as a new layer re-size it so it fits nicely mirror it and arrange it so it sits on top of the pot of gold. Add the same drop shadow.
Open up clover leaf 1 element copy and paste it as a new layer mirror it and re-size it so it fits nicely at the bottom right of the tag.
I also added print 1 and 2 under the whole template. Print 2 I arranged so it showed at the top then duplicated it and arranged so it showed at the bottom.
Copy and paste your tube as a new layer then duplicate it change the blend mode to soft light then go to adjust-blur-gaussian blur set to 3. Add the same drop shadow you used throughout the tutorial to the bottom tube layer.
Now in a font and color of choice type out your name then convert to raster. Then go to selections-select all-float-defloat-modify-expand by 2 add a new layer and flood fill with a color of choice. Move that layer below the original text layer and add some noise and a drop shadow. Same settings for both used in the tutorial.
Finally add your copyright and license number if applicable save as png or jpeg whichever you prefer and we're done!
I hope you enjoyed this tutorial and found it easy to follow.
I would LOVE to see your results to any tutorials that you do, you can email results to me or post them on my page on face-book if you have a face-book account.
This tutorial was written by Brunette on March 11th 2013.
Any similarity to any other tutorial is purely coincidental.
Do not copy and paste my tutorials or claim as your own you may link to them for group challenges.
What you'll need:
You'll need a tube of choice I am using a gorgeous tube by Elias Chatzoudis. Which you can purchase at his store HERE.
A gorgeous PTU kit by Designs by Sarah called Lucky You.
Which you can find purchase at Pimp My Tags With Scraps HERE.
Xero - Fritilary
Template by Kandi Kissez and Dees'sign depot which you can download HERE.
Leave some love when you download!
Fonts of choice - I am using a pixel font for the copyright and Southern Aire for the name.
Ready?
Let's get started!
Firstly Shift+D to duplicate the whole template then close out the original. Close off the copyright layer.
On the gold glitter arch layer add Xero Fritilary settings of your choice I just hit random until I got something that I liked. Then go to adjust-add/remove noise-add noise- random checked, Monochrome checked and percentage at 36%.
On the orange shape layer go to selections-select all-float-defloat add a new layer and flood fill with a color or gradient of choice. Then go to modify expand by 2 and copy and paste paper 2 from the kit then go to selections-invert and hit delete. Close off the original shape layer then move the paper layer below the gradient and change the blend mode of the gradient layer to Hard light.
On the center green shape go to selections-select all-float-defloat now copy and paste your tube as a new layer and do that until it fills up that shape. Then go to selections-invert and hit delete on each layer of tubes you used. Merge them together and colorize them so they're gray. Change the blend mode to soft light lower the opacity to about 82. Duplicate and change that layer to screen lower the opacity to 40. Copy and paste the rainbow element in the shape re-size so it fits nicely then change the blend mode to soft light.
Repeat the same steps for the green glitter frame that you did for the gold glitter arch.
On the Shamrocks layer add Xero Fritilary again a setting of your choice.
On the Gonna Catch Me word-art add some noise like you did earlier then a drop shadow of
H 1
V 1
Opacity 50
Blur 5.00
Color Black
Now from the kit open up the pot of gold copy and paste it as a new layer re-size so it fits nicely and move it to the left of the tag add the same drop shadow as you used above.
Open up the stitched clover copy and paste it as a new layer move it so its on the pot of gold but re-size it so it fits there nicely and arrange it to your liking. Then change the blend mode to soft light.
Open up the hat copy and paste it as a new layer re-size it so it fits nicely mirror it and arrange it so it sits on top of the pot of gold. Add the same drop shadow.
Open up clover leaf 1 element copy and paste it as a new layer mirror it and re-size it so it fits nicely at the bottom right of the tag.
I also added print 1 and 2 under the whole template. Print 2 I arranged so it showed at the top then duplicated it and arranged so it showed at the bottom.
Copy and paste your tube as a new layer then duplicate it change the blend mode to soft light then go to adjust-blur-gaussian blur set to 3. Add the same drop shadow you used throughout the tutorial to the bottom tube layer.
Now in a font and color of choice type out your name then convert to raster. Then go to selections-select all-float-defloat-modify-expand by 2 add a new layer and flood fill with a color of choice. Move that layer below the original text layer and add some noise and a drop shadow. Same settings for both used in the tutorial.
Finally add your copyright and license number if applicable save as png or jpeg whichever you prefer and we're done!
I hope you enjoyed this tutorial and found it easy to follow.
I would LOVE to see your results to any tutorials that you do, you can email results to me or post them on my page on face-book if you have a face-book account.
Wednesday, February 20, 2013
Dreaming
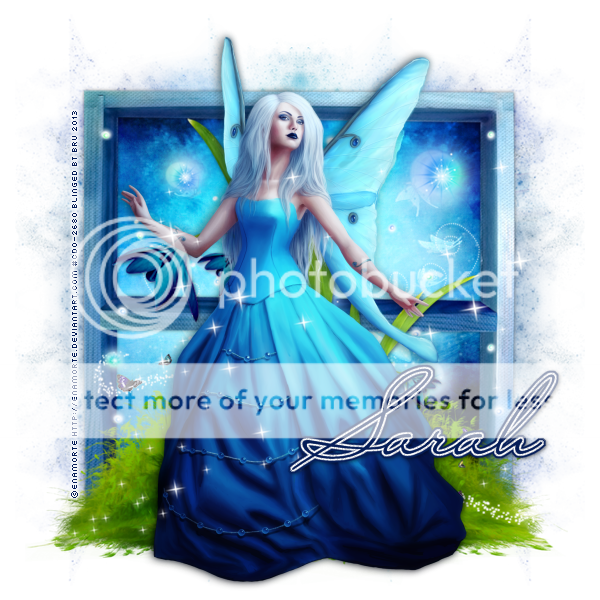
*Click the tag for full view*
This tutorial was written by Brunette on February 20th 2013.
Any similarity to any other tutorial is purely coincidental.
Do not copy and paste my tutorials or claim as your own you may link to them for group challenges.
What you'll need:
You'll need a tube of choice I am using a gorgeous tube by Enamorte. Which you can purchase at Creative Design Outlet HERE.
A gorgeous PTU kit by Designs by Sarah called Dreaming.
This tutorial was written by Brunette on February 20th 2013.
Any similarity to any other tutorial is purely coincidental.
Do not copy and paste my tutorials or claim as your own you may link to them for group challenges.
What you'll need:
You'll need a tube of choice I am using a gorgeous tube by Enamorte. Which you can purchase at Creative Design Outlet HERE.
A gorgeous PTU kit by Designs by Sarah called Dreaming.
Which you can find purchase at Pimp My Tags With Scraps HERE.
Lokas Software 3D Shadow
Mask of choice - mine is from Gems Taggin' Scraps which you can find HERE.
I used mask number 143.
Leave some love when you download!
Fonts of choice - I am using a pixel font for the copyright and Mr Sheffield for the name.
Ready?
Let's get started!
Open a 600x600 transparent canvas.
Open up frame 4 from the kit copy and paste it as a new layer onto your canvas and re-size it to fit nicely. Now take your image if you have one the came with the tube if not skip this step. Copy and paste your image move it below the frame layer then take your eraser tool and erase what hangs over. Open up paper 12 from the kit and do the same thing change the blend mode to hard light. Add a drop shadow to your frame layer I used H 0 V 0 Opacity 50 Blur 5.00 Color black.
Open up the grass element copy and paste it as a new layer re-size it so it fits nicely and move it to the bottom of the frame.
Open up the dreaming light 2 element copy and paste it as a new layer re-size it so it fits nicely and arrange to your liking.
Open up flower 8 copy and paste it as a new layer mirror it then re-size it so it fits nicely and arrange it to your liking.
Copy and paste your tube as a new layer arrange it to your liking then duplicate it and change the blend mode to soft light then go to adjust-blur-gauassian blur 3. Add Lokas Software 3D shadow to the bottom tube layer my settings are shown in the screen-shot below.
Lokas Software 3D Shadow
Mask of choice - mine is from Gems Taggin' Scraps which you can find HERE.
I used mask number 143.
Leave some love when you download!
Fonts of choice - I am using a pixel font for the copyright and Mr Sheffield for the name.
Ready?
Let's get started!
Open a 600x600 transparent canvas.
Open up frame 4 from the kit copy and paste it as a new layer onto your canvas and re-size it to fit nicely. Now take your image if you have one the came with the tube if not skip this step. Copy and paste your image move it below the frame layer then take your eraser tool and erase what hangs over. Open up paper 12 from the kit and do the same thing change the blend mode to hard light. Add a drop shadow to your frame layer I used H 0 V 0 Opacity 50 Blur 5.00 Color black.
Open up the grass element copy and paste it as a new layer re-size it so it fits nicely and move it to the bottom of the frame.
Open up the dreaming light 2 element copy and paste it as a new layer re-size it so it fits nicely and arrange to your liking.
Open up flower 8 copy and paste it as a new layer mirror it then re-size it so it fits nicely and arrange it to your liking.
Copy and paste your tube as a new layer arrange it to your liking then duplicate it and change the blend mode to soft light then go to adjust-blur-gauassian blur 3. Add Lokas Software 3D shadow to the bottom tube layer my settings are shown in the screen-shot below.

Open up sparkles 1 element copy and paste it as a new layer re-size it to so it fits nicely and arrange to your liking. I put mine over the top tube layer.
Open up paper 11 from the kit copy and paste it as a new layer arrange it so its below the frame layer then apply your mask and merge group.
Now in a font and color of choice add your name in a color of choice then go to selections-select all-float-defloat-modify and expand by 2 then add a new layer and flood fill with a color of choice then go to selections-modify and expand by 2 again add a new layer and flood fill with the same color you typed out your name in. Arrange that layer below everything other font layer and add a drop shadow I used H 1 V 1 Opacity 50 Blur 5.00 Color Black.
I hope you enjoyed this tutorial and found it easy to follow.
I would LOVE to see your results to any tutorials that you do, you can email results to me or post them on my page on facebook if you have a facebook account.
Thursday, November 17, 2011
Love You
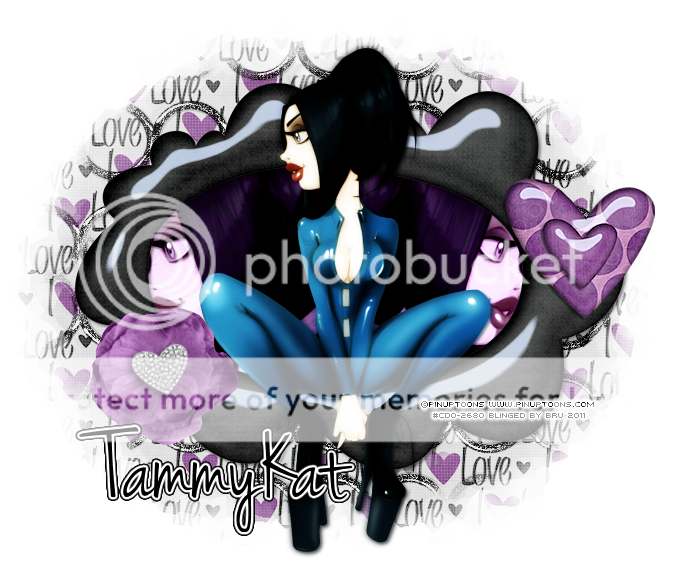
*Click the tag for full view*
This tutorial was written by Brunette on November 17th 2011.
Any similarity to any other tutorial is purely coincidental.
Do not copy and paste my tutorials or claim as your own you may link to them for group challenges.
What you'll need:
You'll need a tube of choice I am using the a tube by PinupToons. You can purchase his art for signature tags at Creative Design Outlet HERE.
Be sure to check out all the other great artists there!
Fonts of choice - I am using a pixel font for the copyright and Jenna Sue for the name.
A kit of choice I am using part of a AWESOME collab kit by the girls at Pimp my Tags with Scraps which is called Girls of Pimp my tags with scraps which you can purchase HERE.
I am using TammyKats portion.
Eye Candy 4000 - Gradient Glow
Mask of choice - mine is from weescottlass creations which you can find HERE.
I used mask number 219 you'll see on the right side they are bundled in bulk downloads :)
Ready?
Let's get started!
Open up a new 700x700 transparent canvas I always crop it later so it will be smaller I just like enough room to work.
This tutorial was written by Brunette on November 17th 2011.
Any similarity to any other tutorial is purely coincidental.
Do not copy and paste my tutorials or claim as your own you may link to them for group challenges.
What you'll need:
You'll need a tube of choice I am using the a tube by PinupToons. You can purchase his art for signature tags at Creative Design Outlet HERE.
Be sure to check out all the other great artists there!
Fonts of choice - I am using a pixel font for the copyright and Jenna Sue for the name.
A kit of choice I am using part of a AWESOME collab kit by the girls at Pimp my Tags with Scraps which is called Girls of Pimp my tags with scraps which you can purchase HERE.
I am using TammyKats portion.
Eye Candy 4000 - Gradient Glow
Mask of choice - mine is from weescottlass creations which you can find HERE.
I used mask number 219 you'll see on the right side they are bundled in bulk downloads :)
Ready?
Let's get started!
Open up a new 700x700 transparent canvas I always crop it later so it will be smaller I just like enough room to work.
Open up doodleframe 3 from the kit copy and paste it as a new layer onto your canvas. Now take your magic wand and select INSIDE the frame then go to selections-modify-expand by 3 then open up a paper of choice I used the purple scratchy paper then paste it as a new layer, go to selections invert and hit delete. DO NOT deselect yet. Open up your tube mine came with a close up but you don't really need one, copy and paste it in the frame arrange it how you want and hit delete again. Duplicate and mirror this layer, merge them together and duplicate change the blend mode of the top layer to soft light and the bottom layer to Luminance L.
I used the heart 4 element and the purple flower elements from the kit the heart I re-sized a little to fit nicely. Arranage them on the frame one on each side.
Now pick another paper of choice I used paper 2 from the kit copy and paste it as a new layer onto your canvas and move it to the very bottom, then add your mask which I provided the link for above. Now I took the black glitter trim from the kit copy and pasted it on the canvas above the paper we just added a mask to, duplicate it several times enough to cover the the masked paper. Merge them together and then add the same mask, merge group then I added a little noise and change the blend mode to hardlight.
Now you can copy and paste your main tube as a new layer at the top of the palette, duplicate it and go to adjust-blur-gaussian blur set to 3 and change then blend mode to overlay add a drop shadow to the bottom copy of the tube. You can also add a drop shadow to the frame layer.
Now in your font of choice we're going to add your name along with a gradient glow and a drop shadow, you can use the same drop shadow you used earlier mine which was H&V 2 Opacity 45 and Blur 4.
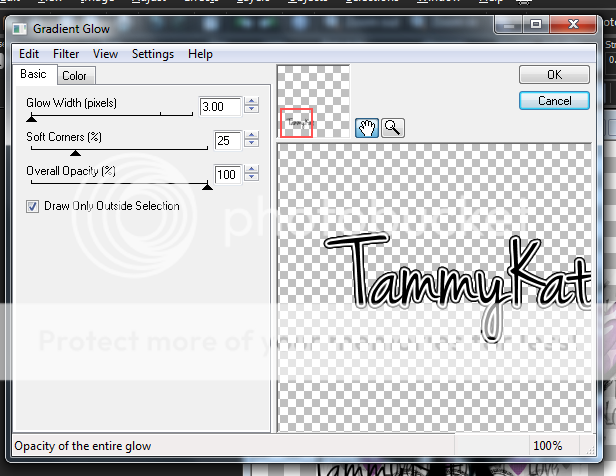
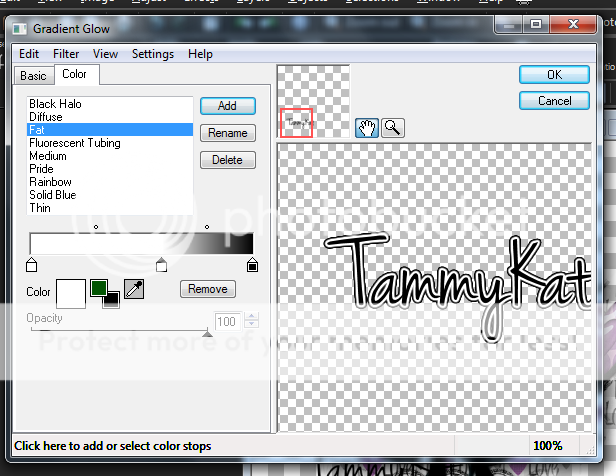
Finally add your copyright and license number if applicable save as png or jpeg whichever you prefer and we're done!
I hope you enjoyed this tutorial and found it easy to follow.
I would LOVE to see your results to any tutorials that you do, you can email results to me or post them on my page on facebook if you have a facebook account.
Thursday, November 10, 2011
Sunset Fay
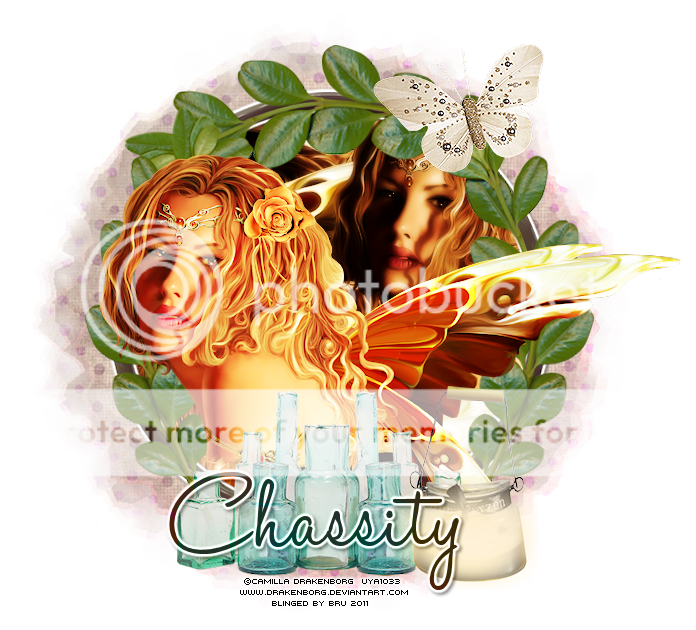
*Click the tag for full view*
This tutorial was written by Brunette on November 10th 2011.
Any similarity to any other tutorial is purely coincidental.
Do not copy and paste my tutorials or claim as your own you may link to them for group challenges.
What you'll need:
You'll need a tube of choice I am using the gorgeous art of Camilla Drakenborg. You can purchase her art for signature tags at Up Your Art HERE.
Be sure to check out all the other great artists there!
Fonts of choice - I am using a pixel font for the copyright and Halo Hand Letter for the name.
A kit of choice I am using part of a AWESOME collab kit by the girls at Pimp My Tags With Scraps which is called Girls of Pimp my tags with scraps which you can purchase HERE.
I am using Polka-dot Scraps portion.
Eye Candy 4000 - Gradient Glow
Xero - Radiance
Mura Meister's - Copies
Mask of choice - mine is from weescottlass creations which you can find HERE.
I used mask number 219 you'll see on the right side they are bundled in bulk downloads :)
Ready?
Let's get started!
Open up a new 700x700 transparent canvas I always crop it later so it will be smaller I just like enough room to work.
From the kit open up frame 2 copy and paste it as a new layer onto your canvas, re-size it a little if you need to. Now we're going to take the magic wand and click INSIDE the frame then to go selections-modify-expand by 3 then open up a paper I uses paper 11 from the kit copy and past it as a new layer. Now go to selections-invert and hit delete move this layer below the frame. DO NOT deselect yet. Open up your tube copy and paste it as a new layer then go to Mura Meister's - Copy and I used the wallpaper settings just leave the numbers as is. Now you should have a bunch of parts of your tube in the circle, you can deselect it now. Duplicate it and change the blend mode of the top layer to overlay, then I added Xero Radiance you can just click random a few times to get a setting you like, it sort of depends on the colors in your tube.
This tutorial was written by Brunette on November 10th 2011.
Any similarity to any other tutorial is purely coincidental.
Do not copy and paste my tutorials or claim as your own you may link to them for group challenges.
What you'll need:
You'll need a tube of choice I am using the gorgeous art of Camilla Drakenborg. You can purchase her art for signature tags at Up Your Art HERE.
Be sure to check out all the other great artists there!
Fonts of choice - I am using a pixel font for the copyright and Halo Hand Letter for the name.
A kit of choice I am using part of a AWESOME collab kit by the girls at Pimp My Tags With Scraps which is called Girls of Pimp my tags with scraps which you can purchase HERE.
I am using Polka-dot Scraps portion.
Eye Candy 4000 - Gradient Glow
Xero - Radiance
Mura Meister's - Copies
Mask of choice - mine is from weescottlass creations which you can find HERE.
I used mask number 219 you'll see on the right side they are bundled in bulk downloads :)
Ready?
Let's get started!
Open up a new 700x700 transparent canvas I always crop it later so it will be smaller I just like enough room to work.
From the kit open up frame 2 copy and paste it as a new layer onto your canvas, re-size it a little if you need to. Now we're going to take the magic wand and click INSIDE the frame then to go selections-modify-expand by 3 then open up a paper I uses paper 11 from the kit copy and past it as a new layer. Now go to selections-invert and hit delete move this layer below the frame. DO NOT deselect yet. Open up your tube copy and paste it as a new layer then go to Mura Meister's - Copy and I used the wallpaper settings just leave the numbers as is. Now you should have a bunch of parts of your tube in the circle, you can deselect it now. Duplicate it and change the blend mode of the top layer to overlay, then I added Xero Radiance you can just click random a few times to get a setting you like, it sort of depends on the colors in your tube.
Open up leave 4 from the kit copy and paste it as a new layer onto your canvas now I made it so it went around the circle frame. So I had to re-size it a little then duplicated it and mirrored it, I duplicated it again and rotated it to the left 90 degrees. You can move this layer below the other leave layers so it looks all together or even use your eraser tool to remove some of it.
Copy and paste your tube as a new layer, mine was not a full tube only half which is fine cause we're going to decorate the bottom of the frame anyway. Duplicate your tube layer and change the blend mode of the top layer to screen. On the bottom layer of your tube add a drop shadow I used H 2, V 2, Opacity 45 and Blur 4.
I used the bottles from the kit re-sizing them a little so they fit nicely and placed them on the bottom part of the frame and over my tube. Duplicate and mirror. I also used lamp 1 from the kit re-size that a little and move it to the right bottom by the bottles. I used the butterfly at the top right.
Copy and paste a paper of choice I used paper 11 from the kit move this layer to the bottom of all your layers. You can re-size it a little then add the mask, open up another paper I used paper 8 repeat the same steps. Now change the blend mode of this paper layer to Luminace L.
Now in your font of choice we're going to add your name along with a gradient glow and a drop shadow. The drop shadow is the same as mentioned earlier. My gradient glow settings are shown in the screen-shots below. Then change the blend mode to Luminance L.


Finally add your copyright and license number if applicable save as png or jpeg whichever you prefer and we're done!
I hope you enjoyed this tutorial and found it easy to follow.
I would LOVE to see your results to any tutorials that you do, you can email results to me or post them on my page on facebook if you have a facebook account.
Monday, November 7, 2011
Film Noir

*Click the tag for full view*
This tutorial was written by Brunette on November 7th 2011.
Any similarity to any other tutorial is purely coincidental.
Do not copy and paste my tutorials or claim as your own you may link to them for group challenges.
What you'll need:
You'll need a tube of choice I am using the gorgeous art of Robert Alvarado. You can purchase his art for signature tags at PSP Tubes Emporium.
Be sure to check out all the other great artists there!
Fonts of choice - I am using a pixel font for the copyright and Angry Blue for the name.
A kit of choice I am using part of a AWESOME collab kit by the girls at Pimp my tags with Scraps which is called Girls of Pimp my tags with scraps which you can purchase HERE.
I am using Designs by Pimp'd Designz's portion.
Eye Candy 4000 - Gradient Glow
Xero - Radiance
Ready?
Let's get started!
Open up a new 700x700 transparent canvas I always crop it later so it will be smaller I just like enough room to work.
This tutorial was written by Brunette on November 7th 2011.
Any similarity to any other tutorial is purely coincidental.
Do not copy and paste my tutorials or claim as your own you may link to them for group challenges.
What you'll need:
You'll need a tube of choice I am using the gorgeous art of Robert Alvarado. You can purchase his art for signature tags at PSP Tubes Emporium.
Be sure to check out all the other great artists there!
Fonts of choice - I am using a pixel font for the copyright and Angry Blue for the name.
A kit of choice I am using part of a AWESOME collab kit by the girls at Pimp my tags with Scraps which is called Girls of Pimp my tags with scraps which you can purchase HERE.
I am using Designs by Pimp'd Designz's portion.
Eye Candy 4000 - Gradient Glow
Xero - Radiance
Ready?
Let's get started!
Open up a new 700x700 transparent canvas I always crop it later so it will be smaller I just like enough room to work.
Open up frame 4 from the kit copy and paste it as a new layer onto your canvas re-size it a little if you need to. Now take a paper of choice I used paper 6 from the kit then take your eraser tool and carefully erase the stuff outside of the frame. Move it below the frame later. I used the close up of my tube copied and pasted it as a new layer under the frame layer and erased the same as I did for the paper. Duplicate it and arrange it on the other side. Merge these two layers together then duplicate them then go to adjust-blur-gaussian blur set to 3 then add Xero Radiance keep hitting random until you get an effect you like. Now we're going to take another paper I used paper 10 from the kit and use your eraser tool same as earlier. Make sure ALL your layers are below the frame layer.
Take the film piece element from the kit copy and paste it as a new layer re-size it a little and rotate it 20 degrees to the left arrange it near the bottom of the frame. Duplicate and mirror it arrange this layer near the top of the frame. These layers should be BELOW the frame layer as well.
Copy and paste your tube as a new layer ON TOP erase the part that overhangs the frame. Duplicate your tube layer and change the blend mode to overlay. Add a drop shadow to your bottom tube layer V 2, H 2 , Opacity 45, Blur 4.
Open up the cherry charm from the kit re-size it so it fits nicely and move it to the top right corner of the frame. Add the same drop shadow as earlier.
Open up the paper element from the kit copy and paste it as a new layer move it below all the other layers. Rotate it 90 degrees to the left re-size it if you need to and make it so its poking out the side of the frame. Duplicate, mirror and re-size it a little moving it on the OTHER side. I used did the same thing with the red glitter rotated it 90 degrees to the left and arranged it so it looked like it was hooked on the frame holding the paper so it must be on top the frame layer. Duplicate, mirror and re-size it a little arrange it on the other side where the paper is sticking out.
I used paper 12 from the kit and added a mask. You can use whatever mask you like or none at all its up to you.
Now in your font of choice we're going to add your name along with a gradient glow and a drop shadow. The drop shadow is the same as mentioned earlier just do it again but change the V&H to -2. My gradient glow settings are shown in the screen-shots below.


Finally add your copyright and license number if applicable save as png or jpeg whichever you prefer and we're done!
I hope you enjoyed this tutorial and found it easy to follow.
I would LOVE to see your results to any tutorials that you do, you can email results to me or post them on my page on facebook if you have a facebook account.
Monday, September 12, 2011
New PTU Tutorial : Girl's Night

*Click the tag for full view*
This tutorial was written by Brunette on September 12th 2011.
Any similarity to any other tutorial is purely coincidental.
Do not copy and paste my tutorials or claim as your own you may link to them for group challenges.
What you'll need:
You'll need a tube of choice I am using the awesome art of Nicholas Garton Gartart Pinups . You can purchase his art for signature tags at Up Your Art HERE.
This tutorial was written by Brunette on September 12th 2011.
Any similarity to any other tutorial is purely coincidental.
Do not copy and paste my tutorials or claim as your own you may link to them for group challenges.
What you'll need:
You'll need a tube of choice I am using the awesome art of Nicholas Garton Gartart Pinups . You can purchase his art for signature tags at Up Your Art HERE.
Be sure to check out all the other great artists there!
Fonts of choice - I am using a pixel font for the copyright and Aeolus for the name.
Tag Template 418 by Missy of Divine Intentionz which you can get HERE.
Fonts of choice - I am using a pixel font for the copyright and Aeolus for the name.
Tag Template 418 by Missy of Divine Intentionz which you can get HERE.
A kit of choice I am using a gorgeous kit by Brandi of Grunge & Glitter called Girl's Night Out which you can find HERE
Eye Candy - Gradient Glow
Xero - Fritillary
VM Extravaganza - Ray Transmission
Penta.com - Jeans
Ready?
Let's get started!
Open up the template by Missy shift+d to duplicate the whole then then close off the original. I also re-sized the canvas to 750x750. To do that you go to image-canvas size and then type in your numbers and hit ok.
Delete the credit layer.
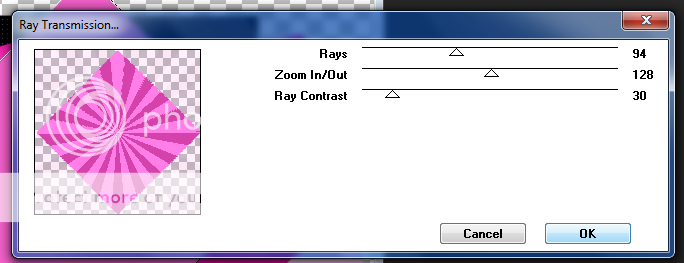
On the diamond layer selections-select all-float-defloat add a new layer and flood fill with a color of choice. DO NOT deselect yet now we're going to add the Ray Transmission settings used are shown in the screen-shot below. Then we're going to add Xero-fritillary settings used shown in the screen-shot below repeat the settings a few times. Delete the original diamond layer.

Now I took my square preset shape and drew out a square about the size of the diamond making sure that I am only using the foreground not the background on the material palette. You're going to have to rotate it and play with it a little to get it to fit right, then add some noise. Adjust-add/remove-add noise-uniform and monochrome checked and 35% the percentage.
On the left circle layer selections-select all-float-defloat copy and paste your tube as a new layer I mirrored mine so it was the other way. Arrange to your liking then go to selections-invert and hit delete. Duplicate your tube layer then go to adjust-blur-gaussian blur set to 3 and change the blend mode to screen the original tube layer set the blend mode to luminance. Repeat these steps for the right circle layer. Now once you're all done that take your preset shape tool set it to circle again only using the foreground not the background draw out a circle the same size as the one there. Repeat the noise settings above then duplicate it and mirror it so its on the other side.
Open up the city scape from the kit copy and paste it as a new layer onto your canvas making sure its behind the circle layers. Arrange it to your liking, I moved mine up a bit.
On the squares layers I merged them together then added penta.com jeans filter settings I used shown in the screen-shot below.
I closed off the other two square layers.

Open up halftone2 from the kit copy and paste it as a new layer re-size so it fits nicely making sure its below everything else. Duplicate it mirror and flip it.
Take cocktail drink 1 and martini glass 1 elements from the kit copy and paste them as a new layer onto your canvas re-size and arrange them to your liking.
Take the party flags from the kit re-size them so they fit nicely and move them up to where the city scape is make it look like they're hanging from the bulidings.
Open up your tube copy and paste it as a new layer duplicate it then go to adjust-blur-gaussian blur set to 3 and change the blend mode to screen.
Open up the Girls Night word-art from the kit copy and paste it as a new layer over your tube re-size it so it fits that area nicely I made sure mine stayed within the diamond. Then change the blend mode to screen then duplicate it.
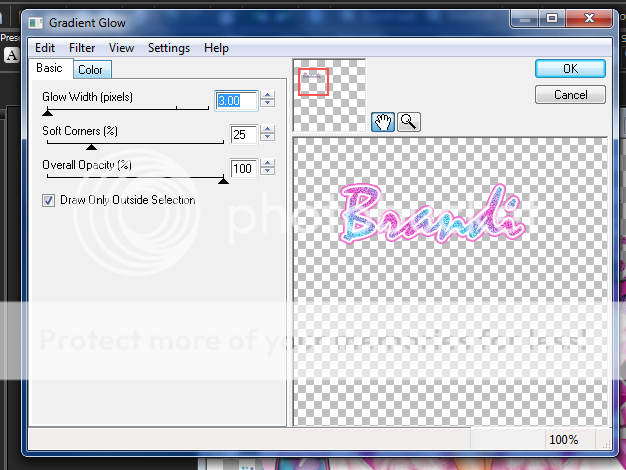
Add your name in a font of choice I used a foreground background gradient two colors from my tag. Then added a gradient glow and a drop shadow, my settings are shown in the screen-shot below.


Finally add your copyright and license number if applicable save as png or jpeg whichever you prefer and we're done!
I hope you enjoyed this tutorial and found it easy to follow.
Subscribe to:
Posts (Atom)


