


Friday, February 11, 2011
Love Letters
You'll need a tube of choice preferably one with a closeup.
I am using the gorgeous art of Keith Garvey I purchased my tube when he was selling at MPT. He has now changed places and you can purchase his art at PTE.
Font of choice
Eye Candy 4000 - Gradient Glow
VanDerLee - Unplugged X
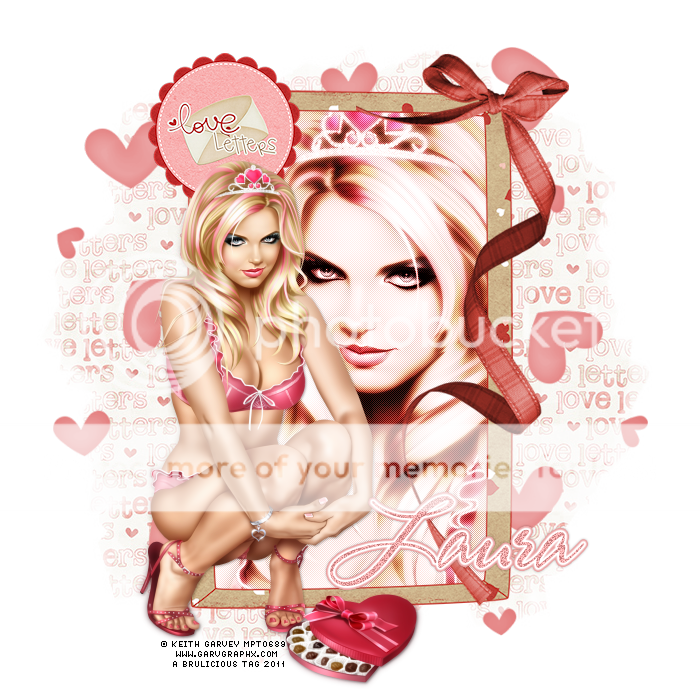
A kit of choice I am using a gorgeous kit by Laura of Cinnamon Scraps called Love Letters which you can find out how to purchase from her blog here.
Ready?
Let's get started!
Open up a new canvas 700X700 we can always crop/re-size later.
Open up frame 6 from the kit and paste it as a new layer onto your canvas.
With your magic wand select inside the frame then go to selections-modify-expand by 2 or 3 open up a paper from the kit I used paper 3 then selections-invert and hit delete. Move this layer below the frame layer. DO NOT deselect yet! Copy and paste your close up I mirrored mine before pasting it but thats up to you. Get it to where you want it and hit delete make sure this layer is below the frame layer as well but above the paper layer. Now duplicate the tube then go to adjust-Blur-Gaussian blur set at 3 then change the blend mode to overly and the original tube layer's blend mode to Luminance L. Then I used VanDerLee - Unplugged X - Pattern Offset, I just played around with the settings until I got something I liked.
Next I opened up Ribbon 1 from the kit re-sized it to fit the tag nicely and placed it on the top right corner of the frame. On the other side of the frame I copied and pasted the Love Letters little tag.
I am using the gorgeous art of Keith Garvey I purchased my tube when he was selling at MPT. He has now changed places and you can purchase his art at PTE.
Font of choice
Eye Candy 4000 - Gradient Glow
VanDerLee - Unplugged X
A kit of choice I am using a gorgeous kit by Laura of Cinnamon Scraps called Love Letters which you can find out how to purchase from her blog here.
Ready?
Let's get started!
Open up a new canvas 700X700 we can always crop/re-size later.
Open up frame 6 from the kit and paste it as a new layer onto your canvas.
With your magic wand select inside the frame then go to selections-modify-expand by 2 or 3 open up a paper from the kit I used paper 3 then selections-invert and hit delete. Move this layer below the frame layer. DO NOT deselect yet! Copy and paste your close up I mirrored mine before pasting it but thats up to you. Get it to where you want it and hit delete make sure this layer is below the frame layer as well but above the paper layer. Now duplicate the tube then go to adjust-Blur-Gaussian blur set at 3 then change the blend mode to overly and the original tube layer's blend mode to Luminance L. Then I used VanDerLee - Unplugged X - Pattern Offset, I just played around with the settings until I got something I liked.
Next I opened up Ribbon 1 from the kit re-sized it to fit the tag nicely and placed it on the top right corner of the frame. On the other side of the frame I copied and pasted the Love Letters little tag.
Now we're going to do the background behind the frame. Open up a paper of choice, I used paper 21 then added a mask and lowered the opacity a little. I opened up the hearts element from the kit pasted it as a new layer at the very bottom layer of the tag re-sized it so it fit nicely.
In a font of choice add your name, add some noise and a gradient glow (shown in my screen shot below) and of course a drop shadow.


Finally add your copyright and license number if applicable save as png or jpeg whichever you prefer and we're done!
I hope you enjoyed this tutorial and found it easy to follow.
I hope you enjoyed this tutorial and found it easy to follow.
Subscribe to:
Post Comments (Atom)


0 comments:
Post a Comment