


Saturday, October 13, 2012
Autumn's Kiss

*Click the tag for full view*
This tutorial was written by Brunette on October 13th 2012.
Any similarity to any other tutorial is purely coincidental.
Do not copy and paste my tutorials or claim as your own you may link to them for group challenges.
What you'll need:
You'll need a tube of choice I am using a gorgeous tube by Enamorte. You can purchase at Creative Design Outlet HERE.
Check out the rest of the beautiful artwork they have while you're there.
A gorgeous PTU kit by Tasha's Playground called Autumn's Kiss which you can find out where to purchase this kit HERE.
Be sure to check out ALL her other awesome kits!
Fonts of choice - I am using a pixel font for the copyright and Desyrel for the name.
Mask of choice - mine is from Gems Taggin' Scraps which you can find HERE.
I used mask number 160.
Leave some love when you download!
Eye Candy 4000 - Gradient Glow (Optional)
Loka's Software - 3D Shadow (Optional)
Ready?
Let's get started!
Open up a 700x700 canvas we can always re-size/crop later.
I like my tags BIG LOL.
Open up the window element from the kit copy and paste it as a new layer re-size it if you need to so it fits nicely. Take your magic wand and click inside the square then go to selections-modify-expand by 3 and add a new layer open up a paper of choice I used paper 9 copy and paste it INTO the selection then move it down below the sqaure. Now you can copy and paste your tube in the square as a new layer then go to selections-invert and hit delete. Change the blend mode of the tube layer to soft light, duplicate it then duplicate it again and change the blend mode of that layer to screen. I used the clock element over the tube and changed the blend mode to soft light and duplicate it.
Add the tree element on each side of the window re-sizing them so they fit there nicely.
Next open up mushroom 1 element re-size it so it fits nicely near the bottom left of the tag. Do the same with the basket element mirror it though. Then add the squirrel on top of it re-sizing it so it fit nicely.
Using the red flowers element copy and paste them as a new layer re-size them so they fit nicely and arrange one on one side of the tag and then duplicate and mirror it arrange it on the other side.
Open up the wheelbarrow element copy and paste it as a new layer mirror it then re-size it so it fits nicely arrange it to the right of your tag then add the rabbit on top of it again re-sizing so it fits there nicely.
Now go through and add a drop shadow to everything BUT the frame and the trees. I used H 1 V2 Opacity 60 Blur 4.00 Color Black.
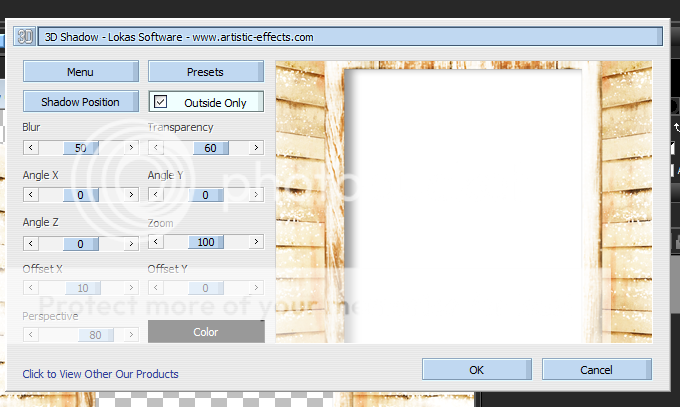
On the window layer we're going to use Loka's Software - 3D Shadow the settings that I used are shown in the screen-shot below.
This tutorial was written by Brunette on October 13th 2012.
Any similarity to any other tutorial is purely coincidental.
Do not copy and paste my tutorials or claim as your own you may link to them for group challenges.
What you'll need:
You'll need a tube of choice I am using a gorgeous tube by Enamorte. You can purchase at Creative Design Outlet HERE.
Check out the rest of the beautiful artwork they have while you're there.
A gorgeous PTU kit by Tasha's Playground called Autumn's Kiss which you can find out where to purchase this kit HERE.
Be sure to check out ALL her other awesome kits!
Fonts of choice - I am using a pixel font for the copyright and Desyrel for the name.
Mask of choice - mine is from Gems Taggin' Scraps which you can find HERE.
I used mask number 160.
Leave some love when you download!
Eye Candy 4000 - Gradient Glow (Optional)
Loka's Software - 3D Shadow (Optional)
Ready?
Let's get started!
Open up a 700x700 canvas we can always re-size/crop later.
I like my tags BIG LOL.
Open up the window element from the kit copy and paste it as a new layer re-size it if you need to so it fits nicely. Take your magic wand and click inside the square then go to selections-modify-expand by 3 and add a new layer open up a paper of choice I used paper 9 copy and paste it INTO the selection then move it down below the sqaure. Now you can copy and paste your tube in the square as a new layer then go to selections-invert and hit delete. Change the blend mode of the tube layer to soft light, duplicate it then duplicate it again and change the blend mode of that layer to screen. I used the clock element over the tube and changed the blend mode to soft light and duplicate it.
Add the tree element on each side of the window re-sizing them so they fit there nicely.
Next open up mushroom 1 element re-size it so it fits nicely near the bottom left of the tag. Do the same with the basket element mirror it though. Then add the squirrel on top of it re-sizing it so it fit nicely.
Using the red flowers element copy and paste them as a new layer re-size them so they fit nicely and arrange one on one side of the tag and then duplicate and mirror it arrange it on the other side.
Open up the wheelbarrow element copy and paste it as a new layer mirror it then re-size it so it fits nicely arrange it to the right of your tag then add the rabbit on top of it again re-sizing so it fits there nicely.
Now go through and add a drop shadow to everything BUT the frame and the trees. I used H 1 V2 Opacity 60 Blur 4.00 Color Black.
On the window layer we're going to use Loka's Software - 3D Shadow the settings that I used are shown in the screen-shot below.
Copy and paste your tube as a new layer arrange it to your liking and add the same drop shadow you used for the window layer.
Open up paper 7 from the kit copy and paste it as a new layer and apply your mask then merge group. Arrange it to your liking then duplicate and mirror it.
In your font and color of choice add your name then go to adjust-add/remove noise-add noise-random and monochrome checked and the precentage at 36. Then add a gradient glow my settings shown below. Add the same drop shadow as earlier H 1 V2 Opacity 60 Blur 4.00 Color Black then change the blend mode to hard light.

Finally add your copyright and license number if applicable save as png or jpeg whichever you prefer and we're done!
I hope you enjoyed this tutorial and found it easy to follow.
I would LOVE to see your results to any tutorials that you do, you can email results to me or post them on my page on face-book if you have a face-book account.
Friday, October 12, 2012
Autumn
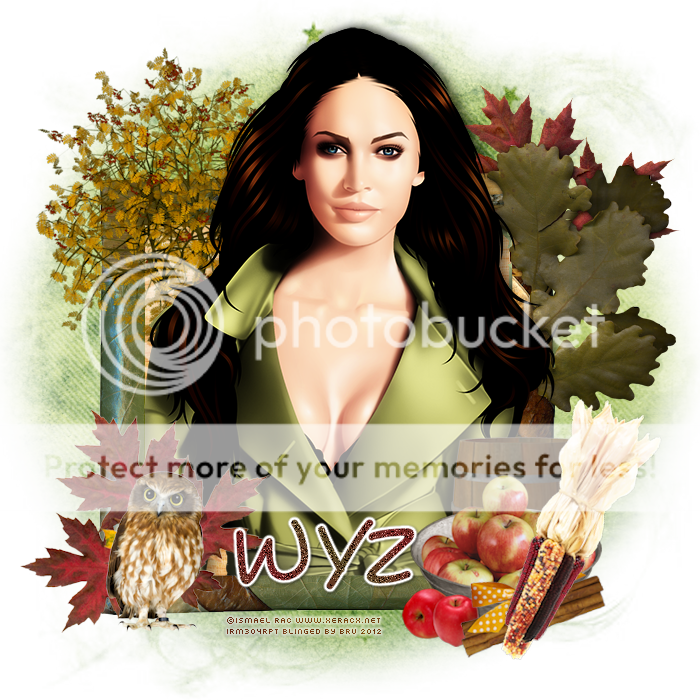
*Click the tag for full view*
This tutorial was written by Brunette on October 12th 2012.
Any similarity to any other tutorial is purely coincidental.
Do not copy and paste my tutorials or claim as your own you may link to them for group challenges.
What you'll need:
You'll need a tube of choice I am using a gorgeous tube by Ismael Rac. You can purchase at his store HERE.
Check out the rest of his beautiful artwork while you're there.
A gorgeous PTU kit by Designs by LK called Autumn Splendor which you can purchase HERE.
Be sure to check out ALL her other awesome kits!
Fonts of choice - I am using a pixel font for the copyright and Desyrel for the name.
Mask of choice - mine is from Gems Taggin' Scraps which you can find HERE.
I used mask number 8.
Leave some love when you download!
Eye Candy 4000 - Gradient Glow
Ready?
Let's get started!
Open up a 700x700 canvas we can always re-size/crop later.
I like my tags BIG LOL.
Open up frame 1 from the kit copy and paste it as a new layer re-size it so it fits nicely. Take your magic wand and click inside the frame then go to selections-modify-expand by 2 then open up a paper of choice from the kit I used paper 12 copy and paste it as a new layer then go to selections-invert and hit delete. Move this layer below the frame.
Open up your tube copy and paste it as a new layer I used the half version for mine so what I did was arranged it to my liking then duplicated it and moved that layer below the frame then used my eraser tool to erase what showed over the frame on the top layer. This way she looks like shes coming out of the frame. Duplicate the original tube layer change the blend mode to soft light then go to adjust-blur-gaussian blur set to 5.00 do the same for the tube layer under the frame then add a drop shadow to the very bottom tube layer of H 1 V 2 Opacity 60 Blur 4.00 Color Black.
Open up tree 1 element from the kit copy and paste it as a new layer behind your tube but above the frame re-size it so it fits nicely. Add the same drop shadow as you did earlier.
Open up the leaves 2 element from the kit copy and paste it as a new layer arrange it near the bottom left of your frame re-size it again so it fits nicely and apply your drop shadow. I added the owl from the kit here as well with the same drop shadow.
Open up the barrel, apples tin, and cinnamon sticks elements re-size them so they fit nicely and arrange to your liking I rotated the cinamon sticks so they were laying flat. All these elements should be near the bottom right of your frame. Add the same drop shadow as you did earlier.
Open up paper 18 from the kit copy and paste it as a new layer arrange it so its the bottom layer and apply your mask. Merge group and arrange to your liking.
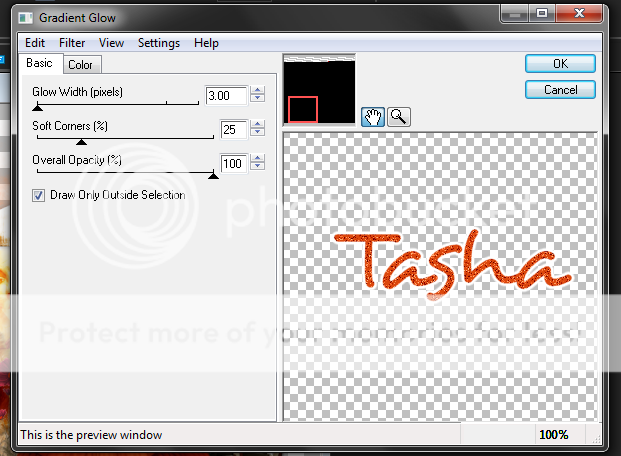
Now in your font and color of choice I used a foreground/background gradient for my color then applied a gradient glow my settings shown in the screen-shot below then add the same drop shadow as you've been using all along.


Finally add your copyright and license number if applicable save as png or jpeg whichever you prefer and we're done!
I hope you enjoyed this tutorial and found it easy to follow.
I would LOVE to see your results to any tutorials that you do, you can email results to me or post them on my page on face-book if you have a face-book account.
Magic Fairy

*Click the tag for full view*
This tutorial was written by Brunette on October 12th 2012.
Any similarity to any other tutorial is purely coincidental.
Do not copy and paste my tutorials or claim as your own you may link to them for group challenges.
What you'll need:
You'll need a tube of choice I am using a gorgeous tube by Terry Heuser. You can purchase at The PSP Project HERE.
Check out the rest of his beautiful artwork while you're there.
A gorgeous PTU kit by Wicked Princess Scraps called Magick In The Woods which you can purchase HERE.
Be sure to check out ALL her other awesome kits!
Fonts of choice - I am using a pixel font for the copyright and Allura for the name.
Mask of choice - mine is from Gems Taggin' Scraps which you can find HERE.
I used mask number 8.
Leave some love when you download!
Eye Candy 4000 - Gradient Glow
Ready?
Let's get started!
Open up a 700x700 canvas we can always re-size/crop later.
I like my tags BIG LOL.
Open up the door element from the kit copy and paste it as a new layer re-size it so it fits nicely.
Next take sign 2 from the kit copy and paste it as a new layer again re-sizing it so it fits nicely arrange it to the left of your door. Repeat these steps but using Tree 2 from the kit and arranging it to the right of your door.
Open up your tube copy and paste it as a new layer arrange it to your liking and add a drop shadow I used H 1 V 1 Opacity 60 Blur 4.00 Color Black.
Open up mushroom house 3 element from the kit copy and paste it as a new layer mirror it and arrange it near the left bottom of your tag of course re-sizing it so it fit there nicely. Add the same drop shadow as you did earlier.
Open up rock 2 element from the kit copy and paste it as a new layer mirror it and arrange ot ner the right bottom of your tag again re-sizing so it fit nicely along with the same drop shadow as earlier.
I added the fox from the kit on the rocks and squirrel 1 to the other side re-sizing them again so they fit nicely and you can add the same drop shadow if you'd like.
Open up the rainbow element copy and paste it as a new layer move it below the tube and the sign but make sure its above the tree, re-size it so it fits nicely. You can erase the little bit that you don't want showing but thats up to you.
Open up paper 8 from the kit and apply your mask then merge group. Arrange the mask to your liking.
Now in your font and color of choice add your name then apply a gradient glow my settings shown in the scree-shot below and the same drop shadow you've used all along.


Finally add your copyright and license number if applicable save as png or jpeg whichever you prefer and we're done!
I hope you enjoyed this tutorial and found it easy to follow.
I would LOVE to see your results to any tutorials that you do, you can email results to me or post them on my page on facebook if you have a facebook account.
Fight Like A Girl

*Click the tag for full view*
This tutorial was written by Brunette on October 12th 2012.
Any similarity to any other tutorial is purely coincidental.
Do not copy and paste my tutorials or claim as your own you may link to them for group challenges.
What you'll need:
You'll need a tube of choice I am using a gorgeous tube by Steve Baier. You can purchase his art for signature tags at Up Your Art HERE.
Check out the rest of his beautiful artwork while you're there.
A gorgeous FTU kit by Tasha's Playground called Check your ChiChis which you can download HERE.
Be sure to check out ALL her other awesome kits!
This kit is part of a collab, they are all gorgeous kits.
Be sure to leave some love when you download!
Fonts of choice - I am using a pixel font for the copyright, KG One Thing for the name and Brushtip for the word-art.
Mask of choice - mine is from Gems Taggin' Scraps which you can find HERE.
I used mask number 153.
Leave some love when you download!
Eye Candy 4000 - Gradient Glow
Ready?
Let's get started!
Open up a 700x700 canvas we can always re-size/crop later.
I like my tags BIG LOL.
Open up frame 4 from the kit, copy and paste it as a new layer.
Take your magic wand and click inside the frame then open up paper 5 from the kit copy and paste it as a new layer then go to selections-invert and hit delete DO NOT deselect yet open up paper 3 from the kit and do the same steps you just did then you can deselect. Change the blend mode of the second paper to Luminance L.
Open up your tube copy and paste it as a new layer, if your tube is like mine and not a full length tube what I did was arranged the tube to my liking then duplicated it moved that one below the frame. Then took my eraser tool and erased what showed over the frame so that it looks like shes IN the frame coming out. Then duplicate that layer change the blend mode to soft light and go to adjust-blur-gaussian blur set to 3 and lower the opacity to about 60. Repeat this step for the duplicated layer below the frame. Then add a drop shadow to the very bottom tube layer I used H 1 , V 1 , Opacity 60, Blur 4.00 Color Black.
Now we can decorate a bit!
I used the hope and faith flairs and placed them on the frame where I thought they looked best of course re-sizing them so they fit nicely. I did the same with the flower 2 element then duplicated, mirrored and flipped it.
Open up paper 1 from the kit copy and paste it as a new layer arrange it so its at the very bottom then apply your mask and merge group.
Now for the word-art I wrote out 'Fight like a girl' but you can of course use whatever words you'd like. I used the black for the color then went to selections-select all-float-defloat-modify-expand by 2 then added a new layer and flood filled it with white, move this layer below the original text. Apply some noise by going to adjust-add/remove noise-add noise-random and monochrome checked at 36% then apply the same drop shadow as earlier then click on the original text layer and merge down. Change the blend mode of this layer to hard light arrange it to where you'd like.
Now in your font and color of choice add your name then apply a gradient glow my settings are shown in the screen-shot below and add the same drop shadow as you did earlier.


Finally add your copyright and license number if applicable save as png or jpeg whichever you prefer and we're done!
I hope you enjoyed this tutorial and found it easy to follow.
I would LOVE to see your results to any tutorials that you do, you can email results to me or post them on my page on facebook if you have a facebook account.
Tuesday, October 2, 2012
A Hauting Snags!
I have some snags for you using an awesome tube by Tony Tzanoukakis which you can purchase at his store HERE. I used an awesome Halloween kit by Evol Angel Scrapz.
I hope you enjoy these, please remember to click to view the full tag and save them to your computer for using.
Thank you!


Beauty Legs Snags!
I made some snags today using a gorgeous tube by Arthur Crowe called Beauty Legs which you can purchase at his store HERE. So go check his stuff out!
I hope you enjoy these snags, remember click to view the full tag then save them to your computer for use.
Thank you!


Subscribe to:
Posts (Atom)


