


Tuesday, April 26, 2011
Spunky

*Click the tag for a bigger view*
This tutorial was written by Brunette on April 26th 2011.
Any similarity to any other tutorial is purely coincidental.
Do not copy and paste my tutorials or claim as your own you may link to them for group challenges.
This tutorial was written by Brunette on April 26th 2011.
Any similarity to any other tutorial is purely coincidental.
Do not copy and paste my tutorials or claim as your own you may link to them for group challenges.
You'll need a tube of choice I am using the gorgeous art of Tyson McAdoo you can purchase his art for tags here at MPT.
And while you're there be sure to check out all the other fab artists there as well!
And while you're there be sure to check out all the other fab artists there as well!
Fonts of choice - I am using Herencia and ohlala for the copyright.
Collab Templates by Tonya and Kat over on the Creative Misfits Blog here.
Be sure to check out all the other fab stuff our members create!
Eye Candy 4000 - Gradient Glow
A kit of choice I am using a gorgeous Free kit by Laura of Cinnamon Scraps called Spunky, you can find out how to purchase this kit from her blog here.
Ready?
Let's get started!
Open up the template shift + D duplicates the whole thing then close out the original.
I closed off the half tone layer because I am using an element from the kit. I used brushes1 element from the kit making sure it was on the very bottom of the layer palette, re-size a little if you need to.
On the aqua oval layer go to selections-select all-float-defloat open up a paper of choice I used paper 4 from the kit then selections-invert and hit delete, close off the original oval layer.
On the pink glitter oval go to selections-select all-float-defloat add a new layer and flood fill with a color of choice I used red. Then add some noise, close off the original oval layer.
On the squiggle back 4 layer selections-select all-float-defloat add a new layer and flood fill with white, add some noise and a drop shadow. Repeat this step for the other squiggle back layers.
On the pink oval layer go to selections-select all-float-defloat open up a paper of choice I used paper 6 from the kit then go to selections-invert and hit delete, close off the original oval layer.
On the pixel text layer go to selections-select all-float-defloat add a new raster layer and with your paint brush color in the pixel words with a color the matches your tube I used red. Close off the original pixel text layer.
On the word-art layers selections-select all-float-defloat add a new layer and flood fill with a color of choice I used red again. Close off the original word-art layers.
I used the little winged heart from the kit re-sized it and placed it on the right side of the template.
Now copy and paste your tube duplicate it then go to adjust-blur-gaussian blur- 3 change change the blend mode of that layer to overlay and added a drop shadow to the original tube layer.
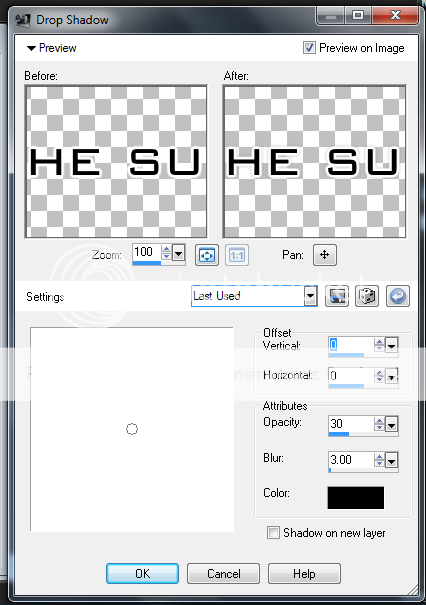
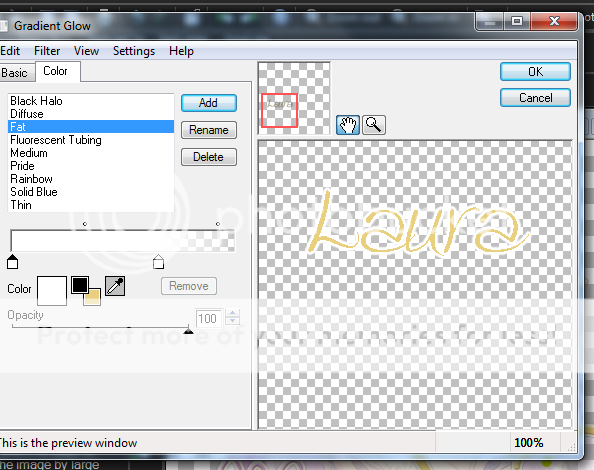
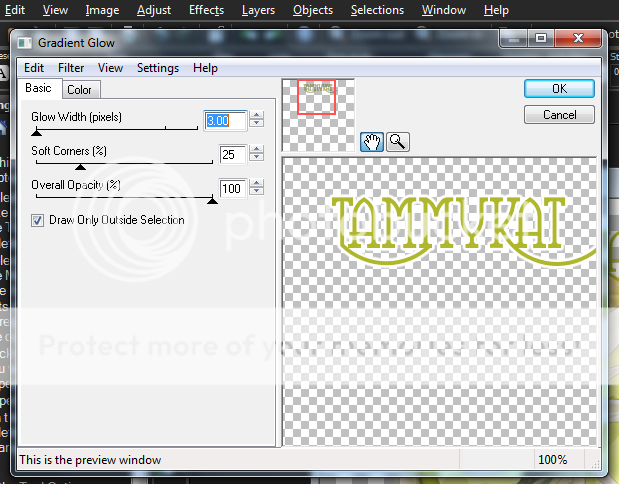
Add your name in a font of choice add a gradient glow and a drop shadow settings shown in the screen-shot below.


Finally add your copyright and license number if applicable save as png or jpeg whichever you prefer and we're done!
I hope you enjoyed this tutorial and found it easy to follow.
Thursday, April 21, 2011
The Sun Will Rise

*Click the tag for a bigger view*
This tutorial was written by Brunette on April 21st 2011.
Any similarity to any other tutorial is purely coincidental.
Do not copy and paste my tutorials or claim as your own you may link to them for group challenges.
You'll need a tube of choice I am using the gorgeous art of Marco Guaglione you can purchase his art for tags here at PTE.
All the proceeds from the sale of this particular tube will be donated to the relief effort in Japan. Thank you PTE and Marco!
And while you're there be sure to check out all the other fab artists there as well!
Fonts of choice - I am using Bank Gothic, Herencia and ohlala for the copyright.
Mask of choice
Eye Candy 4000 - Gradient Glow
A kit of choice I am using a gorgeous Free kit by Lindalous Scrap Spot called Asian Drama. You can get this kit here.
This is what I believe to be a full size kit or at least it is on the larger side, so you will need to re-size the elements you use as well as the papers and frames quite a bit.
Ready?
Let's get started!
Open up a new canvas 700x700 we can always crop/re-size later.
Open up the big sqaure frame copy and paste it as a new layer re-size it so it fits nicely. Open up a paper of choice from the kit I used paper 15 from the kit and just re-sized it so it fit nicely behind the frame.
Open up a new canvas 700x700 we can always crop/re-size later.
Open up the big sqaure frame copy and paste it as a new layer re-size it so it fits nicely. Open up a paper of choice from the kit I used paper 15 from the kit and just re-sized it so it fit nicely behind the frame.
Next I took element 15 from the kit copy and paste it onto your canvas re-size it so it fits nicely on your frame then go to image-mirror and move it so its on the right side of the frame.
I took element 43 from the kit copied and pasted it onto the canvas re-sized it a bit and moved it to the left top corner of the frame.
Take elements 31 & 32 copy and paste them as new layer re-size them so they fit nicely in the lower left corner of the frame. I rotated one a little to make it look like it was sort of laying down but thats up to you.
Open up another paper from the kit I used paper 9 from the kit copy and paste it as a new layer at the very bottom of your layer palette. Re-size it so it fits nicely then add your mask then go to layers-merge-merge group duplicate this layer and go to image-mirror then image-flip and arrange these layers to your liking. I also went to adjust-blur-gaussian blur settings at 20.
Copy and paste your tube as a new layer add a drop shadow settings shown in the screen-shot below.

I added the words 'The sun will rise again' on the sides of my tag in Bank Gothic rotated the ones I needed to so they fit on the frame then added a gradient glow and a drop shadow my settings shown in the screen-shots below.


Now add your name in a font of choice along with a drop shadow same settings as in the screen-shot above.
Finally add your copyright and license number if applicable save as png or jpeg whichever you prefer and we're done!
I hope you enjoyed this tutorial and found it easy to follow.
Wednesday, April 20, 2011
Happy Easter
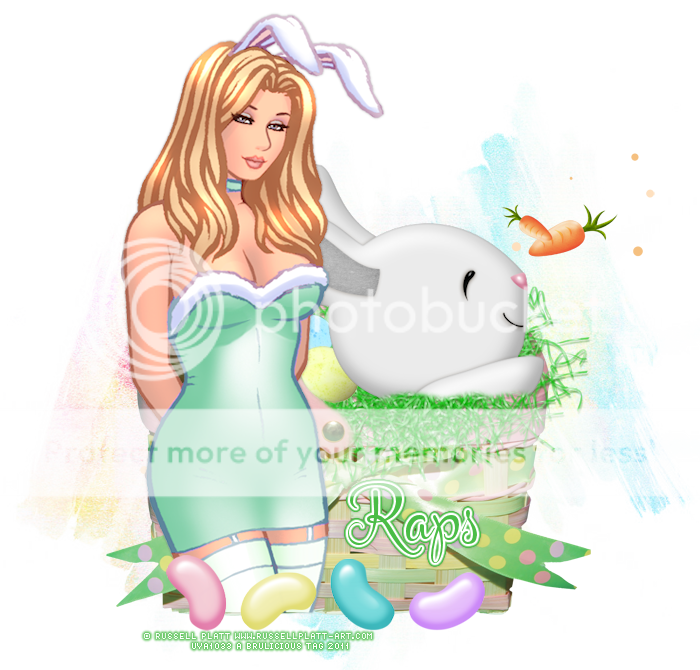
*Click the tag for a bigger view*
This tutorial was written by Brunette on April 20th 2011.
Any similarity to any other tutorial is purely coincidental.
Do not copy and paste my tutorials or claim as your own you may link to them for group challenges.
You'll need a tube of choice I am using the gorgeous art of Russell Platt you can purchase his art for tags here at Up Your Art.
While you're there be sure to check out all the other fab artists there as well!
Font of choice
Mask of choice - mine is by Vix and you can get it here on her site the one I used is Mask350.
Eye Candy 4000 - Gradient Glow
A kit of choice I am using a gorgeous Free kit by Sarah of Designs by Sarah called Peter Cottontail which was issued in this month's copy of Taggers Art magazine!
You can find it here.
Be sure to check out other freebies, contests and much more!
Ready?
Let's get started!
Ready?
Let's get started!
Open up a new canvas 700x700 we can always crop/re-size later.
From the kit open up the basket copy and paste it as a new layer. Now open up the easter green grass from the kit copy and paste it like its in the basket re-size if needed and take your eraser tool and erase where there shouldn't be any. I did the same with bunny 2 from the kit making him look like he was sitting in the basket.
Open up the eggs from the kit copy and paste them on the grass in the basket re-size them so they fit nicely in there.
I copy and pasted the carrots on the canvas and moved it to the very bottom of the platte and moved them in front of the bunny sort of to make it look like he was chasing them lol.
Copy and paste your tube as a new layer and add a drop shadow same setting shown below in the screen-shot.
I used the jellybeans from the kit for along the bottom of the basket and tube re-sizing them so they fit nicely.
Using one of the papers from the kit I used paper 9 copy and paste it as a new layer moving it to the bottom of the layer palette now add your mask. Duplicate, mirror and flip it. Arrange both masked layers to your liking.
Add your name in a font of choice with a gradient glow and a drop shadow settings shown in the screen-shot below.


Finally add your copyright and license number if applicable save as png or jpeg whichever you prefer and we're done!
I hope you enjoyed this tutorial and found it easy to follow.
Easter Babe

*Click the tag for a bigger view*
This tutorial was written by Brunette on April 20th 2011.
Any similarity to any other tutorial is purely coincidental.
Do not copy and paste my tutorials or claim as your own you may link to them for group challenges.
You'll need a tube of choice I am using the gorgeous art of Lady Mishka. You can purchase tubes for tags at Scraps and the City. However the one I am using was a freebie at one time but keep an eye out she will be adding it there soon she said. Thanks so much for sharing your art with us Lady M!
Font of choice
Mask of choice
Template by Tracy from Freebie Friends you can get it here.
I used template number 10 for this tutorial.
Be sure to check out all the other goodies they have on there!
Thanks Freebie Friends!
Eye Candy 4000 - Gradient Glow
Eye Candy 4000 - Gradient Glow
Xero - Radiance
A kit of choice I am using a gorgeous kit by Rieka Rafita called Easter Babe which you can purchase at Twilight Scraps here.
Be sure to check out her other kits along with all the other designers there!
Ready?
Let's get started!
Open up Tracy's template shift+d close out the original template. Delete the copyright info I also deleted the happy easter words but thats up to you and depends on the tube you're using.
On square 1 layer selections-select all-float-defloat open up a paper of choice I used paper 4 copy and paste it as a new layer then go to selections-invert and hit delete close off the original layer. Repeat these steps for circle 3,square 2 layers using different papers from the kit I used paper 13 for the circle and paper 7 for the square.
On the Rectangle 1 layer selections-select all-float-defloat copy and paste your tube as a new layer I mirrored it before I pasted it then go to selections-invert and hit delete. Change the blend mode to Luminance L and lower the opacityand add Xero Radiance my settings shown in the screen-shot below.

On square 3 layer selections-select all-float-defloat now open up your tube copy and paste it as a new layer now go to selections-invert and hit delete. Change the blend mode to Luminance L lower the opacity and add Xero Radiance same settings shown in the screen-shot above.
Copy and paste your tube as a new layer re-size if needed duplicate and change the blend mode to soft light and add a drop shadow.
Now I decorated my tag a bit with elements from the kit. I used the two eggs re-sized them to fit nicely on the sides of the tube one a little smaller then the other and rotated it a bit. I also used one of the flowers from the kit re-sized it to fit nicely and placed it in two different spots on the tag.
Add your name in a font of choice with a gradient glow and a drop shadow settings shown in the screen-shot below.


Finally add your copyright and license number if applicable save as png or jpeg whichever you prefer and we're done!
I hope you enjoyed this tutorial and found it easy to follow.
Monday, April 18, 2011
My Heart

*Click the tag for a bigger view*
This tutorial was written by Brunette on April 18th 2011.
Any similarity to any other tutorial is purely coincidental.
Do not copy and paste my tutorials or claim as your own you may link to them for group challenges.
You'll need a tube of choice I am using the gorgeous art of Sara Butcher. You can purchase tubes for tags at CDO. Mine was purchased at CILM when they were open but she has since moved to Creative Designs Outlet. Thanks for sharing your awesome work with us Sara!
Font of choice
Mask of choice
Eye Candy 4000 - Gradient Glow
A kit of choice I am using a gorgeous kit by Laura of Cinnamon Scraps called My Secret Garden. You can find out how to purchase her kits on her blog here.
Be sure to check out all her other gorgeous kits too!
Ready?
Let's get started!
Open up a new canvas 700x700 we can always re-size/crop it later.
Open up a paper of choice I used paper 24 from the kit copy and paste it as a new layer and add your mask. Repeat this with another paper of choice I used paper 23 from the kit. Duplicate both masked layers and mirror them arrange them to your liking.
Open up the circles scatters from the kit copy and paste it as a new layer re-size if you need to.
I also added word-art from the kit and re-sized it so it fit nicely.
Now we're going copy and paste your tube as a new layer, duplicate it and change the blend mode to screen lower the opacity a bit.
Add your name in a font of choice with a gradient glow and a drop shadow settings shown in the screen-shot below.


Finally add your copyright and license number if applicable save as png or jpeg whichever you prefer and we're done!
I hope you enjoyed this tutorial and found it easy to follow.
Friday, April 15, 2011
Spring Fairy
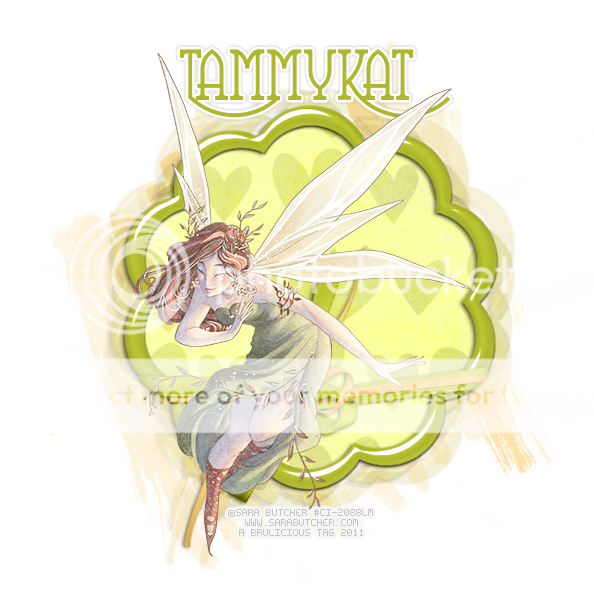
*Click the tag for a bigger view*
This tutorial was written by Brunette on April 13th 2011.
Any similarity to any other tutorial is purely coincidental.
Do not copy and paste my tutorials or claim as your own you may link to them for group challenges.
You'll need a tube of choice I am using the gorgeous art of Sara Butcher. You can purchase tubes for tags at CDO. Mine was purchased at CILM when they were open but she has since moved to Creative Designs Outlet. Thanks for sharing your awesome work with us Sara!
Font of choice
Mask of choice
Eye Candy 4000 - Gradient Glow
Toadies - What are you
A kit of choice I am using a gorgeous collab kit by the wonderfully talented girls over at Pimp my tags with Scraps called Spring Love you can get it here.
Be sure to check out all their other fab kits too!
Ready?
Let's get started!
Open up a new canvas 700x700 we can always re-size/crop it later.
Open up the green frame from Tammy's part of the kit copy and paste it as a new layer onto your canvas. With your magic wand select inside the frame make sure you select every part that you can then go to selections-modify-expand by 6. Open up a paper of choice I used the leaf paper from the kit copy and paste it as a new layer selections-invert and hit delete. Move this layer below the frame layer DO NOT deselect yet open up another paper I used the pink hearts paper from the kit copy and paste it as a new layer and hit delete. Change the blend mode of this layer to Luminance L. Duplicate your frame move it to the very bottom of the layer palette and appy Toadies - what are you setting shown in the screen-shot below.

Open up another paper of choice I used the yellow paper from the kit move it below the frame on the bottom and apply your mask.
Copy and paste your tube as a new layer duplicate it and change the blend mode to screen and lower the opacity to about 69 or so.
Add your name in a font of choice with a gradient glow and a drop shadow settings shown in the screen-shot below.

Finally add your copyright and license number if applicable save as png or jpeg whichever you prefer and we're done!
I hope you enjoyed this tutorial and found it easy to follow.
Wednesday, April 13, 2011
Nature's Butterfly

*Click the tag for a bigger view*
This tutorial was written by Brunette on April 13th 2011.
This tutorial was written by Brunette on April 13th 2011.
Any similarity to any other tutorial is purely coincidental.
Do not copy and paste my tutorials or claim as your own you may link to them for group challenges.
You'll need a tube of choice I am using the gorgeous art of Rachael Tallamy. You can purchase tubes for tags at Up Your Art. Thanks for sharing your awesome work with us Rachael!
You'll need a tube of choice I am using the gorgeous art of Rachael Tallamy. You can purchase tubes for tags at Up Your Art. Thanks for sharing your awesome work with us Rachael!
Font of choice
Mask of choice - mine is by Vix and you can get it here on her site the one I used is Mask350.
Eye Candy 4000 - Gradient Glow
A kit of choice I am using a gorgeous kit by Foxy Designs called Braylin which you can purchase over at here store here.
Ready?
Let's get started!
Open up a new canvas 700x700 we can always re-size/crop it later.
Open up element 6 from the kit and take your magic wand click inside the squares of the frame then go to selections-modify-expand by 3 then with a paper of choice I used paper 9 from the kit copy and paste it as a new layer, then go to selections-invert and hit delete. Move this layer BELOW the frame layer and select none.
Open up element 11 from the kit copy and paste it as a new layer on your canvas, re-size it so it fits nicely on the frame. Then open up the bird element from the kit copy and paste that as a new layer, re-size it so it fits nicely on the birdhouse to make it look like it is resting there.
Open up element 9 from the kit copy and paste it as a new layer move it to the top part of your frame and re-size it so it fits there nicely, of course making sure its behind the birdhouse layer.
Open up element 30 from the kit copy and paste it as a new layer re-size it so it fits nicely and move it to the corner of the frame. Duplicate this layer and move it to the other corner of the frame.
Add a new raster layer move it all the way to the bottom of your palette and flood fill with a color from your tube then add your mask.
Copy and paste your tube arrange to your liking and add a drop shadow, my setting shown in the screen-shot below.

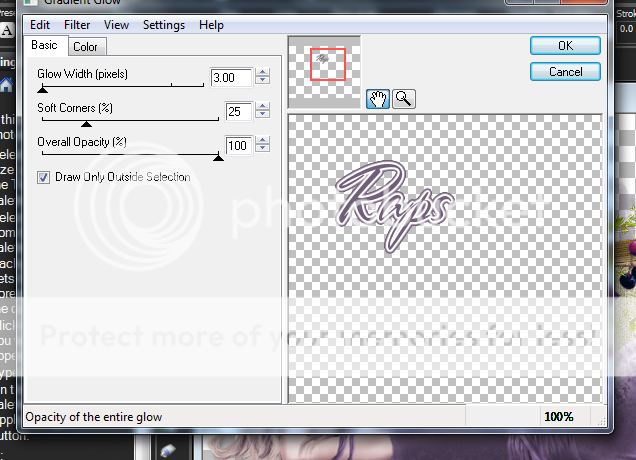
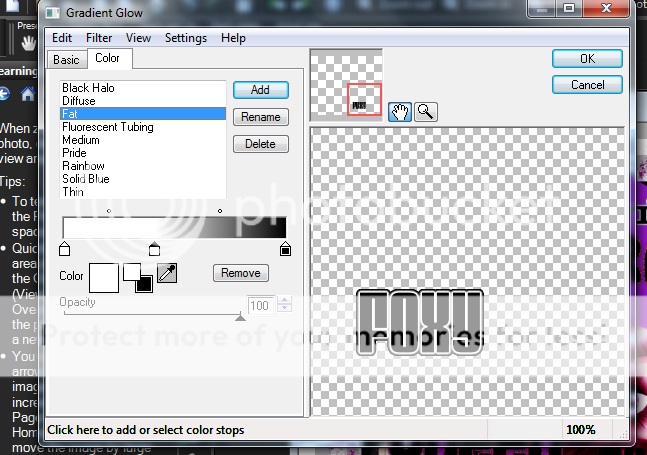
Add your name in a font of choice and a gradient glow, my setting shown in the screen-shot below, add the same drop shadow shown in the screen-shot above.
Finally add your copyright and license number if applicable save as png or jpeg whichever you prefer and we're done!
I hope you enjoyed this tutorial and found it easy to follow.
My Hero
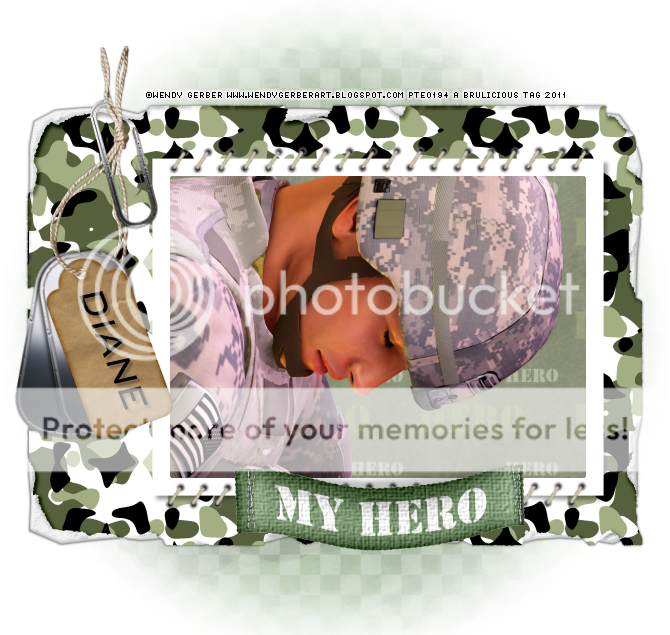
*Click the tag for a bigger view*
This tutorial was written by Brunette on April 13th 2011.
Any similarity to any other tutorial is purely coincidental.
Do not copy and paste my tutorials or claim as your own you may link to them for group challenges.
You'll need a tube of choice I am using the fabulous art of Wendy Gerber. You can purchase tubes for tags at PTE. Thanks for sharing your awesome work with is Wendy!.
This tutorial is dedicated to all our heroic troops past, present and future. Thank you for all you do for all of us, you are our heros.
Font of choice
Mask of choice
A kit of choice I am using a gorgeous kit by Candy Treats called Hero which you can purchase over at Twilight Scraps.
Ready?
Let's get started!
Open up a new canvas 700x700 we can always re-size/crop it later.
Open up a frame from the kit I chose to use CT frame 3 from the kit, copy and paste it as a new layer on your canvas. With your magic wand click inside the frame selections-modify-expand by 3 then open up a paper of choice I used paper 5 from the kit then selections-invert and hit delete. DO NOT deselect yet copy and paste your tube as a new layer mine is a close up which came with the tube but any tube will do and hit delete again. Duplicate it and change the blend mode to soft light.
Next I added the dogstring tag from the kit copy and pasted it as a new layer on my canvas and moved it up to the left top corner. Then I took the paper clip from the kit moved it so it looked like it was holding the tag on the frame and used my eraser tool to erase the inner part of the paper clip to help with the effect of it holding it on the frame.
I took the hero 2 element from the kit placed it at the bottom of the frame.
Using a paper of choice I used grungy paper 3 from the kit copy and paste it as a new layer and move it to the very bottom of the palette then added a mask.
In a font of choice add your name I rotated it so it was on the tag on the dog tags then add a drop shadow. My setting shown in the screen-shot below.

Finally add your copyright and license number if applicable save as png or jpeg whichever you prefer and we're done!
I hope you enjoyed this tutorial and found it easy to follow.
Tuesday, April 5, 2011
Don't be a Drag

*Click the tag for a bigger view*
This tutorial was written by Brunette on April 5th 2011.
Any similarity to any other tutorial is purely coincidental.
Do not copy and paste my tutorials or claim as your own you may link to them for group challenges.
You'll need a tube of choice I am using the cute art of Lix you can purchase her art to use for tags at PTE. Her art is just awesome!
Font of choice
Eye Candy 4000 - Gradient Glow
Xero - Fritillary & Radiance
A kit of choice I am using a awesome kit by Foxy of Foxys Designz called Emo Qt. You can purchase this kit here at her store . Thank you for the FAB kit Foxy!
Ready?
Let's get started!
Open up the template shift+D that duplicates the image and close out the original, I also closed off layer 1 on the temp.
On the oval layer selections-select all-float-defloat add a new layer and flood fill with a color of choice select none then I added Xero Fritillary settings shown in the screen-shot below. Close off the original oval layer.

On the rectangle layer selections-select all-float-defloat add a new layer and flood fill with a color of choice select none. Close off the original rectangle layer.
On the square layer selections-select all-float-defloat open up a paper of choice I used paper 9 from the kit and re-sized it a bit then go to selections-invert and hit delete select none and close off the original square layer.
On the circle layer selections-select all-float-defloat add a new layer flood fill with a color of choice I used the same color as the oval but thats up do you. Select none and close off the original circle layer.
On the squares layer selections-select all-float-defloat add a new layer flood fill both squares DO NOT deselect yet copy and paste your tube or closeup if your tube has one then go to selections-invert and hit delete. Duplicate the tube go to adjust-blur-gaussian blur- 3 change the blend mode to soft light and the original layer to Luminance L. Add xero radiance to the top tube layers. Settings shown in the screen-shot below. Select none and close off the original squares layer.

I closed of Star 2 and 3 but that is up to you.
On the wordart background layer selections-select all-float-defloat add a new layer flood fill with a color of choice and add some noise and a drop shadow.
Copy and paste your main tube I moved mine below the words and off to the left so you could still read the words. Duplicate and change the blend mode of this layer to soft light.
I used element 1 from the kit and placed them where the stars were on the template. I added element 25 move it below ALL layers of the template re-size it so it fits nicely. I duplicated it and mirrored and arranged them both so they sort of stuck out on the sides, top and bottom of the background. I did the same thing with element 39 just I didn't re-size it.
Now we're going to add your name in a font of choice and add a gradient glow same as the screen shot above and a drop shadow shown in the screen shot below.


Finally add your copyright and license number if applicable save as png or jpeg whichever you prefer and we're done!
I hope you enjoyed this tutorial and found it easy to follow.
Subscribe to:
Comments (Atom)


