


Showing posts with label Autumn. Show all posts
Showing posts with label Autumn. Show all posts
Tuesday, November 11, 2014
Changing Sands

*Click the tag for full view*
This tutorial was written by Brunette on November 11th 2014.
Any similarity to any other tutorial is purely coincidental.
Do not copy and paste my tutorials or claim as your own you may link to them for group challenges.
What you'll need:
You'll need a tube of choice I am using a stunning tube by Robert Alvarado.
I purchased this tube when he was selling at PTE.
As far as I know he no longer sells his art for tubes or sig tags.
A gorgeous PTU kit by Jackie's Jewels called Changing Sands.
Which you can find out where to purchase this kit HERE.
Be sure to check out all her other awesome kits!
Fonts of choice - I am using a pixel font for the copyright and Housegrind for the name.
Eye Candy 4000 - Gradient Glow
Loka's Software - 3D Shadow
Mask of choice
Mine is from Gem's Taggin' Scraps.
Any of her lovely masks will do.
You can find them HERE.
Open up a 600x600 blank canvas.
Alright let's get started!
Open up frame 1 from the kit copy and paste it as a new layer onto your canvas, re-size if you feel you need to. Now grab your magic wand and click inside the frame then to go selections-expand and expand by at least 3. Open up a paper of choice I used paper 11. Add a new layer copy and paste your paper INTO the selection then select none and move the paper layer below the frame. Add a drop shadow of choice with Loka's Software play around with your settings.
Back on the frame layer again with your magic wand click inside the frame layer again now open up your tube if it has a close up use that. Copy and paste it as a new layer arrange to your liking then to go selections-invert and hit delete then select none move this layer below the frame but above the paper. Duplicate and mirror your tube if you'd like. Lower the opacity a bit to your liking and change the blend mode to screen.
I used the pumpkin element from the kit re-sized and arranged it to my liking duplicated it and mirrored it. Along with the books and cup with shells. Arrange them near the bottom of your tag and add the same drop shadow you did to the frame.
Open up your tube copy and paste it as a new layer arrange it so its below the pumpkins layer. Duplicate your tube layer then go to adjust-blur-gaussian blur of 3 then change the blend mode to soft light. Add the same drop shadow to the bottom layer tube.
Open up the first branch element copy and paste it as a new layer re-size to your liking. Arrange it below the tube layer and to either side then duplicate and mirror it. Add the same drop shadow to wach branch layer.
Open up the fence element copy and paste it as a new layer re-sizing it so it sort of fits in the frame again below the tube layer. Arrange to your liking and add your drop shadow.
Open up element 74 since I am not sure what to call them LOL. Copy and paste as a new layer re-size to your liking and move to the side of your tag under your branch layer. Duplicate and mirror arrange it on the other side of your tag.
Open up the second flying leaves element copy and paste as a new layer re-size if you need to and have this as your top layer over your tube, arrange it to your liking.
I also added the flying bird re-size it so it fits nicely arrange to your liking and add your drop shadow.
Open a paper of choice I used paper 8 copy and paste it as a new layer move it to the bottom of all your elements and tubes. Apply your mask then merge group. Arrange to your liking then I added a tiny bit of noise. You can do this by going to adjust-add/remove noise and add what you'd like.
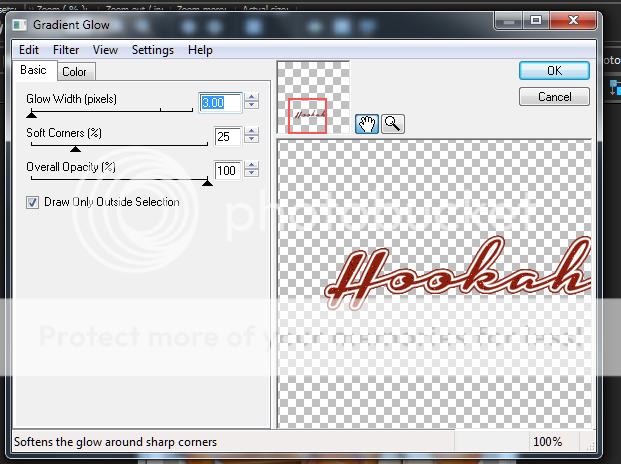
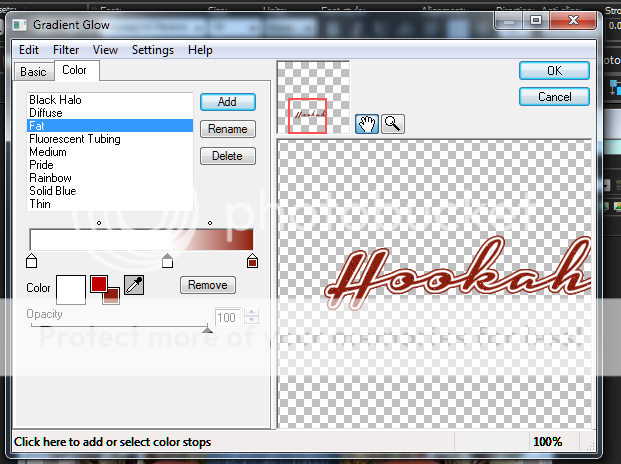
Finally add your name in a color and font of choice apply the same noise settings you used. Then apply your gradient glow, my settings shown in the screen-shot below. Duplicate your text layer and change the blend mode to hard light then merge down and add your drop shadow.
This tutorial was written by Brunette on November 11th 2014.
Any similarity to any other tutorial is purely coincidental.
Do not copy and paste my tutorials or claim as your own you may link to them for group challenges.
What you'll need:
You'll need a tube of choice I am using a stunning tube by Robert Alvarado.
I purchased this tube when he was selling at PTE.
As far as I know he no longer sells his art for tubes or sig tags.
A gorgeous PTU kit by Jackie's Jewels called Changing Sands.
Which you can find out where to purchase this kit HERE.
Be sure to check out all her other awesome kits!
Fonts of choice - I am using a pixel font for the copyright and Housegrind for the name.
Eye Candy 4000 - Gradient Glow
Loka's Software - 3D Shadow
Mask of choice
Mine is from Gem's Taggin' Scraps.
Any of her lovely masks will do.
You can find them HERE.
Open up a 600x600 blank canvas.
Alright let's get started!
Open up frame 1 from the kit copy and paste it as a new layer onto your canvas, re-size if you feel you need to. Now grab your magic wand and click inside the frame then to go selections-expand and expand by at least 3. Open up a paper of choice I used paper 11. Add a new layer copy and paste your paper INTO the selection then select none and move the paper layer below the frame. Add a drop shadow of choice with Loka's Software play around with your settings.
Back on the frame layer again with your magic wand click inside the frame layer again now open up your tube if it has a close up use that. Copy and paste it as a new layer arrange to your liking then to go selections-invert and hit delete then select none move this layer below the frame but above the paper. Duplicate and mirror your tube if you'd like. Lower the opacity a bit to your liking and change the blend mode to screen.
I used the pumpkin element from the kit re-sized and arranged it to my liking duplicated it and mirrored it. Along with the books and cup with shells. Arrange them near the bottom of your tag and add the same drop shadow you did to the frame.
Open up your tube copy and paste it as a new layer arrange it so its below the pumpkins layer. Duplicate your tube layer then go to adjust-blur-gaussian blur of 3 then change the blend mode to soft light. Add the same drop shadow to the bottom layer tube.
Open up the first branch element copy and paste it as a new layer re-size to your liking. Arrange it below the tube layer and to either side then duplicate and mirror it. Add the same drop shadow to wach branch layer.
Open up the fence element copy and paste it as a new layer re-sizing it so it sort of fits in the frame again below the tube layer. Arrange to your liking and add your drop shadow.
Open up element 74 since I am not sure what to call them LOL. Copy and paste as a new layer re-size to your liking and move to the side of your tag under your branch layer. Duplicate and mirror arrange it on the other side of your tag.
Open up the second flying leaves element copy and paste as a new layer re-size if you need to and have this as your top layer over your tube, arrange it to your liking.
I also added the flying bird re-size it so it fits nicely arrange to your liking and add your drop shadow.
Open a paper of choice I used paper 8 copy and paste it as a new layer move it to the bottom of all your elements and tubes. Apply your mask then merge group. Arrange to your liking then I added a tiny bit of noise. You can do this by going to adjust-add/remove noise and add what you'd like.
Finally add your name in a color and font of choice apply the same noise settings you used. Then apply your gradient glow, my settings shown in the screen-shot below. Duplicate your text layer and change the blend mode to hard light then merge down and add your drop shadow.
Finally add your copyright and license number if applicable save as png or jpeg whichever you prefer and we're done!
I hope you enjoyed this tutorial and found it easy to follow.
I would LOVE to see your results to any tutorials that you do, you can email results to me or post them on my page on face-book if you have a face-book account.
Monday, September 24, 2012
Autumn Leaves

*Click the tag for full view*
This tutorial was written by Brunette on September 24th 2012.
Any similarity to any other tutorial is purely coincidental.
Do not copy and paste my tutorials or claim as your own you may link to them for group challenges.
What you'll need:
You'll need a tube of choice I am using a gorgeous tube by Alena Lazareva. You can purchase her art for signature tags at Up Your Art HERE.
Check out the rest of her beautiful artwork while you're there.
A gorgeous FTU kit by Designs by Vaybs called Fall which you can download HERE.
Be sure to check out ALL her other awesome kits!
Fonts of choice - I am using a pixel font for the copyright and Before the Rain for the name.
Mask of choice - mine is from Gems Taggin' Scraps which you can find HERE.
I used mask number 8.
Leave some love when you download!
Eye Candy 4000 - Gradient Glow
Ready?
Let's get started!
Open up a 700x700 canvas we can always re-size/crop later.
I like my tags BIG LOL.
Open up your kit an in the elements folder grab element 24 which should be a circle of leaves. Copy and paste it as a new layer onto your canvas. Now take your magic wand and click inside the frame then go to selections-modify-expand by 3 and add a new layer. Go to your paper folder and pick paper 14 from the kit then paste it into the selection then select none move this layer below the circle frame.
Copy and paste your tube as a new layer mine is only a half tube so what I did was arranged it where I wanted then duplicated it and moved the duplicate below the frame. Then took my eraser tool and erased what I wanted on the top layer to make it look like shes coming out of the frame. Duplicate the top tube layer change the blend mode to soft light and go to adjust-blur-gaussian blur set to 5. Do the same for the tube layer under the frame then add a drop shadow to the VERY bottom tube layer I used H 2 V 2 Opacity 60 Blur 4.00 Color Black.
Next open up elements 44, 49, 58 and 59. Arrange the flowers element 44 near the bottom left of the tag, arrange the star element 49 near the middle right of the tag, arrange the birds elements 58 and 59 on the bottom left and right of the tag.
Using element 52 from the kit copy and paste it as a new layer move it below the frame layer.
Open up paper 13 from the kit copy and paste it as a new layer below the frame and the wire you just added. Then apply your mask and merge group and duplicate.
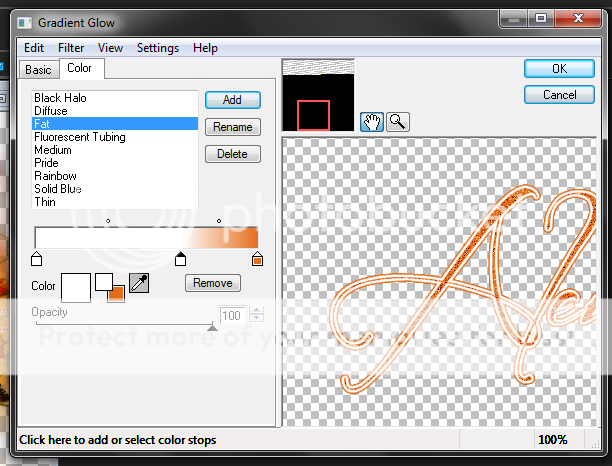
Now in your font and color of choice making sure you at the very top layer on your palette add your name then go to adjust-add/remove noise-add noise- random selected, monochrome selected, noise percent at 36. Then add a gradient glow my settings shown in the screen-shot below then add the same drop shadow as earlier and change the blend mode to hard light.
This tutorial was written by Brunette on September 24th 2012.
Any similarity to any other tutorial is purely coincidental.
Do not copy and paste my tutorials or claim as your own you may link to them for group challenges.
What you'll need:
You'll need a tube of choice I am using a gorgeous tube by Alena Lazareva. You can purchase her art for signature tags at Up Your Art HERE.
Check out the rest of her beautiful artwork while you're there.
A gorgeous FTU kit by Designs by Vaybs called Fall which you can download HERE.
Be sure to check out ALL her other awesome kits!
Fonts of choice - I am using a pixel font for the copyright and Before the Rain for the name.
Mask of choice - mine is from Gems Taggin' Scraps which you can find HERE.
I used mask number 8.
Leave some love when you download!
Eye Candy 4000 - Gradient Glow
Ready?
Let's get started!
Open up a 700x700 canvas we can always re-size/crop later.
I like my tags BIG LOL.
Open up your kit an in the elements folder grab element 24 which should be a circle of leaves. Copy and paste it as a new layer onto your canvas. Now take your magic wand and click inside the frame then go to selections-modify-expand by 3 and add a new layer. Go to your paper folder and pick paper 14 from the kit then paste it into the selection then select none move this layer below the circle frame.
Copy and paste your tube as a new layer mine is only a half tube so what I did was arranged it where I wanted then duplicated it and moved the duplicate below the frame. Then took my eraser tool and erased what I wanted on the top layer to make it look like shes coming out of the frame. Duplicate the top tube layer change the blend mode to soft light and go to adjust-blur-gaussian blur set to 5. Do the same for the tube layer under the frame then add a drop shadow to the VERY bottom tube layer I used H 2 V 2 Opacity 60 Blur 4.00 Color Black.
Next open up elements 44, 49, 58 and 59. Arrange the flowers element 44 near the bottom left of the tag, arrange the star element 49 near the middle right of the tag, arrange the birds elements 58 and 59 on the bottom left and right of the tag.
Using element 52 from the kit copy and paste it as a new layer move it below the frame layer.
Open up paper 13 from the kit copy and paste it as a new layer below the frame and the wire you just added. Then apply your mask and merge group and duplicate.
Now in your font and color of choice making sure you at the very top layer on your palette add your name then go to adjust-add/remove noise-add noise- random selected, monochrome selected, noise percent at 36. Then add a gradient glow my settings shown in the screen-shot below then add the same drop shadow as earlier and change the blend mode to hard light.

Finally add your copyright and license number if applicable save as png or jpeg whichever you prefer and we're done!
I hope you enjoyed this tutorial and found it easy to follow.
I would LOVE to see your results to any tutorials that you do, you can email results to me or post them on my page on facebook if you have a facebook account.
Subscribe to:
Posts (Atom)


