


Showing posts with label Eclipsy. GrnIz Dezinez. Show all posts
Showing posts with label Eclipsy. GrnIz Dezinez. Show all posts
Tuesday, August 21, 2012
Sweet Cupcake - Forum Banner

*Click the tag for full view*
This tutorial was written by Brunette on August 21st 2012.
Any similarity to any other tutorial is purely coincidental.
Do not copy and paste my tutorials or claim as your own you may link to them for group challenges.
What you'll need:
You'll need a tube of choice I am using an gorgeous tube by Wendy Gerber.
This tutorial was written by Brunette on August 21st 2012.
Any similarity to any other tutorial is purely coincidental.
Do not copy and paste my tutorials or claim as your own you may link to them for group challenges.
What you'll need:
You'll need a tube of choice I am using an gorgeous tube by Wendy Gerber.
A gorgeous kit by GrnIz Dezinez called My Sweet Cupcake. Which you can purchase HERE as a collab with the tubes by Wendy Gerber or HERE alone as just the kit.
Fonts of choice - I am using a pixel font for the copyright and Clipper Script for the name.
Ready?
Let's get started!
Open up a 650x250 canvas
Add a new layer and made a foreground/background gradient using two colors from your tube. Your angle in the settings should be 36 and repeats set on 3 Linear style. Now flood fill your layer.
Open up your tube if it comes with a close up great if not just use your regular tube. Change the blend mode to Luminance L.
Open up a paper of choice I used paper 2 from the kit copy and paste it as a new layer re-size and arrange it to your liking then change the blend mode to screen.
Open up another paper of choice I used paper 14 from the kit copy and paste it as a new layer re-size and arrange to your liking. I moved mine so it was all the way to one side and the middle was empty then duplicated it and mirrored it, merged them together and changed the blend mode to soft light and lowered the opacity to 53.
Open up one of the starspray elements from the kit copy and paste it as a new layer arrange it to your liking again I moved mine to the far side of the canvas then duplicated and mirrored it.
Open up the fairy dust copy and paste it as a new layer arrange it to your liking and do the same as the above steps duplicate and mirror.
Now we can copy and paste our tube re-size and arrange it to your liking duplicate it and change the blend mode to screen then go to adjust-blur-gaussian blur and set it to 3.
Now we're going to do the borders. Go to the very bottom layer of your canvas it should be blank click it then go to selections-modify-contract by 4 then invert add a new layer flood fill with a color of choice then add some noise if you like. Arrange this layer so its at the top of your layers. Repeat these steps but change the number you contract by to 2.
Add your name in your font and color of choice then go to selections-select all-float-defloat-modify and expand by 2 add a new layer flood fill it with white or a color of choice then add some noise by going to adjust-add/remove noise-add noise uniform checked, 35% noise and monochrome checked. DO NOT deslect yet go to modify and expand by 2 again add a new layer and flood fill with the color you used for your name move it below all the name layers and add a drop shadow.
Here are the settings I used
H 2
V 2
Opacity 60
Blur 4.00
Color Black
Finally add your copyright and license number if applicable save as png or jpeg whichever you prefer and we're done!
I hope you enjoyed this tutorial and found it easy to follow.
I would LOVE to see your results to any tutorials that you do, you can email results to me or post them on my page on facebook if you have a facebook account.
Wednesday, June 6, 2012
Gothic

*Click the tag for full view*
This tutorial was written by Brunette on June 6th 2012.
Any similarity to any other tutorial is purely coincidental.
Do not copy and paste my tutorials or claim as your own you may link to them for group challenges.
What you'll need:
You'll need a tube of choice I am using an awesome tube by Eclipsy which you can purchase at The PSP Project HERE.
Be sure to check out all the other great artists there!
This tutorial was written by Brunette on June 6th 2012.
Any similarity to any other tutorial is purely coincidental.
Do not copy and paste my tutorials or claim as your own you may link to them for group challenges.
What you'll need:
You'll need a tube of choice I am using an awesome tube by Eclipsy which you can purchase at The PSP Project HERE.
Be sure to check out all the other great artists there!
A gorgeous kit by GrnIz Dezinez called Gothic Ballet. Which you can find out where to purchase by checking out her blog HERE.
Fonts of choice - I am using a pixel font for the copyright and Aeolus for the name.
Eye Candy 400 - Gradient Glow (optional)
Mask of choice - mine is from weescottlass creations which you can find HERE.
I used mask number 25 you'll see on the right side they are bundled in bulk downloads :)
Ready?
Let's get started!
Open up a 700X700 canvas, we can always re-size/crop later.
I like BIG tags LOL.
I used mask number 25 you'll see on the right side they are bundled in bulk downloads :)
Ready?
Let's get started!
Open up a 700X700 canvas, we can always re-size/crop later.
I like BIG tags LOL.
Open up heart frame 2 from the kit copy and paste it as a new layer onto your canvas re-size it a little if you want. Then take your magic wand and click inside the frame then go to selections-modify-expand by 3 and add a new raster layer DO NOT deslect yet. Now open up a paper of choice I used paper 9 from the kit. Copy and paste it into the selection and move it below the frame layer.
Click so you're on your frame layer then go to selections-select all-float-defloat-modify-expand by 3 add a new layer and flood fill with a color of choice, I used white. Then go to adjust-add/remove noise-add noise and pick your settings.
Then add a drop shadow, the settings I used are below
H 2
V 2
Opacity 60
Blur 4.00
Then change the H&V to -2
H 2
V 2
Opacity 60
Blur 4.00
Then change the H&V to -2
I used the moon from the kit re-sized it and placed it in the top right corner.
Open up the skulls which are by Krissy's Imaging copy and paste them as a new layer near the bottom of your frame, re-size them a little.
Open up the glitter spill from the kit copy and paste it as a new layer move it so it shows at the top and side of the frame arrange it so it is below the frame layer. Duplicate this layer and flip it then merge down.
Using a different paper I used paper 11 from the kit copy and paste it as a new layer below the layer you just worked with then add your mask. Duplicate and mirror it merge down, then duplicate that layer.
Copy and paste your tube as a new layer and arrange it to your liking.
Add your name in a font and color of choice. I used Eye Candy Gradient glow on mine, settings shown below.
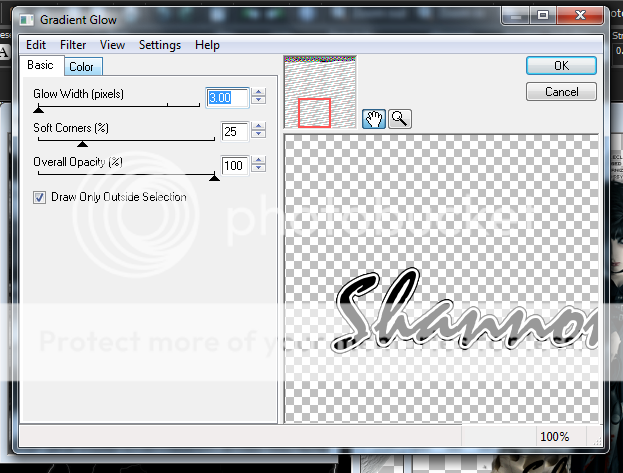

Add your drop shadow
H 2
V 2
Opacity 60
Blur 4.00
If you do not have the gradient glow plugin you can do your glow this way
Add your name in your font and color of choice then go to selections-select all-float-defloat-modify and expand by 2 add a new layer flood fill it with white or a color of choice then add some noise by going to adjust-add/remove noise-add noise uniform checked, 50% noise and monochrome checked. DO NOT deslect yet go to modify and expand by 2 again add a new layer and flood fill with the color you used for your name move it below all the name layers and add the same drop shadow as above.
Finally add your copyright and license number if applicable save as png or jpeg whichever you prefer and we're done!
I hope you enjoyed this tutorial and found it easy to follow.
I would LOVE to see your results to any tutorials that you do, you can email results to me or post them on my page on facebook if you have a facebook account.
Subscribe to:
Posts (Atom)


