Labels ♥
- AIL (4)
- AmyMarie (1)
- Angela Newman (1)
- Anna Marine (1)
- AOG (1)
- ArtisticRealityTalent (2)
- Autumn (2)
- Awards (1)
- Barbara Jensen (1)
- BCA (1)
- ByWendyG (2)
- CamillaDrakenborg (2)
- CDO (14)
- Charles Bristow (1)
- Cinnamon Scraps (1)
- Cluster Frames (2)
- Collab Tag Templates (2)
- Crowe (3)
- CuteLoot (1)
- Designs By Sarah (1)
- Ditzy Dezigns (1)
- Easter (1)
- Eclipsy. GrnIz Dezinez (2)
- Elias Chatzoudis (4)
- Enamorte (2)
- Enys Guerrero (1)
- Fall (1)
- Forum Set (1)
- Foxy Designz (3)
- Freya Langford-Sidebottom Freya Langford-Sidebottom (1)
- FTU Tags (7)
- FTU Tutorials (15)
- Gaetano Di Falco (1)
- Garv (1)
- GeminiCreationz (1)
- GothicInspirations (1)
- Gothique Starr (3)
- GraphFreaks (1)
- GrnIz Dezinez (8)
- Grunge-Glitter (1)
- Hungry Hill (2)
- Indie-Zine (1)
- Inzpired Creationz (1)
- Irish Princess Designs (1)
- Jackie's Jewels (5)
- JoseCano (1)
- Keith Garvey (4)
- KiwiFireStorm (3)
- LexisCreationz (3)
- Misc. (3)
- My Tubed Art (3)
- O'ScrapCandyShack (5)
- PFD (1)
- PFD. Wendy Gerber (2)
- PicsforDesign (3)
- Pimpin' PSPers Warehouse (1)
- Pink (1)
- PMTwS (8)
- PTE (41)
- PTU Tags (33)
- PTU Tutorials (90)
- PurplesKreationz (3)
- Rabid Designz (4)
- Rac (13)
- Ricky Fang (1)
- Robert Alvarado (1)
- Roman Zaric (1)
- Roo (2)
- Sale (1)
- Sam'sScraps (1)
- ScrappinKrazyDesigns (1)
- Scraps and the City (1)
- ScrapsNCompany (1)
- Sherri Baldy (1)
- Snags (31)
- Spring (2)
- St.Patricks Day (2)
- Steve Baier (1)
- Tag Show Off (6)
- Tag Show off using my tutorials (1)
- Tag Templates (11)
- TaggersArt (1)
- TaggersDelight (1)
- Tags (2)
- Tashas Playground (18)
- TeaserTag (1)
- The PSP Project (20)
- TheARTofGiving (1)
- TimeThief (1)
- Tony Mauro (1)
- TonyT (3)
- Toxic Desirez (1)
- Tutorials (2)
- Tyger's Tidbits (1)
- UpYourArt (15)
- ValentinesDay (1)
- Verymany (5)
- Wendy Gerber (4)
- Wicked Princess Scraps (11)
- wordart (1)
- Xketch (1)
- ZlataM (3)
Powered by Blogger.
Tuesday, March 19, 2013
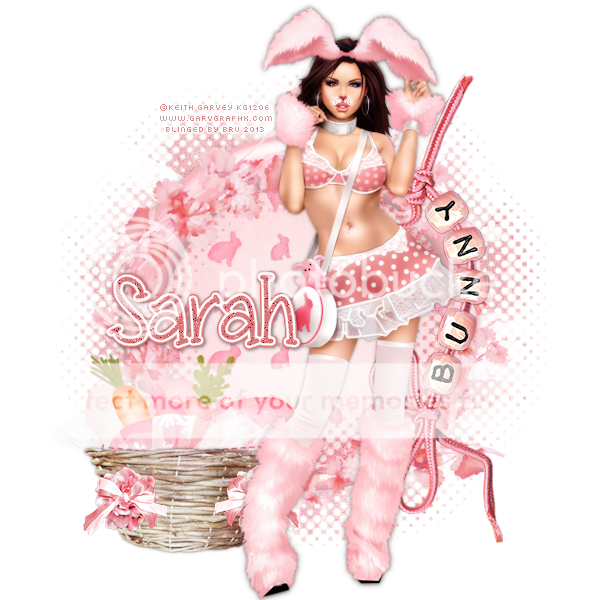
Snuggle Bunny
*Click the tag for full view*
This tutorial was written by Brunette on March 19th 2013.
Any similarity to any other tutorial is purely coincidental.
Do not copy and paste my tutorials or claim as your own you may link to them for group challenges.
What you'll need:
You'll need a tube of choice I am using a gorgeous tube by Keith Garvey.
Which you can purchase at his store HERE.
A gorgeous PTU kit by Designs by Sarah called Snuggle Bunny.
Which you can purchase this lovely kit HERE.
Be sure to check out all her and the other designers awesome kits!
Eye Candy 400 - Gradient Glow
Fonts of choice - I am using a pixel font for the copyright and Miss Smarty Pants for the name.
Ready?
Let's get started!
Open up a new canvas 700x700.
Open up frame 1 from the kit copy and paste it as a new layer re-size it a little if you find it too big. Open up greenery 1 from the kit copy and paste it on top of the frame re-size it a little. Open up print 3 element from the kit copy and paste it below the frame layer. Take your magic wand and click inside the frame then go to selections-modify-expand by 3 add a new layer then copy and paste the paper INTO the selection. Select none.
Open up the bunny beads on string element copy and paste it as a new layer re-size it so it fits nicely and rotate it 90 degrees to the left and arrange it so that side on the frame.
Open up the basket element from the kit copy and paste it as a new layer re-size it so it fits nicely then arrange it near the bottom left of the tag. Now open up the lace element from the kit copy and paste it as a new layer re-size it so it fits nicely and move it below the basket layer. Keep re-sizing it so it looks like the lace is in the basket like a decoration. Open up egg 1, 2 and 3 copy and paste them as new layers re-size them so they fit in the basket move each of them below the basket layer arrange them so they show a bit outside the top part of the basket. Do the same with carrot 1 and two you can rotate them to your liking and place them where you'd like. I also used the bunny shape element.
Open up flower 4 from the kit copy and paste it as a new layer now we're going to re-size it so it fits on the basket like a decoration. Then open up bow 4 do the same but place it near the middle of the flower. Merge together then duplicate arrange this layer on the opposite side.
Copy and paste your tube as a new layer arrange and re-size to your liking. Duplicate it then change the blend mode to soft light then go to adjust-blur-gaussian blur set to 3. Add a drop shadow of H 0 V 0 Opacity 50 Blur 5.00 Color Black to the BOTTOM tube layer.
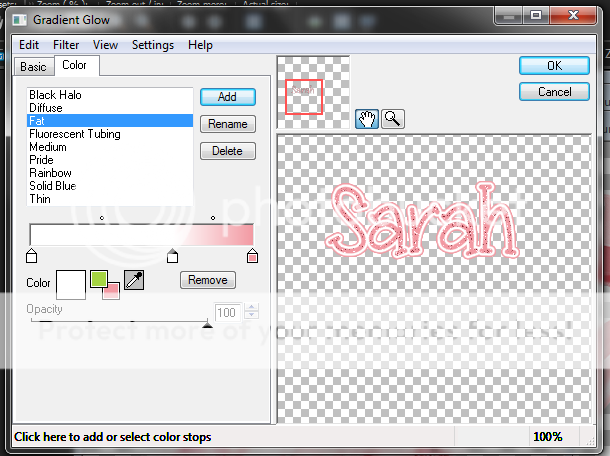
Now in a font and color of choice add your name I added some noise by going to adjust-add/remove noise-add noise then play with your settings to get something you like. I applied a gradient glow the settings that I used are shown in the screen-shot below. Now apply the same drop shadow you used earlier.
Finally add your copyright and license number if applicable save as png or jpeg whichever you prefer and we're done!
I hope you enjoyed this tutorial and found it easy to follow.
I would LOVE to see your results to any tutorials that you do, you can email results to me or post them on my page on face-book if you have a face-book account.
Labels:
Easter,
Keith Garvey,
PMTwS,
PTU Tutorials
Subscribe to:
Post Comments (Atom)


0 comments:
Post a Comment