


Thursday, July 28, 2011
Twisted

This tutorial was written by Brunette on July 28th 2011.
Any similarity to any other tutorial is purely coincidental.
Do not copy and paste my tutorials or claim as your own you may link to them for group challenges.
What you'll need:
You'll need a tube of choice I am using the gorgeous art of Camilla Drakenborg. You can purchase her art for signature tags at Up Your Art.
AND while you're there be sure to check out the other awesome artists there!
Fonts of choice
Eye Candy - Gradient Glow
Mask 4 pack by Brutal Designs here.
I used masks 21 and 29 from the pack.
A kit of choice I am using an awesome kit called Evil Ann and Andy by Wicked Princess Scraps. You can find this kit over at Designer Scraps and the kit can be found here. While you're there check out the rest of her fab kits, as well as the other talented designers there!
Ready?
Let's get started!
Open up a 700x700 transparent canvas.
Open up paper 1 from the kit copy and paste it onto your canvas re-size it a little. Apply mask 21 and then merge group.
Open paper 2 from the kit copy and paste it onto your canvas re-size it a little. Apply mask 21 then merge group. You can merge these two layers together.
Open up paper 10 from the kit copy and paste it onto your canvas re-size it a little and move it below the above layer or layers if you merged them together. Apply mask 29 and then merge group.
Open up the Twisted word-art from the kit copy and paste it on your masked layers make sure you're on the top masked layers not the bottom. Re-size so if fits nicely and change the blend mode to screen.
I added moon 2 from the kit re-sized it so it fit nicely and placed it up in the left top corner. I added the ghost and tombstone from the kit re-sizing both so they fit nicely move the ghost behind the tombstone to kind of make it look like its coming out of the tombstone.
Add your tube mine I used the eraser tool on the bottom a little since it wasn't a full tube to make it sort of blend in with the masked layers. Duplicate it and change the blend mode to soft light.
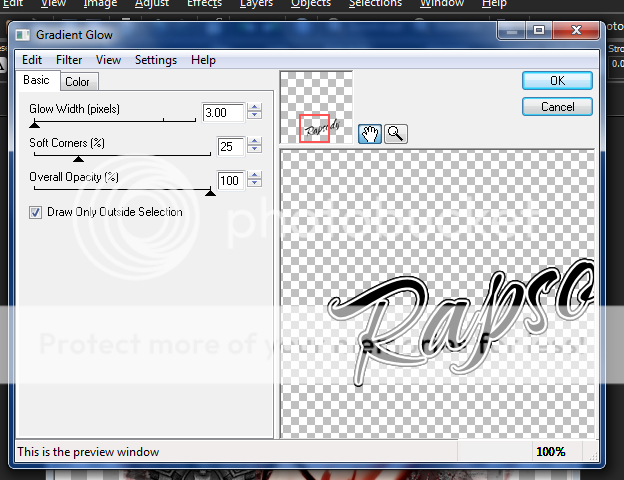
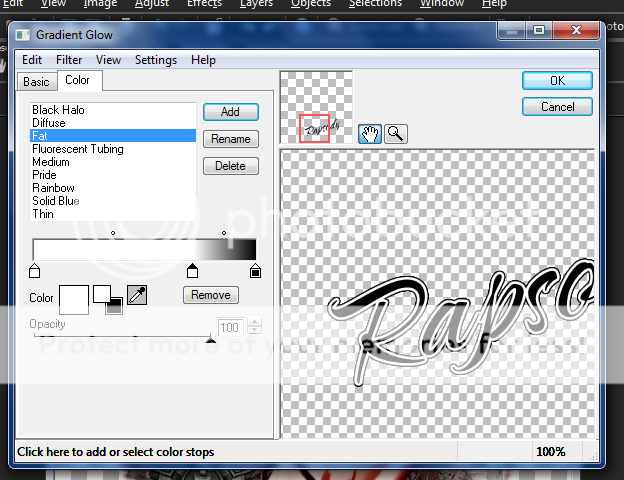
Add your name in a font of choice I used Caramel Candy. Rotate it 15 degrees to the left then apply a gradient glow and a drop shadow. My settings are shown in the screen-shot below. Change the blend mode to Luminance.

Finally add your copyright and license number if applicable save as png or jpeg whichever you prefer and we're done!
I hope you enjoyed this tutorial and found it easy to follow.
Subscribe to:
Post Comments (Atom)


1 comments:
Thanks this on e was fun!!
Post a Comment