


Saturday, July 30, 2011
High Maintenance

This tutorial was written by Brunette on July 30th 2011.
Any similarity to any other tutorial is purely coincidental.
Do not copy and paste my tutorials or claim as your own you may link to them for group challenges.
You'll need a tube of choice I am using the awesome art of Angie Monasterio. You can purchase her art for signature tags at Up Your Art.
AND while you're there be sure to check out the other awesome artists there!
Fonts of choice
Mask of choice
I used mask 31 from Brutal Designs which you can find on her blog here.
The mask I used is in set 5.
I am also using a fab template by Deb over at Creative by Nature here.
I used template 116
Open up the template shift+d to duplicate it then close out the original.
Then go to image-Canvas size- change it to 750x750 and close off the copyright layer on the template.
On the word-art layer make sure your on the black layer and go to selections-select all-float-defloat add a new layer and flood fill with a color of choice, I used a gradient of two colors. Delete the original word-art layer but leave the other layers for the word-art alone.
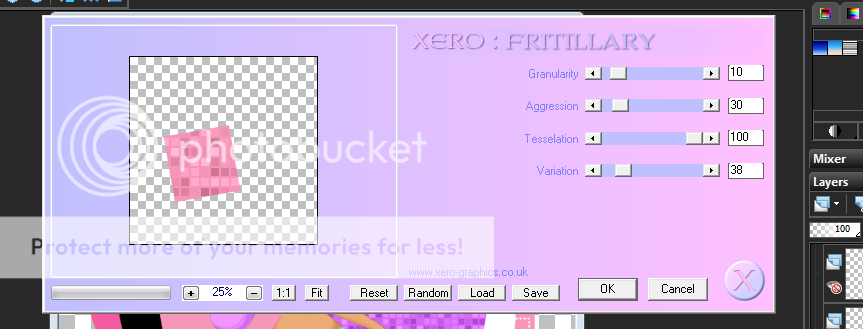
On layer 3 of the template selections-select all-float-defloat add a new layer and flood fill with a color of choice then apply Xero-Fritillary with the settings shown below. Repeat this step for layer 4 of the template.
On layer 5 selections-select all-float-defloat add a new layer and flood fill with a color of choice. Do the same step for all the remaining layers. BUT on layer 6 when you are done flood filling add the weave texture settings shown in the screen-shot below.

Add your tube as a new layer I had to erase some of it so it fit in the circle but that all depends on the tube you use.
Add your name in a font of choice I used a background/foreground gradient then went to selections-select all-float-defloat-modify-expand by 2 add a new layer and flood fill with the color white DO NOT deslect yet add another new layer and then add a drop shadow. Now deselect and move the drop shadow layer below the white layer.
Add a new layer and move it below all the other layers flood fill with a color of choice I used another combination of colors for a gradient. Then add your mask merge group. Duplicate and mirror it arrange them to your liking.
Finally add your copyright and license number if applicable save as png or jpeg whichever you prefer and we're done!
I hope you enjoyed this tutorial and found it easy to follow
Subscribe to:
Post Comments (Atom)


0 comments:
Post a Comment