


Thursday, April 21, 2011
The Sun Will Rise

*Click the tag for a bigger view*
This tutorial was written by Brunette on April 21st 2011.
Any similarity to any other tutorial is purely coincidental.
Do not copy and paste my tutorials or claim as your own you may link to them for group challenges.
You'll need a tube of choice I am using the gorgeous art of Marco Guaglione you can purchase his art for tags here at PTE.
All the proceeds from the sale of this particular tube will be donated to the relief effort in Japan. Thank you PTE and Marco!
And while you're there be sure to check out all the other fab artists there as well!
Fonts of choice - I am using Bank Gothic, Herencia and ohlala for the copyright.
Mask of choice
Eye Candy 4000 - Gradient Glow
A kit of choice I am using a gorgeous Free kit by Lindalous Scrap Spot called Asian Drama. You can get this kit here.
This is what I believe to be a full size kit or at least it is on the larger side, so you will need to re-size the elements you use as well as the papers and frames quite a bit.
Ready?
Let's get started!
Open up a new canvas 700x700 we can always crop/re-size later.
Open up the big sqaure frame copy and paste it as a new layer re-size it so it fits nicely. Open up a paper of choice from the kit I used paper 15 from the kit and just re-sized it so it fit nicely behind the frame.
Open up a new canvas 700x700 we can always crop/re-size later.
Open up the big sqaure frame copy and paste it as a new layer re-size it so it fits nicely. Open up a paper of choice from the kit I used paper 15 from the kit and just re-sized it so it fit nicely behind the frame.
Next I took element 15 from the kit copy and paste it onto your canvas re-size it so it fits nicely on your frame then go to image-mirror and move it so its on the right side of the frame.
I took element 43 from the kit copied and pasted it onto the canvas re-sized it a bit and moved it to the left top corner of the frame.
Take elements 31 & 32 copy and paste them as new layer re-size them so they fit nicely in the lower left corner of the frame. I rotated one a little to make it look like it was sort of laying down but thats up to you.
Open up another paper from the kit I used paper 9 from the kit copy and paste it as a new layer at the very bottom of your layer palette. Re-size it so it fits nicely then add your mask then go to layers-merge-merge group duplicate this layer and go to image-mirror then image-flip and arrange these layers to your liking. I also went to adjust-blur-gaussian blur settings at 20.
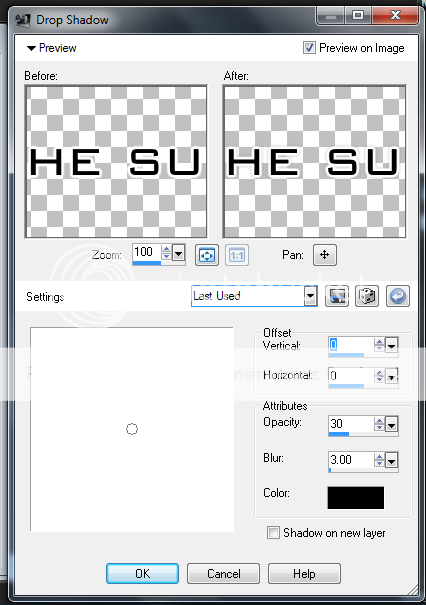
Copy and paste your tube as a new layer add a drop shadow settings shown in the screen-shot below.

I added the words 'The sun will rise again' on the sides of my tag in Bank Gothic rotated the ones I needed to so they fit on the frame then added a gradient glow and a drop shadow my settings shown in the screen-shots below.


Now add your name in a font of choice along with a drop shadow same settings as in the screen-shot above.
Finally add your copyright and license number if applicable save as png or jpeg whichever you prefer and we're done!
I hope you enjoyed this tutorial and found it easy to follow.
Subscribe to:
Post Comments (Atom)


0 comments:
Post a Comment