Labels ♥
- AIL (4)
- AmyMarie (1)
- Angela Newman (1)
- Anna Marine (1)
- AOG (1)
- ArtisticRealityTalent (2)
- Autumn (2)
- Awards (1)
- Barbara Jensen (1)
- BCA (1)
- ByWendyG (2)
- CamillaDrakenborg (2)
- CDO (14)
- Charles Bristow (1)
- Cinnamon Scraps (1)
- Cluster Frames (2)
- Collab Tag Templates (2)
- Crowe (3)
- CuteLoot (1)
- Designs By Sarah (1)
- Ditzy Dezigns (1)
- Easter (1)
- Eclipsy. GrnIz Dezinez (2)
- Elias Chatzoudis (4)
- Enamorte (2)
- Enys Guerrero (1)
- Fall (1)
- Forum Set (1)
- Foxy Designz (3)
- Freya Langford-Sidebottom Freya Langford-Sidebottom (1)
- FTU Tags (7)
- FTU Tutorials (15)
- Gaetano Di Falco (1)
- Garv (1)
- GeminiCreationz (1)
- GothicInspirations (1)
- Gothique Starr (3)
- GraphFreaks (1)
- GrnIz Dezinez (8)
- Grunge-Glitter (1)
- Hungry Hill (2)
- Indie-Zine (1)
- Inzpired Creationz (1)
- Irish Princess Designs (1)
- Jackie's Jewels (5)
- JoseCano (1)
- Keith Garvey (4)
- KiwiFireStorm (3)
- LexisCreationz (3)
- Misc. (3)
- My Tubed Art (3)
- O'ScrapCandyShack (5)
- PFD (1)
- PFD. Wendy Gerber (2)
- PicsforDesign (3)
- Pimpin' PSPers Warehouse (1)
- Pink (1)
- PMTwS (8)
- PTE (41)
- PTU Tags (33)
- PTU Tutorials (90)
- PurplesKreationz (3)
- Rabid Designz (4)
- Rac (13)
- Ricky Fang (1)
- Robert Alvarado (1)
- Roman Zaric (1)
- Roo (2)
- Sale (1)
- Sam'sScraps (1)
- ScrappinKrazyDesigns (1)
- Scraps and the City (1)
- ScrapsNCompany (1)
- Sherri Baldy (1)
- Snags (31)
- Spring (2)
- St.Patricks Day (2)
- Steve Baier (1)
- Tag Show Off (6)
- Tag Show off using my tutorials (1)
- Tag Templates (11)
- TaggersArt (1)
- TaggersDelight (1)
- Tags (2)
- Tashas Playground (18)
- TeaserTag (1)
- The PSP Project (20)
- TheARTofGiving (1)
- TimeThief (1)
- Tony Mauro (1)
- TonyT (3)
- Toxic Desirez (1)
- Tutorials (2)
- Tyger's Tidbits (1)
- UpYourArt (15)
- ValentinesDay (1)
- Verymany (5)
- Wendy Gerber (4)
- Wicked Princess Scraps (11)
- wordart (1)
- Xketch (1)
- ZlataM (3)
Powered by Blogger.
Sunday, January 13, 2013
Breathe Me
*Click the tag for full view*
This tutorial was written by Brunette on January 5th 2013.
Any similarity to any other tutorial is purely coincidental.
Do not copy and paste my tutorials or claim as your own you may link to them for group challenges.
What you'll need:
You'll need a tube of choice I am using a gorgeous tube by Irene Shpak. Which I purchased at My PSP tubes. I am unaware if she is currently selling anywhere.
A gorgeous PTU kit by Tasha's Playground called Breathe Mewhich you can find out where to purchase this kit HERE.
Be sure to check out ALL her other awesome kits!
Fonts of choice - I am using a pixel font for the copyright and Cherish for the name.
Mask of choice - mine is from Gem's Taggin Scraps which you can find HERE.
Leave some love when you download!
I used mask 116.
Eye Candy 4000 - Gradient Glow (Optional)
Ready?
Let's get started!
Open up a 600x600 canvas we can always re-size/crop later.
Open up frame 6 from the kit copy and paste it as a new layer onto your canvas. Open up paper 2 from the kit copy and paste it as a new layer and move it below the frame layer. Then take your magic wand and click inside the frame then go to selections-modify-expand by 2 then back to selections-invert and click on your paper layer then hit delete. DO NOT deslect yet. Copy and paste your tube as a new layer mine is only part of a tube so I did this then hit delete. Duplicate the tube change the blend mode of the original tube layer to Luminance L and change the blend mode of the duplicated tube layer to soft light then go to adjust-blur-gaussian blur set to 3.
Add the light burst element from the kit below the tube layers and duplicate.
Add the stone path from the kit to the bottom of your tag move it so its below the frame layer but you can still see it.
Open sparkle 2 from the kit and place it on top of the tube layers.
Now we're going to decorate the frame!
Open up the Clock,flowers,books, ballet shoes and candle 2 from the kit.
Copy and paste the books as a new layer place them to the bottom right of your frame re-size them so they fit nicely then copy and paste the ballet shoes on top of the books again re-sizing them so they fit nicely.
Copy and paste the clock as a new layer and place it on the left side bottom of the frame re-sizing it so it fit nicely. Along with the candle.
The flowers you'll have to mirror and flip them then arrange them over the rest thats already there on the bottom left of the frame.
Add a drop shadow to everything except the burst and sparkles of course.
My settings were
H 0
V 0
Opacity 50
Blur 5.00
Color Black
Open up paper 9 from the kit copy and paste it as a new layer below the frame and add your mask then merge group.
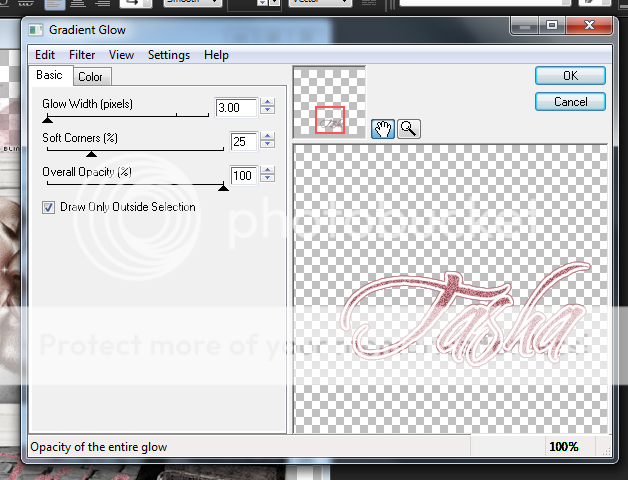
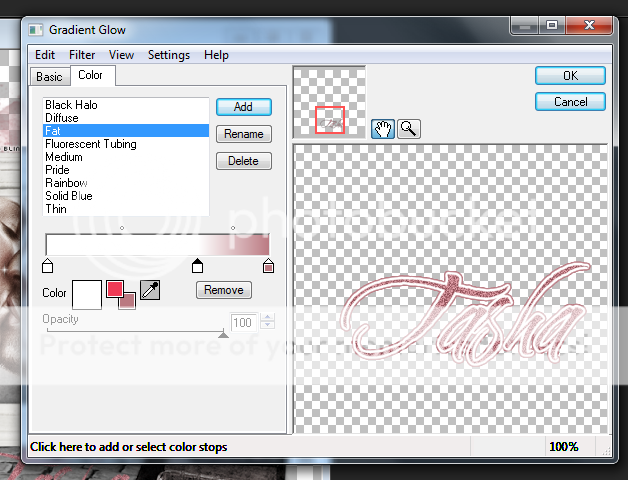
Now in a font and color of choice add your name then apply the following gradient glow. I also added a little bit of noise to the name before adding the gradient glow. Then apply your drop shadow changing the H&V to 1.
Finally add your copyright and license number if applicable save as png or jpeg whichever you prefer and we're done!
I hope you enjoyed this tutorial and found it easy to follow.
I would LOVE to see your results to any tutorials that you do, you can email results to me or post them on my page on face-book if you have a face-book account.
Labels:
PTU Tutorials,
Tashas Playground
Subscribe to:
Post Comments (Atom)


0 comments:
Post a Comment