Labels ♥
- AIL (4)
- AmyMarie (1)
- Angela Newman (1)
- Anna Marine (1)
- AOG (1)
- ArtisticRealityTalent (2)
- Autumn (2)
- Awards (1)
- Barbara Jensen (1)
- BCA (1)
- ByWendyG (2)
- CamillaDrakenborg (2)
- CDO (14)
- Charles Bristow (1)
- Cinnamon Scraps (1)
- Cluster Frames (2)
- Collab Tag Templates (2)
- Crowe (3)
- CuteLoot (1)
- Designs By Sarah (1)
- Ditzy Dezigns (1)
- Easter (1)
- Eclipsy. GrnIz Dezinez (2)
- Elias Chatzoudis (4)
- Enamorte (2)
- Enys Guerrero (1)
- Fall (1)
- Forum Set (1)
- Foxy Designz (3)
- Freya Langford-Sidebottom Freya Langford-Sidebottom (1)
- FTU Tags (7)
- FTU Tutorials (15)
- Gaetano Di Falco (1)
- Garv (1)
- GeminiCreationz (1)
- GothicInspirations (1)
- Gothique Starr (3)
- GraphFreaks (1)
- GrnIz Dezinez (8)
- Grunge-Glitter (1)
- Hungry Hill (2)
- Indie-Zine (1)
- Inzpired Creationz (1)
- Irish Princess Designs (1)
- Jackie's Jewels (5)
- JoseCano (1)
- Keith Garvey (4)
- KiwiFireStorm (3)
- LexisCreationz (3)
- Misc. (3)
- My Tubed Art (3)
- O'ScrapCandyShack (5)
- PFD (1)
- PFD. Wendy Gerber (2)
- PicsforDesign (3)
- Pimpin' PSPers Warehouse (1)
- Pink (1)
- PMTwS (8)
- PTE (41)
- PTU Tags (33)
- PTU Tutorials (90)
- PurplesKreationz (3)
- Rabid Designz (4)
- Rac (13)
- Ricky Fang (1)
- Robert Alvarado (1)
- Roman Zaric (1)
- Roo (2)
- Sale (1)
- Sam'sScraps (1)
- ScrappinKrazyDesigns (1)
- Scraps and the City (1)
- ScrapsNCompany (1)
- Sherri Baldy (1)
- Snags (31)
- Spring (2)
- St.Patricks Day (2)
- Steve Baier (1)
- Tag Show Off (6)
- Tag Show off using my tutorials (1)
- Tag Templates (11)
- TaggersArt (1)
- TaggersDelight (1)
- Tags (2)
- Tashas Playground (18)
- TeaserTag (1)
- The PSP Project (20)
- TheARTofGiving (1)
- TimeThief (1)
- Tony Mauro (1)
- TonyT (3)
- Toxic Desirez (1)
- Tutorials (2)
- Tyger's Tidbits (1)
- UpYourArt (15)
- ValentinesDay (1)
- Verymany (5)
- Wendy Gerber (4)
- Wicked Princess Scraps (11)
- wordart (1)
- Xketch (1)
- ZlataM (3)
Powered by Blogger.
Saturday, October 13, 2012
Autumn's Kiss
*Click the tag for full view*
This tutorial was written by Brunette on October 13th 2012.
Any similarity to any other tutorial is purely coincidental.
Do not copy and paste my tutorials or claim as your own you may link to them for group challenges.
What you'll need:
You'll need a tube of choice I am using a gorgeous tube by Enamorte. You can purchase at Creative Design Outlet HERE.
Check out the rest of the beautiful artwork they have while you're there.
A gorgeous PTU kit by Tasha's Playground called Autumn's Kiss which you can find out where to purchase this kit HERE.
Be sure to check out ALL her other awesome kits!
Fonts of choice - I am using a pixel font for the copyright and Desyrel for the name.
Mask of choice - mine is from Gems Taggin' Scraps which you can find HERE.
I used mask number 160.
Leave some love when you download!
Eye Candy 4000 - Gradient Glow (Optional)
Loka's Software - 3D Shadow (Optional)
Ready?
Let's get started!
Open up a 700x700 canvas we can always re-size/crop later.
I like my tags BIG LOL.
Open up the window element from the kit copy and paste it as a new layer re-size it if you need to so it fits nicely. Take your magic wand and click inside the square then go to selections-modify-expand by 3 and add a new layer open up a paper of choice I used paper 9 copy and paste it INTO the selection then move it down below the sqaure. Now you can copy and paste your tube in the square as a new layer then go to selections-invert and hit delete. Change the blend mode of the tube layer to soft light, duplicate it then duplicate it again and change the blend mode of that layer to screen. I used the clock element over the tube and changed the blend mode to soft light and duplicate it.
Add the tree element on each side of the window re-sizing them so they fit there nicely.
Next open up mushroom 1 element re-size it so it fits nicely near the bottom left of the tag. Do the same with the basket element mirror it though. Then add the squirrel on top of it re-sizing it so it fit nicely.
Using the red flowers element copy and paste them as a new layer re-size them so they fit nicely and arrange one on one side of the tag and then duplicate and mirror it arrange it on the other side.
Open up the wheelbarrow element copy and paste it as a new layer mirror it then re-size it so it fits nicely arrange it to the right of your tag then add the rabbit on top of it again re-sizing so it fits there nicely.
Now go through and add a drop shadow to everything BUT the frame and the trees. I used H 1 V2 Opacity 60 Blur 4.00 Color Black.
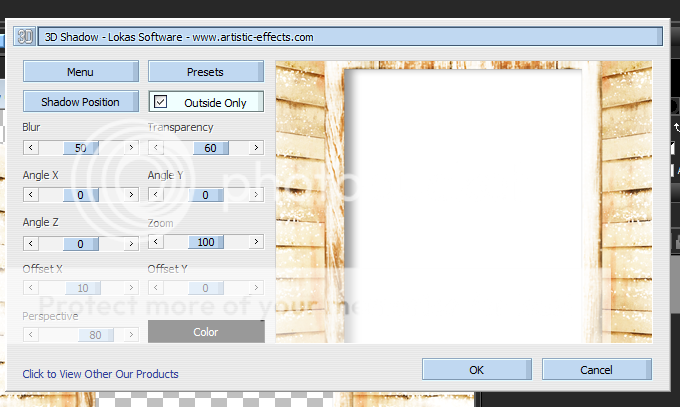
On the window layer we're going to use Loka's Software - 3D Shadow the settings that I used are shown in the screen-shot below.
Copy and paste your tube as a new layer arrange it to your liking and add the same drop shadow you used for the window layer.
Open up paper 7 from the kit copy and paste it as a new layer and apply your mask then merge group. Arrange it to your liking then duplicate and mirror it.
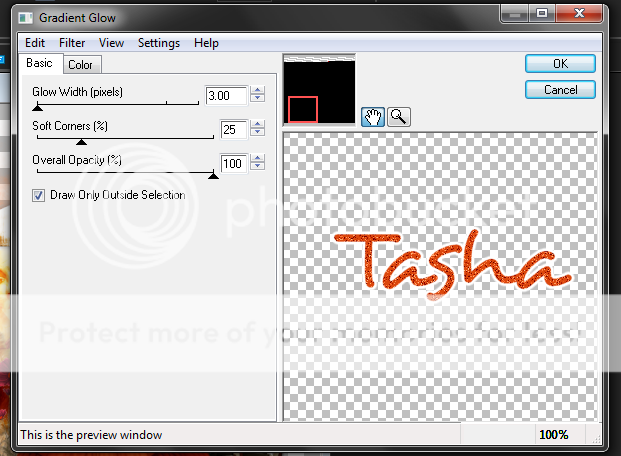
In your font and color of choice add your name then go to adjust-add/remove noise-add noise-random and monochrome checked and the precentage at 36. Then add a gradient glow my settings shown below. Add the same drop shadow as earlier H 1 V2 Opacity 60 Blur 4.00 Color Black then change the blend mode to hard light.
Finally add your copyright and license number if applicable save as png or jpeg whichever you prefer and we're done!
I hope you enjoyed this tutorial and found it easy to follow.
I would LOVE to see your results to any tutorials that you do, you can email results to me or post them on my page on face-book if you have a face-book account.
Labels:
CDO,
PTU Tutorials,
Tashas Playground
Subscribe to:
Post Comments (Atom)


0 comments:
Post a Comment