


Saturday, July 7, 2012
Get Bent!

*Click the tag for full view*
This tutorial was written by Brunette on July 7th 2012.
Any similarity to any other tutorial is purely coincidental.
Do not copy and paste my tutorials or claim as your own you may link to them for group challenges.
What you'll need:
You'll need a tube of choice I am using a gorgeous tube by Gothique Starr which you can purchase at The PSP Project HERE.
Be sure to check out all the other great artists there!
An awesome kit by Roo called Get Bent. You can purchase this kit at The PSP Project HERE.
Be sure to check out ALL her other awesome kits!
Fonts of choice - I am using a pixel font for the copyright and Calvin and Hobbes for the name.
Xero -Fritillary
Eye Candy 4000 - Gradient Glow
Ready?
Let's get started!
Open up a 700X700 canvas, we can always re-size/crop later.
I like BIG tags LOL.
Open up element 27 from the kit which is a frame copy and paste it as a new layer onto your canvas, re-size it a little if it doesn't fit how you like. Now open up two papers of choice I used paper 9 and 10. Copy and paste one paper I used paper 9 move it below the frame now take your eraser tool and erase all the paper outside of the inner circle of the frame. Now do the same thing with the other paper but make sure its in the second circle in the frame and erase everywhere else. Then apply Xero-Fritillary to both paper layers, just play around with your settings until you get something you like, I just hit random a bunch of times until I liked what I had.
Next open up element 43 copy and paste it onto the first paper you did re-size it if you need to.
Open up element 5 which is a CUTE cupcake, copy and paste it as a new layer and place it to the bottom left of the tag re-size it so it fits nicely.
Open up the Get Bent word-art copy and paste it onto your canvas arrange and re-size it to your liking and add a gradient glow and a drop shadow. My settings shown below.
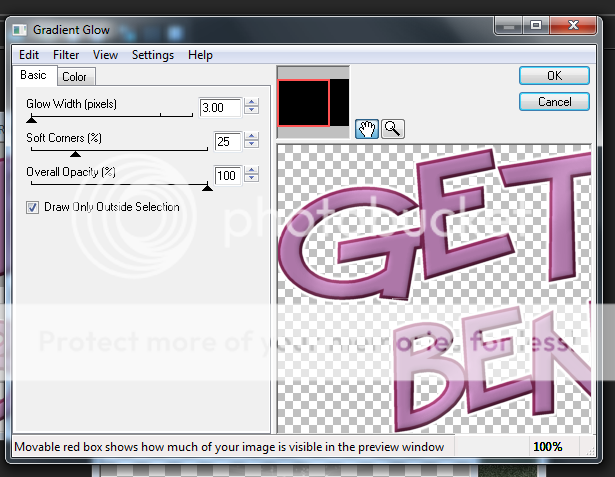

H 2
V 2
Opacity 60
Blur 4.00
Color: Black
Open up element one which is a skull bat copy and paste it as a new layer onto your canvas re-size it and place it near the top right of your frame.
I also used element 29 which is gorgeous scatterd sparkles of some sort lol copy and paste them as a new layer re-size them so they fit nicely move them BELOW the frame layer arrange them to one side of the tag duplicate and mirror.
Copy and paste your tube as a new layer duplicate your tube and change the blend mode to soft light lower the opacity to 63 aslo add a gaussian blur of 3.00. You can find that under adjust-blur in the psp tools.
Add your name in your font and color of choice then go to selections-select all-float-defloat-modify and expand by 2 add a new layer flood fill it with white or a color of choice then add some noise by going to adjust-add/remove noise-add noise uniform checked, 35% noise and monochrome checked. DO NOT deslect yet go to modify and expand by 2 again add a new layer and flood fill with the color you used for your name move it below all the name layers and add a drop shadow.
Here are the settings I used
H 2
V 2
Opacity 60
Blur 4.00
Color Black
Finally add your copyright and license number if applicable save as png or jpeg whichever you prefer and we're done!
I hope you enjoyed this tutorial and found it easy to follow.
I would LOVE to see your results to any tutorials that you do, you can email results to me or post them on my page on facebook if you have a facebook account.
Subscribe to:
Post Comments (Atom)


0 comments:
Post a Comment