


Sunday, January 13, 2013
Breathe Me

*Click the tag for full view*
This tutorial was written by Brunette on January 5th 2013.
Any similarity to any other tutorial is purely coincidental.
Do not copy and paste my tutorials or claim as your own you may link to them for group challenges.
What you'll need:
You'll need a tube of choice I am using a gorgeous tube by Irene Shpak. Which I purchased at My PSP tubes. I am unaware if she is currently selling anywhere.
A gorgeous PTU kit by Tasha's Playground called Breathe Mewhich you can find out where to purchase this kit HERE.
Be sure to check out ALL her other awesome kits!
Fonts of choice - I am using a pixel font for the copyright and Cherish for the name.
Mask of choice - mine is from Gem's Taggin Scraps which you can find HERE.
Leave some love when you download!
I used mask 116.
Eye Candy 4000 - Gradient Glow (Optional)
Ready?
Let's get started!
Open up a 600x600 canvas we can always re-size/crop later.
Open up frame 6 from the kit copy and paste it as a new layer onto your canvas. Open up paper 2 from the kit copy and paste it as a new layer and move it below the frame layer. Then take your magic wand and click inside the frame then go to selections-modify-expand by 2 then back to selections-invert and click on your paper layer then hit delete. DO NOT deslect yet. Copy and paste your tube as a new layer mine is only part of a tube so I did this then hit delete. Duplicate the tube change the blend mode of the original tube layer to Luminance L and change the blend mode of the duplicated tube layer to soft light then go to adjust-blur-gaussian blur set to 3.
Add the light burst element from the kit below the tube layers and duplicate.
Add the stone path from the kit to the bottom of your tag move it so its below the frame layer but you can still see it.
Open sparkle 2 from the kit and place it on top of the tube layers.
Now we're going to decorate the frame!
This tutorial was written by Brunette on January 5th 2013.
Any similarity to any other tutorial is purely coincidental.
Do not copy and paste my tutorials or claim as your own you may link to them for group challenges.
What you'll need:
You'll need a tube of choice I am using a gorgeous tube by Irene Shpak. Which I purchased at My PSP tubes. I am unaware if she is currently selling anywhere.
A gorgeous PTU kit by Tasha's Playground called Breathe Mewhich you can find out where to purchase this kit HERE.
Be sure to check out ALL her other awesome kits!
Fonts of choice - I am using a pixel font for the copyright and Cherish for the name.
Mask of choice - mine is from Gem's Taggin Scraps which you can find HERE.
Leave some love when you download!
I used mask 116.
Eye Candy 4000 - Gradient Glow (Optional)
Ready?
Let's get started!
Open up a 600x600 canvas we can always re-size/crop later.
Open up frame 6 from the kit copy and paste it as a new layer onto your canvas. Open up paper 2 from the kit copy and paste it as a new layer and move it below the frame layer. Then take your magic wand and click inside the frame then go to selections-modify-expand by 2 then back to selections-invert and click on your paper layer then hit delete. DO NOT deslect yet. Copy and paste your tube as a new layer mine is only part of a tube so I did this then hit delete. Duplicate the tube change the blend mode of the original tube layer to Luminance L and change the blend mode of the duplicated tube layer to soft light then go to adjust-blur-gaussian blur set to 3.
Add the light burst element from the kit below the tube layers and duplicate.
Add the stone path from the kit to the bottom of your tag move it so its below the frame layer but you can still see it.
Open sparkle 2 from the kit and place it on top of the tube layers.
Now we're going to decorate the frame!
Open up the Clock,flowers,books, ballet shoes and candle 2 from the kit.
Copy and paste the books as a new layer place them to the bottom right of your frame re-size them so they fit nicely then copy and paste the ballet shoes on top of the books again re-sizing them so they fit nicely.
Copy and paste the clock as a new layer and place it on the left side bottom of the frame re-sizing it so it fit nicely. Along with the candle.
The flowers you'll have to mirror and flip them then arrange them over the rest thats already there on the bottom left of the frame.
Add a drop shadow to everything except the burst and sparkles of course.
My settings were
H 0
V 0
Opacity 50
Blur 5.00
Color Black
Open up paper 9 from the kit copy and paste it as a new layer below the frame and add your mask then merge group.
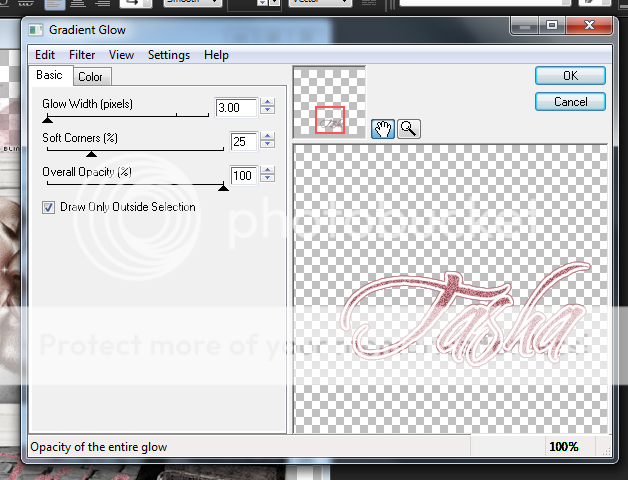
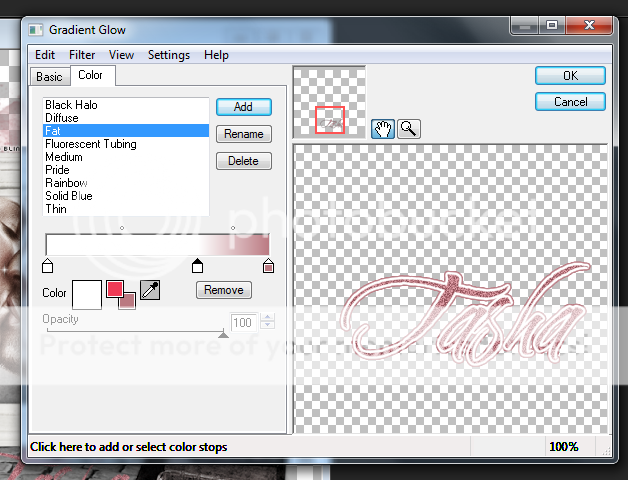
Now in a font and color of choice add your name then apply the following gradient glow. I also added a little bit of noise to the name before adding the gradient glow. Then apply your drop shadow changing the H&V to 1.
Finally add your copyright and license number if applicable save as png or jpeg whichever you prefer and we're done!
I hope you enjoyed this tutorial and found it easy to follow.
I would LOVE to see your results to any tutorials that you do, you can email results to me or post them on my page on face-book if you have a face-book account.
Friday, January 11, 2013
Rac Valentine Snags!
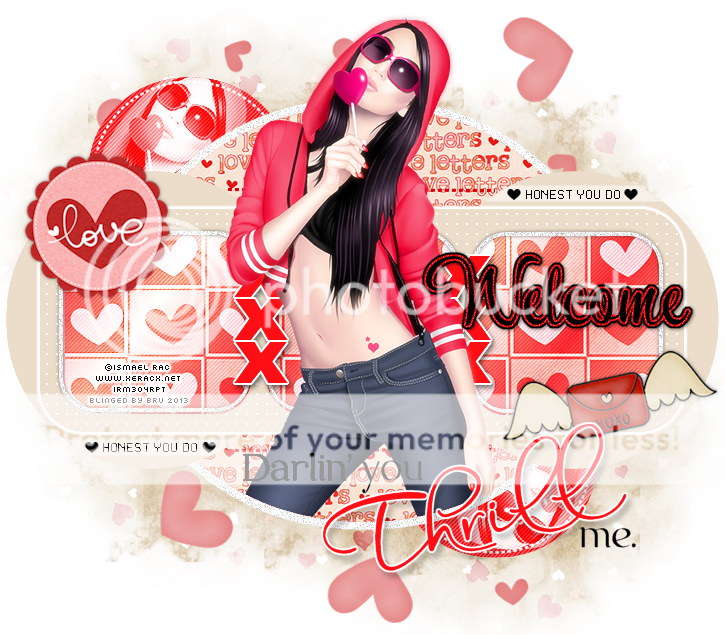
Here are some snags for you using one of my favorite tubes my Ismael Rac called Cool Valentine and you can purchase her and MANY other gorgeous Rac tubes HERE.
Enjoy these snags!
Please click for FULL view and please save them to your computer for use.


Saturday, January 5, 2013
Purgatory

*Click the tag for full view*
This tutorial was written by Brunette on January 5th 2013.
Any similarity to any other tutorial is purely coincidental.
Do not copy and paste my tutorials or claim as your own you may link to them for group challenges.
What you'll need:
You'll need a tube of choice I am using a gorgeous tube by Gaetano Di Falco. You can purchase at his art for tags at Creative Design Outlet HERE.
Check out the rest of the beautiful artwork there.
A gorgeous PTU kit by Tasha's Playground called Vamp/Goth which you can find out where to purchase this kit HERE.
Be sure to check out ALL her other awesome kits!
Fonts of choice - I am using a pixel font for the copyright and Kingthings Pique'n'meex for the name.
Mask of choice - mine is from Moonbeams and Spiderwebs which you can find HERE.
Leave some love when you download!
I used mask 21.
Ready?
Let's get started!
Open up a 600x600 canvas we can always re-size/crop later.
Open up frame 1 from the kit, copy and paste it as a new layer onto your canvas then go to image-free rotate and rotate the frame 90 degrees doesn't matter if its to the left or right.
Now take your magic wand and click inside the frame then go to selections-modify-expand by 3 add a new layer then open up a paper of choice I used paper 7 copy it then paste it INTO the selection move it below the frame layer. Copy and paste your close up tube or tube as a new layer arrange it to your liking under the frame layer then go to selections-invert and hit delete. Open up another paper of choice I used paper 4 copy and paste it as a new layer above the tube you just did and then hit delete then go to selections-select none. Duplicate your tube layer and move it above the paper we just added. Change the blend mode of the original tube layer to Luminance L the paper layer to soft light and the top tube layer to screen then go to adjust-blur-gaussian blur set to 3. Add a drop shadow to your frame I used V 1 H 1 Opacity 50 Blur 5.00 Color Black.
Open up the glass element from the kit copy and paste it as a new layer on top of your tube in the frame. Re-size it so it fits there nicely then lower the opacity to about 66. Open up the cemetary element and do the same thing except don't lower the opacity but add a drop shadow of V 1 H 1 Opacity 50 Blur 5.00 Color Black. Open up the moon element copy and paste it as a new layer arrange it to your liking and re-size it so it fits there nicely. I also used the coffin under my main tube sort of made her look like shes sitting on it.
Open up another paper of choice I used paper 5 copy and paste it as a new layer move it below the frame and everything else. Apply your mask then merge group.
Add your name in a font and color of choice. Then to go selections-select all-float-defloat-modify and expand by 2 add a new layer and flood fill with a color of choice. Move that layer below the original text layer then go to modify and expand by 2 add another new layer and flood fill with the original color of the text. Move that layer below all the text layers. Now I added noise to the middle layer by going to adjust-add/remove noise-add noise uniform and monochrome checked and at 50%. Add the same drop shadow you used above to the bottom layer of the text. Merge your layers of text from top to bottom together then change the blend mode of to hardlight and duplicate it.
Finally add your copyright and license number if applicable save as png or jpeg whichever you prefer and we're done!
I hope you enjoyed this tutorial and found it easy to follow.
I would LOVE to see your results to any tutorials that you do, you can email results to me or post them on my page on face-book if you have a face-book account.
Thursday, January 3, 2013
Missing You
*Click the tag for full view*
This tutorial was written by Brunette on January 3rd 2013.
Any similarity to any other tutorial is purely coincidental.
Do not copy and paste my tutorials or claim as your own you may link to them for group challenges.
What you'll need:
You'll need a tube of choice I am using a gorgeous tube by Steve Baier. You can purchase at his art for tags at Up Your Art HERE.
Check out the rest of the beautiful artwork there.
A gorgeous PTU kit by Tasha's Playground called Midnight Kiss which you can find out where to purchase this kit HERE.
Be sure to check out ALL her other awesome kits!
Fonts of choice - I am using a pixel font for the copyright and Cezanne for the name.
Mask of choice - mine is from Moonbeams and Spiderwebs which you can find HERE.
Leave some love when you download!
I used mask 34.
Ready?
Let's get started!
Open up a 600x600 canvas we can always re-size/crop later.
Open up frame 4 from the kit copy and paste it as a new layer onto your canvas. Now take your tube or image copy and paste it as a new layer under the frame layer arrange it to your liking, then take your eraser tool and erase what overhangs the frame. Duplicate the tube or image and change the blend mode to soft light then go to adjust-blur-gaussian blur set to 3. Add a drop shadow to the frame I used
H 0
V 0
Opacity 60
Blur 4.00
Color Black
Take your magic wand and click inside the frame then go to selections-modify-expand by 3 then add a new layer, copy the paper then paste it INTO the selection. Move this layer below the tube/image layers. Change the bottom tube/image layer to Luminance L.
We can decorate a bit!
Open up the butterflies element copy and paste it as a new layer re-size it so it fits nicely and place it in the top right corner of the frame add the same drop shadow you used earlier. Then copy and paste the bling element behind the butterflies arrange it to your liking.
Next open up the heart element from the kit copy and paste it as a new layer re-size it so it fits nicely mirror it and place it near the bottom left of the frame arrange it to your liking.
Open up another paper from the kit I used paper 10 then add your mask and merge group. Arrange your mask layer to your liking.
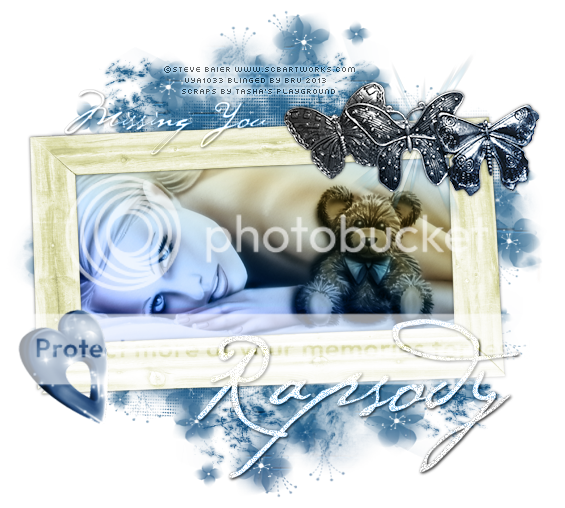
I added the words Missing You near the top left of the frame in white then applied the same drop shadow as we used earlier and changed the blend mode to luminance L. Repeat the same steps for your name but add some noise and use H 1 and V 1 for the drop shadow using the same blend mode as the words.
Finally add your copyright and license number if applicable save as png or jpeg whichever you prefer and we're done!
I hope you enjoyed this tutorial and found it easy to follow.
I would LOVE to see your results to any tutorials that you do, you can email results to me or post them on my page on face-book if you have a face-book account.
This tutorial was written by Brunette on January 3rd 2013.
Any similarity to any other tutorial is purely coincidental.
Do not copy and paste my tutorials or claim as your own you may link to them for group challenges.
What you'll need:
You'll need a tube of choice I am using a gorgeous tube by Steve Baier. You can purchase at his art for tags at Up Your Art HERE.
Check out the rest of the beautiful artwork there.
A gorgeous PTU kit by Tasha's Playground called Midnight Kiss which you can find out where to purchase this kit HERE.
Be sure to check out ALL her other awesome kits!
Fonts of choice - I am using a pixel font for the copyright and Cezanne for the name.
Mask of choice - mine is from Moonbeams and Spiderwebs which you can find HERE.
Leave some love when you download!
I used mask 34.
Ready?
Let's get started!
Open up a 600x600 canvas we can always re-size/crop later.
Open up frame 4 from the kit copy and paste it as a new layer onto your canvas. Now take your tube or image copy and paste it as a new layer under the frame layer arrange it to your liking, then take your eraser tool and erase what overhangs the frame. Duplicate the tube or image and change the blend mode to soft light then go to adjust-blur-gaussian blur set to 3. Add a drop shadow to the frame I used
H 0
V 0
Opacity 60
Blur 4.00
Color Black
Take your magic wand and click inside the frame then go to selections-modify-expand by 3 then add a new layer, copy the paper then paste it INTO the selection. Move this layer below the tube/image layers. Change the bottom tube/image layer to Luminance L.
We can decorate a bit!
Open up the butterflies element copy and paste it as a new layer re-size it so it fits nicely and place it in the top right corner of the frame add the same drop shadow you used earlier. Then copy and paste the bling element behind the butterflies arrange it to your liking.
Next open up the heart element from the kit copy and paste it as a new layer re-size it so it fits nicely mirror it and place it near the bottom left of the frame arrange it to your liking.
Open up another paper from the kit I used paper 10 then add your mask and merge group. Arrange your mask layer to your liking.
I added the words Missing You near the top left of the frame in white then applied the same drop shadow as we used earlier and changed the blend mode to luminance L. Repeat the same steps for your name but add some noise and use H 1 and V 1 for the drop shadow using the same blend mode as the words.
Finally add your copyright and license number if applicable save as png or jpeg whichever you prefer and we're done!
I hope you enjoyed this tutorial and found it easy to follow.
I would LOVE to see your results to any tutorials that you do, you can email results to me or post them on my page on face-book if you have a face-book account.
Wednesday, January 2, 2013
Tag Show Offs!
Firstly I want to apologize for no tags or creativeness on my part for awhile, I promise I kicked that in the butt and I am back LOL.
The first tag I have to show you is the January 2013 Desktop from Arthur Crowe which you can purchase HERE.
Here is what I came up with using the tube!

Another tag using an Arthur Crowe tube and a matching kit called Pinky Love which you can purchase HERE.

And one more tag using a Tony Tzanoukakis tube along with a kit that matches called Queen of Hearts which you can purchase HERE.

Autumn Fairy

*Click the tag for full view*
This tutorial was written by Brunette on January 2nd 2013.
Any similarity to any other tutorial is purely coincidental.
Do not copy and paste my tutorials or claim as your own you may link to them for group challenges.
What you'll need:
You'll need a tube of choice I am using a gorgeous tube by Elias Chatzoudis. You can purchase at his store HERE.
Check out the rest of his beautiful artwork.
A gorgeous PTU kit by Tasha's Playground called Autumn's Kiss which you can find out where to purchase this kit HERE.
Be sure to check out ALL her other awesome kits!
Fonts of choice - I am using a pixel font for the copyright and Desyrel for the name.
This tutorial was written by Brunette on January 2nd 2013.
Any similarity to any other tutorial is purely coincidental.
Do not copy and paste my tutorials or claim as your own you may link to them for group challenges.
What you'll need:
You'll need a tube of choice I am using a gorgeous tube by Elias Chatzoudis. You can purchase at his store HERE.
Check out the rest of his beautiful artwork.
A gorgeous PTU kit by Tasha's Playground called Autumn's Kiss which you can find out where to purchase this kit HERE.
Be sure to check out ALL her other awesome kits!
Fonts of choice - I am using a pixel font for the copyright and Desyrel for the name.
Mask of choice - mine is from Gems Taggin' Scraps which you can find HERE.
Leave some love when you download!
Eye Candy 4000 - Gradient Glow (Optional)
Ready?
Let's get started!
Open up a 700x700 canvas we can always re-size/crop later.
I like my tags BIG LOL.
Open up frame 2 from the kit copy and paste it as a new layer onto your canvas. Open up paper 9 from the kit copy and paste it as a new layer below the frame. Re-size it so it fits nicely and if any hangs over the frame use your eraser tool and erase what does. Copy and paste the closeup of the tube if you have one mirror it and place it below the frame layer as well. Repeat the eraser tool steps with the tube layer. Once you're done with that duplicate the tube layer change both tube layers blend mode to soft light.
Open up the leaf circle element copy and paste it as a new layer re-size it so it fits nicely arrange it to your liking. This layer should be ABOVE the frame layer. I also added the red flowers, the basket ,the first set of mushrooms and the bird, I arranged those to the right side bottom of the frame re-sizing them so they fit nicely.
Open up paper 4 from the kit copy and paste it as a new layer below the frame and apply your mask then merge group. Arrange your mask layer to your liking.
Copy and paste your tube as a new layer arrange her to your liking then duplicate change the blend mode of the duplicated layer to soft light then go to adjust-blur-gaussian blur set to 3. Then add a drop shadow on your original tube layer I used
H 1
V 1
Opacity 60
Blur 4.00
Color Black
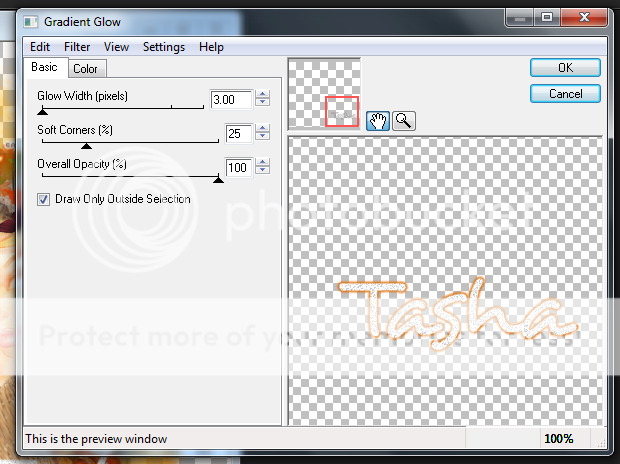
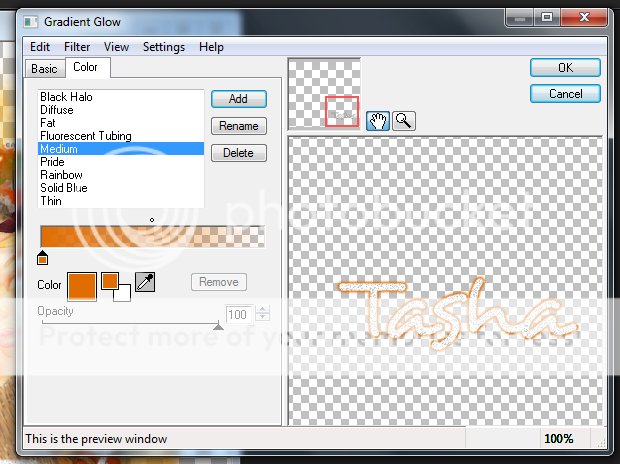
Add your name in a font and color of choice. I used white for my font color then added some noise and a light gradient glow my settings for the glow are shown in the screen-shot below. Apply the same drop shadow as you used earlier.
Finally add your copyright and license number if applicable save as png or jpeg whichever you prefer and we're done!
I hope you enjoyed this tutorial and found it easy to follow.
I would LOVE to see your results to any tutorials that you do, you can email results to me or post them on my page on face-book if you have a face-book account.
I hope you enjoyed this tutorial and found it easy to follow.
I would LOVE to see your results to any tutorials that you do, you can email results to me or post them on my page on face-book if you have a face-book account.
Forum Set Tutorial: Chained


*Click the tag for full view*
This tutorial was written by Brunette on January 2nd 2013.
Any similarity to any other tutorial is purely coincidental.
Do not copy and paste my tutorials or claim as your own you may link to them for group challenges.
What you'll need:
You'll need a tube of choice I am using a gorgeous tube by Tony Mauro which you can purchase at My Tubed Art HERE.
Be sure to check out all the other great artists there!
Fonts of choice - I am using a pixel font for the copyright and Mustang for the name.
This tutorial was written by Brunette on January 2nd 2013.
Any similarity to any other tutorial is purely coincidental.
Do not copy and paste my tutorials or claim as your own you may link to them for group challenges.
What you'll need:
You'll need a tube of choice I am using a gorgeous tube by Tony Mauro which you can purchase at My Tubed Art HERE.
Be sure to check out all the other great artists there!
Fonts of choice - I am using a pixel font for the copyright and Mustang for the name.
Mask of Choice
Ready?
Let's get started!
Open up a 650x250 transparent canvas copy and paste your IMAGE as a new layer. Move it to the far left or right your choice then duplicate and mirror it. Merge these two layers together then duplicate. Change the blend mode of the duplicated layer to soft light then go to adjust-blur-gaussian blur set to 3.
Open up a 650x250 transparent canvas copy and paste your IMAGE as a new layer. Move it to the far left or right your choice then duplicate and mirror it. Merge these two layers together then duplicate. Change the blend mode of the duplicated layer to soft light then go to adjust-blur-gaussian blur set to 3.
Now open a new canvas it doesn't really matter the size and flood fill with a color of choice one that matches your tag. Then apply your mask and merge group. Copy and paste it as a new layer onto your forum set above the duplicated copy and change the blend mode to screen and lower the opacity a little I put mine to 86.
Now copy and paste your tube as a new layer duplicate it change the blend mode to soft light and again add the gaussian blur the same settings as earlier. Apply a drop shadow I used
H 1
V 1
Opacity 60
Blur 4.00
Color Black
Now we're going to do the borders. Go to the very bottom layer of your canvas it should be blank click it then go to selections-modify-contract by 4 then invert add a new layer flood fill with a color of choice then add some noise if you like. Arrange this layer so its at the top of your layers. Repeat these steps but change the number you contract by to 2.
Add your name in your font and color of choice. Then to go selections-select all-float-defloat-modify and expand by 2 add a new layer and flood fill with a color of choice. Move that layer below the original text layer then go to modify and expand by 2 add another new layer and flood fill with the original color of the text. Move that layer below all the text layers. Now I added noise to the middle layer by going to adjust-add/remove noise-add noise uniform and monochrome checked and at 50%. Add the same drop shadow you used above to the bottom layer of the text.
Add your copyright and license number if applicable save as png or jpg whichever you prefer and we're done unless you do want to make the avatar too then keep reading!
Now for the avatar all I did was open up a new canvas 150x150 closed off the border layers and copyright layers on my banner then copy merged and pasted it as a new layer on the 150x150 canvas. Arrange it to your liking even re-size it a little if you want. Then again go to the bottom layer then go to selections-modify-contract by 4 then invert add a new layer and flood fill with the same color as you did on the banner. Arrange this layer so its at the top of your layers. Repeat these steps but change the number you contract by to 2.
Of course add your name or the first letter of your name it your full name won't fit then be sure to add your copyright info to your avatar as well.
I hope you enjoyed this tutorial and found it easy to follow.
I would LOVE to see your results to any tutorials that you do, you can email results to me or post them on my page on facebook if you have a facebook account.
Subscribe to:
Posts (Atom)


