


Wednesday, September 19, 2012
Harvest

*Click the tag for full view*
This tutorial was written by Brunette on September 19th 2012.
Any similarity to any other tutorial is purely coincidental.
Do not copy and paste my tutorials or claim as your own you may link to them for group challenges.
What you'll need:
You'll need a tube of choice I am using a gorgeous tube by Roman Zaric. You can purchase this tube at his store HERE.
A gorgeous kit by Ditzy Dezigns called Pumpkin Spice which you can purchase at Roman's store HERE.
You can get this gorgeous kit and tube together as a bundle for a great deal!
I also used a stock photo from morgue-file in the frame but you don't have to but if you do don't forget your credits. I just put photo courtesy of morguefile.
Eye Candy 4000 - Gradient Glow (Optional)
Fonts of choice - I am using a pixel font for the copyright and Origin for the name.
Ready?
Let's get started!
Open up a 700x700 canvas we can always re-size/crop later.
I like my tags BIG LOL.
Now from the kit open up frame 2 from the kit copy and paste it as a new layer re-size it if you need to. Now take your magic wand and click inside the frame open up paper 5 from the kit copy and paste it as a new layer then go to selections-invert and hit delete move this layer below the frame layer. Now if you're using a photo you're going to do the same thing then you can select none. Change the blend mode of the photo layer if you have one to screen duplicate and change the blend mode to soft light.
Still on your frame layer go to selections-select all-float-defloat-modify-expand by 3 add a new layer and flood fill with a color of choice then go to adjust-add/remove noise-add noise- random checked as well as monochrome and noise at 36%. Move this layer below the frame layer then add a drop shadow of H 0 V 0 Opacity 60 Blur 4.00 Color Black.
Take the fence element from the kit copy and paste it as a new layer re-size it a little to fit nicely and place it above the glitter frame we just did but under the original frame layer. Duplicate and mirror if you re-sized it quite small, we want it to fit along the whole bottom of the frame.
Take the wooden sign element from the kit copy and paste it as a new layer and re-size it to fit nicely move it to the left of your tag under the fence you just added. Now in a font of choice write some words on the parts of the sign that point in different directions.
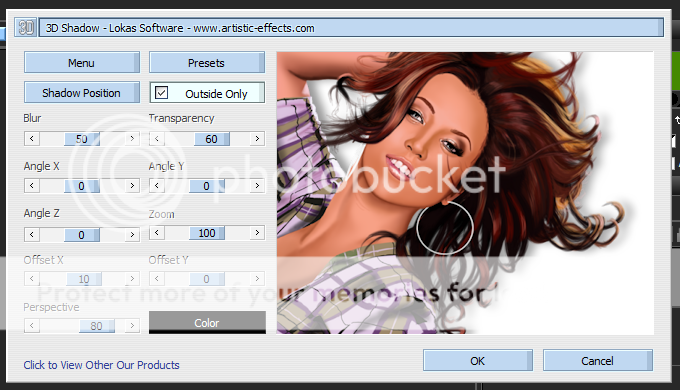
Copy and paste your tube as a new layer re-size it to your liking and arrange it where you want it. Duplicate it then go adjust-blur-gaussian blur at 5 and change the blend mode to soft light. Add a drop shadow to your bottom tube layer I used Lokas Software 3D shadow. Settings shown in the screen-shot below.
This tutorial was written by Brunette on September 19th 2012.
Any similarity to any other tutorial is purely coincidental.
Do not copy and paste my tutorials or claim as your own you may link to them for group challenges.
What you'll need:
You'll need a tube of choice I am using a gorgeous tube by Roman Zaric. You can purchase this tube at his store HERE.
A gorgeous kit by Ditzy Dezigns called Pumpkin Spice which you can purchase at Roman's store HERE.
You can get this gorgeous kit and tube together as a bundle for a great deal!
I also used a stock photo from morgue-file in the frame but you don't have to but if you do don't forget your credits. I just put photo courtesy of morguefile.
Eye Candy 4000 - Gradient Glow (Optional)
Fonts of choice - I am using a pixel font for the copyright and Origin for the name.
Ready?
Let's get started!
Open up a 700x700 canvas we can always re-size/crop later.
I like my tags BIG LOL.
Now from the kit open up frame 2 from the kit copy and paste it as a new layer re-size it if you need to. Now take your magic wand and click inside the frame open up paper 5 from the kit copy and paste it as a new layer then go to selections-invert and hit delete move this layer below the frame layer. Now if you're using a photo you're going to do the same thing then you can select none. Change the blend mode of the photo layer if you have one to screen duplicate and change the blend mode to soft light.
Still on your frame layer go to selections-select all-float-defloat-modify-expand by 3 add a new layer and flood fill with a color of choice then go to adjust-add/remove noise-add noise- random checked as well as monochrome and noise at 36%. Move this layer below the frame layer then add a drop shadow of H 0 V 0 Opacity 60 Blur 4.00 Color Black.
Take the fence element from the kit copy and paste it as a new layer re-size it a little to fit nicely and place it above the glitter frame we just did but under the original frame layer. Duplicate and mirror if you re-sized it quite small, we want it to fit along the whole bottom of the frame.
Take the wooden sign element from the kit copy and paste it as a new layer and re-size it to fit nicely move it to the left of your tag under the fence you just added. Now in a font of choice write some words on the parts of the sign that point in different directions.
Copy and paste your tube as a new layer re-size it to your liking and arrange it where you want it. Duplicate it then go adjust-blur-gaussian blur at 5 and change the blend mode to soft light. Add a drop shadow to your bottom tube layer I used Lokas Software 3D shadow. Settings shown in the screen-shot below.
Take the Harvest word-art from the kit copy and paste it as a new layer re-size it a little to fit nicely and move it at the bottom of your tag near the center and add a drop shadow same one we used earlier for the glitter frame.
I used the acorn cluster and watering can combo elements from the kit on each side of the word-art re-size them so they fit there nicely and add the same drop shadow as earlier.
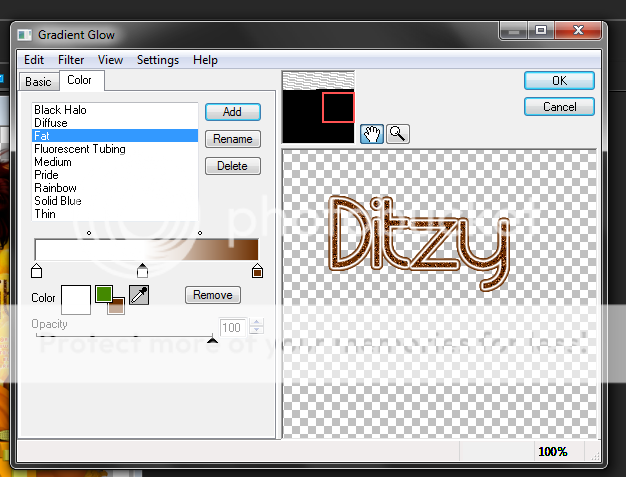
Now in your font and color of choice add your name then go to adjust-add/remove noise-add noise- random checked as well as monochrome and noise at 36% then add a gradient glow settings shown in the screen-shot below. Add a drop shadow of H 2 V 2 Opacity 60 Blur 4.00 Color Black.

Finally add your copyright and license number if applicable save as png or jpeg whichever you prefer and we're done!
I hope you enjoyed this tutorial and found it easy to follow.
I would LOVE to see your results to any tutorials that you do, you can email results to me or post them on my page on facebook if you have a facebook account.
Subscribe to:
Post Comments (Atom)


0 comments:
Post a Comment