


Saturday, November 20, 2010
Pink Angel

You'll need a tube of choice I am using the gorgeous art of Keith Garvey you can purchase his art to use for tags MPT.
Font of choice
Mask of choice
Eye Candy 4000 - Gradient Glow
A kit of choice I am using a gorgeous kit by Cora over at Pimp my Tags with Scraps called Pink Holiday.
Ready?
Let's get started!
Make a new canvas 700 x 700 you can always crop/re-size later.
Open up a paper of choice from the kit I used paper 4 then add a mask of your choice. I duplicated my mask layer to make it a little darker but that is totally up to you.
Next open up the window from the kit paste it onto your canvas re-size it so it fits nicely. I added the wreath, and ribbon to the window to decorate it a little.
Open up the holiday cheer element from the kit, paste it as a new layer and move it below the window you can erase the parts that over hang past it with your eraser tool.
Next we're going to open up the tree from the kit paste it onto your canvas and re-size it so its fits nicely. I added one of the start elements from the kit at the top to make it look like a tree top.
Copy and paste your tube of choice then duplicate it change the blend mode to soft light and add a drop shadow to the original tube layer.
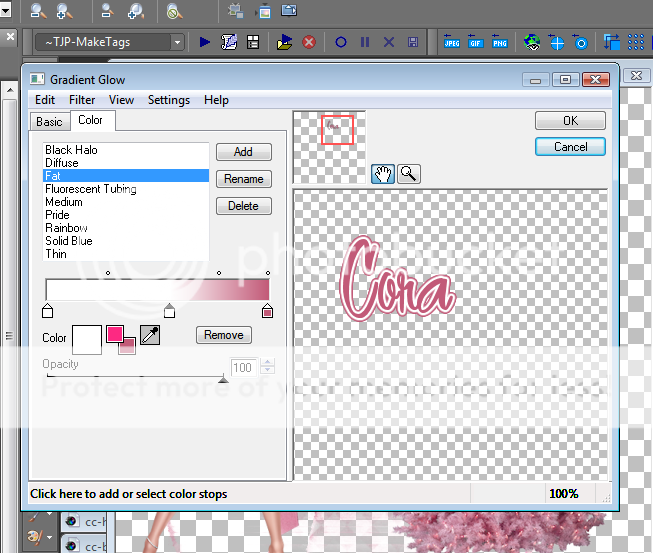
Add your name in a font of choice and add a gradient glow my settings are shown in the screen shot below.

Finally add your copyright and license number if applicable save as png or jpeg whichever you prefer and we're done!
I hope you enjoyed this tutorial and found it easy to follow.
Friday, November 19, 2010
Tag Ho Christmas

This tutorial was written by Brunette on November 19th 2010. Any similarity to any other tutorial is purely coincidental.
Do not copy and paste my tutorials or claim as your own you may link to them for group challenges.
You'll need a tube of choice I am using the gorgeous art of Keith Garvey you can purchase his art to use for tags MPT. This image was part of the FAB gift the artist at MPT put together for us this year. Thank you MPT and artists!
Font of choice
A kit of choice I am using a gorgeous collab kit by Sarah, Cora and TammyKat over at Pimp my Tags with Scraps called Naughty List.
Ready?
Let's get started!
Open up the template duplicate it close out the original. Delete the copright layer.
I closed out the gradient circle, black circle and text layers.
Select the gradient rectangle layer selections-select all-float-defloat and add a new layer flood fill with a color of choice. Add some noise and a drop shadow, close off the original rectangle layer.
Next open up the tree from Sarah's folder of the kit copy and paste it as a new layer and add a drop shadow. Open up the naughty list scroll re-size so if fits nicely and paste it as a new layer rotate it a little then add a drop shadow. I added one of the holly elements from Tammy's folder of the kit to the scroll and added a drop shadow. Decorate your tag how you see fit adding a drop shadow to whatever you add.
Next we're going to add our tube. Once you have the tube you want to use copy it then paste it as a new layer, move it below the tag ho xmas and ho ho ho layers. Then on the oval frame layer selections-select all-float-defloat back on the tube later delete the part that is in the frame itself with your eraser tool. Go back on the oval frame layer then selections-invert back on the tube later delete the parts that over hang the frame with your eraser tool. Duplicate the tube layer and change the blend mode of the top one to soft light and add a drop shadow to the original layer.
In a font of choice add your name I put it on the naughty list scroll to make it look like it was a name on the naughty list. I used the color white then added some noise and a drop shadow.
Add a new layer below the black circle layer either copy and paste a paper of flood fill with a color of choice and add a mask.
Finally add your copyright and license number if applicable save as png or jpeg whichever you prefer and we're done!
I hope you enjoyed this tutorial and found it easy to follow.
Friday, November 12, 2010
Tag Template
I LOVE Pink's new song Raise your Glass! While listening to it I got creative in PSP and here is the result lol. I hope its useful to you!
Enjoy!
You can get it here.

Monday, October 25, 2010
Tag Template
Its been awhile since I actually made a tag template lol.
So here is a new one I just finished and yep you guessed it I was listening to music! Music always inspires me when it comes to templates.
Anyway here it is I hope you find it useful!
Enjoy!

Wednesday, October 20, 2010
Playful Pumpkins

This tutorial was written by Brunette on October 20th 2010. Any similarity to any other tutorial is purely coincidental.
Do not copy and paste my tutorials or claim as your own you may link to them for group challenges.
You'll need a tube of choice I am using the gorgeous art of Scott Blair you can purchase his art to use for tags MPT.
Font of choice
A kit of choice I am using a gorgeous kit by Sarah over at Pimp my tags with Scraps called H A double L O double U double E N.
Ready?
Let's get started!
Open up the template I closed off the dotted squares layer. On the right circle layer selections-select all-float-defloat open up the spilled beads2 element from the kit re-size so it fits nicely in the circle then selections-invert and hit delete. Repeat the same steps for the left circle layer.
On the rectangle layer selections-select all-float-defloat copy and paste a paper of choice I used paper 8 from the kit then selections-invert and hit delete DO NOT deselect yet go back to selections-invert then modify-expand by 4 add a new raster layer and flood fill with a color of choice. Move this layer below the paper rectangle we have now add some noise effect to this then a drop shadow of choice.
Close off the left and right tone layers and the pumpkin layers. Merge the wordart layer and the wordart layer back together, then using your selection tool rectangle draw around one of them then go to Edit-cut select none, then copy and paste it where you want I put it in the orange rectangles, move the other one in the same place.
On the left and right square layers I added some weave to them, settings shown in the screenshot below.

On the circle 2 layer selections-select all-float-defloat open up a paper of choice I used paper 11 from the kit arrange how you want then selections-invert and hit delete. Close off the original circle layer. Change the blend mode of the pixel words layer to Luminance L.
Copy and paste your tube of choice then duplicate it, change the blend mode to soft light add a drop shadow of choice to the original layer.
Decorate your tag with elements from the kit. I used a cat and the spider but feel free to use what you think looks best for your tag.
In a font of choice add your name then selections-select all-float-defloat-modify-expand by 2 add a new layer flood fill with a color of choice and add some noise to it. Move this layer below your name and add a drop shadown of choice.
Finally add your copyright and license number if applicable save as png or jpeg whichever you prefer and we're done!
I hope you enjoyed this tutorial and found it easy to follow.
Save the Boobies

This tutorial was written by Brunette on October 20th 2010. Any similarity to any other tutorial is purely coincidental.
Do not copy and paste my tutorials or claim as your own you may link to them for group challenges.
You'll need a tube of choice I am using the gorgeous art of Ismael Rac you can purchase his art to use for tags at his store here. This tube happens to be a freebie! Thanks Ismael!
Eye Candy 4000 (optional)
Xero - Fritillary
Mask of choice
Font of choice
Template 36 by Deb here. Thank you Deb!
A kit of choice I am using a gorgeous kit by TammyKat over at Pimp my tags with Scraps called Feel Your Boobies.
Ready?
Let's get started!
Open up the template and on Raster 1 layer colorize it to a color that matches your tube.
Then on Raster layer 2 selections-select all-float-defloat copy and paste a paper of choice I used the ltpinkplain paper from the kit. Selections-invert and hit delete close off the original layer.
On Raster 4 layer selections-select all-float-defloat add a new layer and flood fill with a color of choice. Repeat for the copy of raster 4 layer, then add Xero Fritillary to both layers. I just hit random a few times until I got one that I liked.
I closed off Raster 3 layer and the copy of vector one layer.
Colorize Raster 6 to the same color as you did earlier to the oval.
Copy and paste your tube of choice duplicate it change the blend mode to soft light on the duplicate copy and add a drop shadow of choice to the original layer.
I used the metallicbow drk pink and the pink flower on the lower part of the tag re-sized them so they fit nicely.
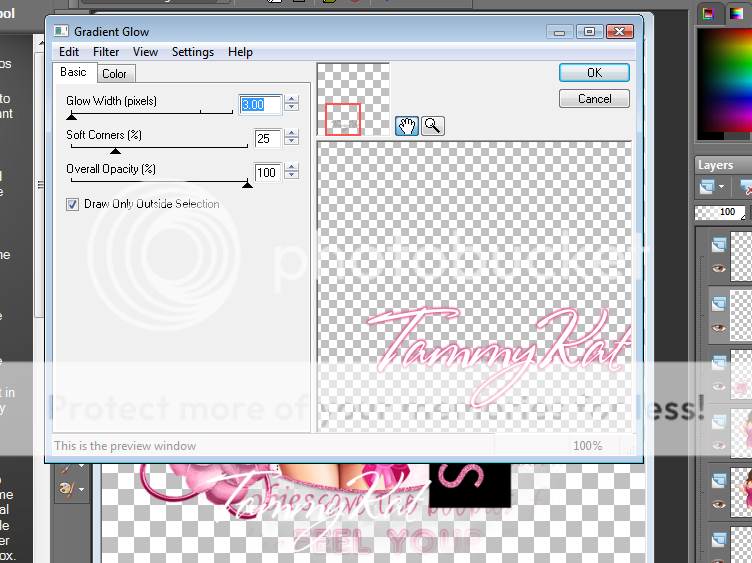
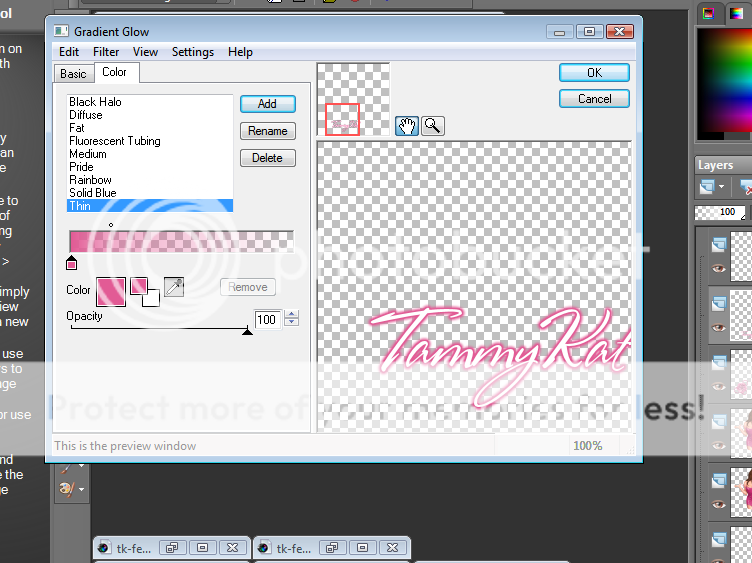
Add your name in a font of choice then add a gradient glow settings shown in the screen shot below, then add a drop shadow.

Open up another paper from the kit I used boobiepaper2 move it to the bottom of the template and add a mask of choice.
Finally add your copyright and license number if applicable save as png or jpeg whichever you prefer and we're done!
I hope you enjoyed this tutorial and found it easy to follow.
Sunday, October 3, 2010
Wicked Bitch

This tutorial was written by Brunette on October 3rd 2010. Any similarity to any other tutorial is purely coincidental.
Do not copy and paste my tutorials or claim as your own you may link to them for group challenges.
You'll need a tube of choice I am using the gorgeous art of Keith Garvey you can purchase his art to use for tags at MPT.
Eye Candy 4000 (optional)
Mura Meisters Copies
Mask of choice
Font of choice
Template 48 by Sapphy here. Thank you Sapphy!
A kit of choice I am using a gorgeous kit by Sarah over at Pimp my tags with Scraps called Sit a Spell.
Ready?
Let's get started!
Open up the template go to the Wickedest wordart layer selections-select all-float-defloat add a new raster layer and flood fill with a color of choice to match your tube. Select none, delete the original layer. Add a drop shadow to the glitter back layer.
On the small orange circle layer selections-select all-float-defloat flood fill with a color of choice then open up a paper of choice I used paper 10 from the kit. Paste as a new layer then selections-invert and hit delete. Change the blend mode to Luminance L and select none. Delete the original small circle layer.
On the back rectangle layers I added some words make sure you put the words in the center of the canvas. To do this go to objects-align-center in canvas then used Mura Meisters copies settings for the filter shown in the screen shot below. Then use you magic to select the rectangle the words are in then selections-invert making sure you are the words layer and hit delete. Then add your mask of choice. Repeat these steps for the other rectangle.

On the large orange circle layer selections-select all-float-defloat add a new raster layer and flood fill with a color of choice then open up a paper of choice I used paper 4 from the kit. Paste as a new layer then selections-invert and hit delete. Change the blend mode to Luminance L and select none.
On the orange glitter rectangle frame layer selections-select all-float-defloat flood fill with a color of choice add some noise and a drop shadow.
Colorize the mask layer to match your tube duplicate it and mirror or flip it and move it to another part of your canvas to make it show all over the tag.
Copy and paste your tube of choice duplicate and change the blend mode to soft light add a drop shadow to the original tube layer.
Open up whatever elements from your kit that you would like to decorate your tag with, I used the cauldron.
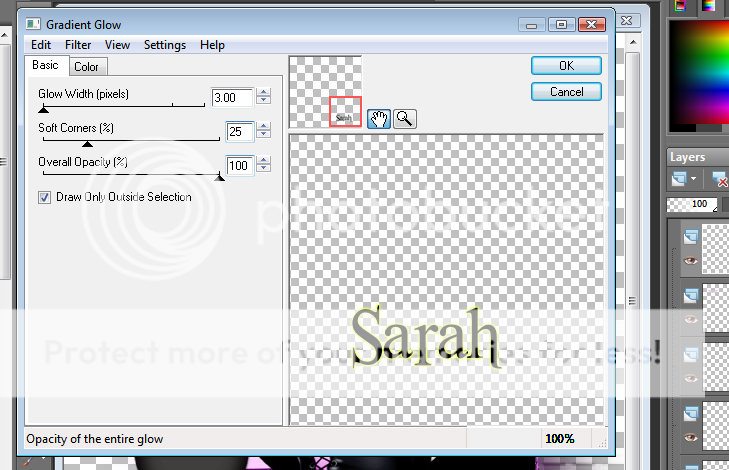
Add your name in a font of choice then add a gradient glow and a drop shadow of choice. My gradient glow settings are shown in the screenshot below.

Finally add your copyright and license number if applicable save as png or jpeg whichever you prefer and we're done!
I hope you enjoyed this tutorial and found it easy to follow.
Subscribe to:
Posts (Atom)


