


Wednesday, September 19, 2012
Harvest

*Click the tag for full view*
This tutorial was written by Brunette on September 19th 2012.
Any similarity to any other tutorial is purely coincidental.
Do not copy and paste my tutorials or claim as your own you may link to them for group challenges.
What you'll need:
You'll need a tube of choice I am using a gorgeous tube by Roman Zaric. You can purchase this tube at his store HERE.
A gorgeous kit by Ditzy Dezigns called Pumpkin Spice which you can purchase at Roman's store HERE.
You can get this gorgeous kit and tube together as a bundle for a great deal!
I also used a stock photo from morgue-file in the frame but you don't have to but if you do don't forget your credits. I just put photo courtesy of morguefile.
Eye Candy 4000 - Gradient Glow (Optional)
Fonts of choice - I am using a pixel font for the copyright and Origin for the name.
Ready?
Let's get started!
Open up a 700x700 canvas we can always re-size/crop later.
I like my tags BIG LOL.
Now from the kit open up frame 2 from the kit copy and paste it as a new layer re-size it if you need to. Now take your magic wand and click inside the frame open up paper 5 from the kit copy and paste it as a new layer then go to selections-invert and hit delete move this layer below the frame layer. Now if you're using a photo you're going to do the same thing then you can select none. Change the blend mode of the photo layer if you have one to screen duplicate and change the blend mode to soft light.
Still on your frame layer go to selections-select all-float-defloat-modify-expand by 3 add a new layer and flood fill with a color of choice then go to adjust-add/remove noise-add noise- random checked as well as monochrome and noise at 36%. Move this layer below the frame layer then add a drop shadow of H 0 V 0 Opacity 60 Blur 4.00 Color Black.
Take the fence element from the kit copy and paste it as a new layer re-size it a little to fit nicely and place it above the glitter frame we just did but under the original frame layer. Duplicate and mirror if you re-sized it quite small, we want it to fit along the whole bottom of the frame.
Take the wooden sign element from the kit copy and paste it as a new layer and re-size it to fit nicely move it to the left of your tag under the fence you just added. Now in a font of choice write some words on the parts of the sign that point in different directions.
Copy and paste your tube as a new layer re-size it to your liking and arrange it where you want it. Duplicate it then go adjust-blur-gaussian blur at 5 and change the blend mode to soft light. Add a drop shadow to your bottom tube layer I used Lokas Software 3D shadow. Settings shown in the screen-shot below.
This tutorial was written by Brunette on September 19th 2012.
Any similarity to any other tutorial is purely coincidental.
Do not copy and paste my tutorials or claim as your own you may link to them for group challenges.
What you'll need:
You'll need a tube of choice I am using a gorgeous tube by Roman Zaric. You can purchase this tube at his store HERE.
A gorgeous kit by Ditzy Dezigns called Pumpkin Spice which you can purchase at Roman's store HERE.
You can get this gorgeous kit and tube together as a bundle for a great deal!
I also used a stock photo from morgue-file in the frame but you don't have to but if you do don't forget your credits. I just put photo courtesy of morguefile.
Eye Candy 4000 - Gradient Glow (Optional)
Fonts of choice - I am using a pixel font for the copyright and Origin for the name.
Ready?
Let's get started!
Open up a 700x700 canvas we can always re-size/crop later.
I like my tags BIG LOL.
Now from the kit open up frame 2 from the kit copy and paste it as a new layer re-size it if you need to. Now take your magic wand and click inside the frame open up paper 5 from the kit copy and paste it as a new layer then go to selections-invert and hit delete move this layer below the frame layer. Now if you're using a photo you're going to do the same thing then you can select none. Change the blend mode of the photo layer if you have one to screen duplicate and change the blend mode to soft light.
Still on your frame layer go to selections-select all-float-defloat-modify-expand by 3 add a new layer and flood fill with a color of choice then go to adjust-add/remove noise-add noise- random checked as well as monochrome and noise at 36%. Move this layer below the frame layer then add a drop shadow of H 0 V 0 Opacity 60 Blur 4.00 Color Black.
Take the fence element from the kit copy and paste it as a new layer re-size it a little to fit nicely and place it above the glitter frame we just did but under the original frame layer. Duplicate and mirror if you re-sized it quite small, we want it to fit along the whole bottom of the frame.
Take the wooden sign element from the kit copy and paste it as a new layer and re-size it to fit nicely move it to the left of your tag under the fence you just added. Now in a font of choice write some words on the parts of the sign that point in different directions.
Copy and paste your tube as a new layer re-size it to your liking and arrange it where you want it. Duplicate it then go adjust-blur-gaussian blur at 5 and change the blend mode to soft light. Add a drop shadow to your bottom tube layer I used Lokas Software 3D shadow. Settings shown in the screen-shot below.
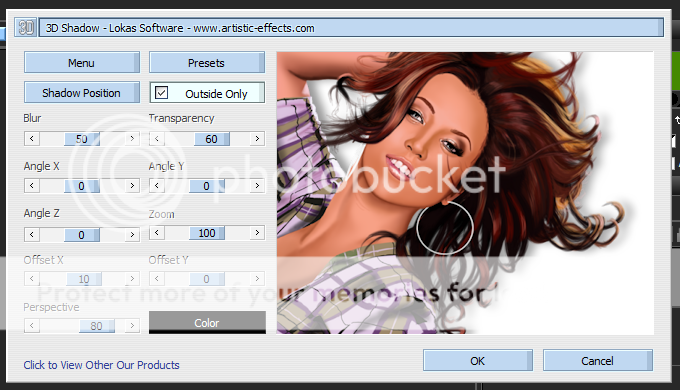
Take the Harvest word-art from the kit copy and paste it as a new layer re-size it a little to fit nicely and move it at the bottom of your tag near the center and add a drop shadow same one we used earlier for the glitter frame.
I used the acorn cluster and watering can combo elements from the kit on each side of the word-art re-size them so they fit there nicely and add the same drop shadow as earlier.
Now in your font and color of choice add your name then go to adjust-add/remove noise-add noise- random checked as well as monochrome and noise at 36% then add a gradient glow settings shown in the screen-shot below. Add a drop shadow of H 2 V 2 Opacity 60 Blur 4.00 Color Black.

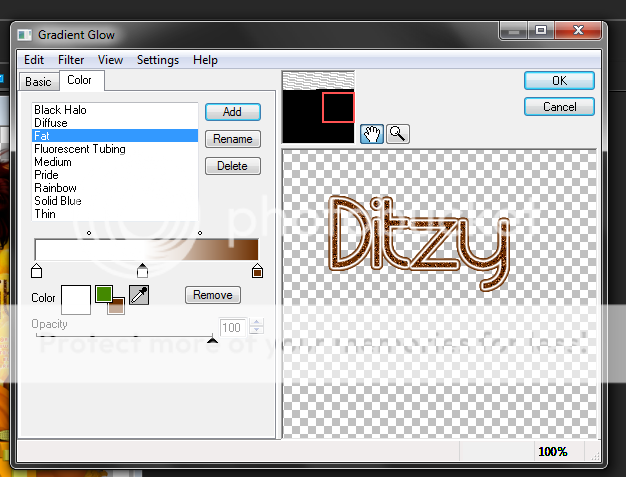
Finally add your copyright and license number if applicable save as png or jpeg whichever you prefer and we're done!
I hope you enjoyed this tutorial and found it easy to follow.
I would LOVE to see your results to any tutorials that you do, you can email results to me or post them on my page on facebook if you have a facebook account.
Muted Love

*Click the tag for full view*
This tutorial was written by Brunette on September 19th 2012.
Any similarity to any other tutorial is purely coincidental.
Do not copy and paste my tutorials or claim as your own you may link to them for group challenges.
What you'll need:
You'll need a tube of choice I am using a gorgeous tube by Angela Newman. You can purchase this tube at The PSP Project HERE.
Be sure to check out all her other great stuff as well as other designers there!
A gorgeous FTU kit by Wicked Princess Scraps called Muted Love which you can download HERE.
Make sure to leave some love!
Be sure to check out all her other great kits while you're there!
Template by Elegant Inspirations which you can download HERE.
Make sure you leave some love when you download!
Eye Candy 4000 - Gradient Glow (Optional)
Penta - Dot and Cross
Xero - Fritilary
Fonts of choice - I am using a pixel font for the copyright and Desyrel for the name.
Ready?
Let's get started!
Open up the template then hit Shift+ D this will open the template on a whole new canvas. Close the original template file.
We're going to work on the template from the bottom upwards.
On the gray flower 2 layer selections-select all-float-defloat add a new layer now open up a paper of choice I used paper 11 from the kit copy and paste it INTO the selection. Close off the original flower layer. Now on your new flower layer go to selections-float-defloat-modify-expand by 2 add a new layer and flood fill with a color of choice I used white. Move this layer below the flower layer and add some noise settings of your choice and add a drop shadow I used H 2 V 2 Opacity 60 Blur 4.00 Color Black. Repeat these steps for the other gray flower layer.
On the Lil black circle 2 layer go to selections-float-defloat now open up a paper of choice from the kit I used paper 5 copy and paste it as a new layer arrange it to your liking then go to selections-invert and hit delete. Close off the original lil black circle 2 layer. Repeat these steps for the other black circle layer.
We're leaving the black rectangles as they are.
On dark grey square 1 and two add Xero Fritilary to them hit random on the settings until you get something you like.
On Grey rectangle 3 and 4 add penta dot and cross my settings shown in th screen shot below.
This tutorial was written by Brunette on September 19th 2012.
Any similarity to any other tutorial is purely coincidental.
Do not copy and paste my tutorials or claim as your own you may link to them for group challenges.
What you'll need:
You'll need a tube of choice I am using a gorgeous tube by Angela Newman. You can purchase this tube at The PSP Project HERE.
Be sure to check out all her other great stuff as well as other designers there!
A gorgeous FTU kit by Wicked Princess Scraps called Muted Love which you can download HERE.
Make sure to leave some love!
Be sure to check out all her other great kits while you're there!
Template by Elegant Inspirations which you can download HERE.
Make sure you leave some love when you download!
Eye Candy 4000 - Gradient Glow (Optional)
Penta - Dot and Cross
Xero - Fritilary
Fonts of choice - I am using a pixel font for the copyright and Desyrel for the name.
Ready?
Let's get started!
Open up the template then hit Shift+ D this will open the template on a whole new canvas. Close the original template file.
We're going to work on the template from the bottom upwards.
On the gray flower 2 layer selections-select all-float-defloat add a new layer now open up a paper of choice I used paper 11 from the kit copy and paste it INTO the selection. Close off the original flower layer. Now on your new flower layer go to selections-float-defloat-modify-expand by 2 add a new layer and flood fill with a color of choice I used white. Move this layer below the flower layer and add some noise settings of your choice and add a drop shadow I used H 2 V 2 Opacity 60 Blur 4.00 Color Black. Repeat these steps for the other gray flower layer.
On the Lil black circle 2 layer go to selections-float-defloat now open up a paper of choice from the kit I used paper 5 copy and paste it as a new layer arrange it to your liking then go to selections-invert and hit delete. Close off the original lil black circle 2 layer. Repeat these steps for the other black circle layer.
We're leaving the black rectangles as they are.
On dark grey square 1 and two add Xero Fritilary to them hit random on the settings until you get something you like.
On Grey rectangle 3 and 4 add penta dot and cross my settings shown in th screen shot below.

On the dark grey circle layer selections-select all-float-defloat now copy and paste your tube as a new layer I used a closeup that came with the tube. Arrange it to your liking then go to selections-invert and hit delete. Change the blend mode to Luminace L. Repeat this step for the other dark grey circle layer.
Now we're on the black circle layer. Open up the silver clock element from the kit copy and paste it as a new layer arrange it so its peeking out from behind the white circle layer a bit. If it doesn't show all the way around duplicate and mirror. Use your erase tool to erase what you don't want seen on both layers. Then open up the moon element from the kit copy and paste it as a new layer below the clocks you just added re-size it so it fits nicely and change the blend mode to Luminance L. Duplicate and mirror if it doesn't cover the circle fully.
On the white circle layer I just added some noise to it by going to adjust-add/remove noise-add noise then choose your settings.
Open up the boxes element from the kit copy and paste it as a new layer near the bottom right of the tag re-size them so they fit nicely.
Open up the sachet bag element from the kit copy and paste it as a new layer near the bottom left of the tag and re-size it so it fits nicely.
Open up the feather element from the kit copy and paste it as a new layer and move it up near the top left of your tag then re-size it so it fits nicely.
Open up the flower clip element from the kit copy and paste it as a new layer and move it up near the top right of the tag and re-size it so it fits nicely.
Now copy and paste your tube as a new layer then duplicate it and go to adjust-blur-gaussian blur set to 5 and change the blend mode to soft light. Add a drop shadow I used Loka's Software 3D shadow, settings shown below in my screen-shot.

Add your name in a font and color of choice then add a gradient glow my settings shown in the screen-shot below, then add drop shadow I used H 2 V 2 Opacity 60 Blur 4.00 Color Black.


Finally add your copyright and license number if applicable save as png or jpeg whichever you prefer and we're done!
I hope you enjoyed this tutorial and found it easy to follow.
I would LOVE to see your results to any tutorials that you do, you can email results to me or post them on my page on face-book if you have a face-book account.
Monday, August 27, 2012
Lick This!

*Click the tag for full view*
This tutorial was written by Brunette on August 27th 2012.
Any similarity to any other tutorial is purely coincidental.
Do not copy and paste my tutorials or claim as your own you may link to them for group challenges.
What you'll need:
You'll need a tube of choice I am using a gorgeous tube by KiwiFire Storm. You can purchase this tube at The PSP Project HERE.
Be sure to check out all her other great stuff as well as other designers there!
A gorgeous kit by Toxic Desirez called Lick This which you can purchase at The PSP Project HERE.
Be sure to check out all her other great kits while you're there!
Template 181 by Toxic Desirez which you can download HERE.
Make sure you leave some love when you download!
This tutorial was written by Brunette on August 27th 2012.
Any similarity to any other tutorial is purely coincidental.
Do not copy and paste my tutorials or claim as your own you may link to them for group challenges.
What you'll need:
You'll need a tube of choice I am using a gorgeous tube by KiwiFire Storm. You can purchase this tube at The PSP Project HERE.
Be sure to check out all her other great stuff as well as other designers there!
A gorgeous kit by Toxic Desirez called Lick This which you can purchase at The PSP Project HERE.
Be sure to check out all her other great kits while you're there!
Template 181 by Toxic Desirez which you can download HERE.
Make sure you leave some love when you download!
Eye Candy 4000 - Gradient Glow (Optional)
Fonts of choice - I am using a pixel font for the copyright and Battlelines for the name.
Ready?
Let's get started!
Open up the template then hit Shift+ D this will open the template on a whole new canvas. Close the original template file.
On the rounded rectangle layer go to selections-select all-float-defloat add a new layer now use a gradient I used two different colors from my tag and made a background/foreground one then flood fill it. DO NOT deselect yet copy and paste your tube as a new layer arrange it to your liking on either side then go to selections-invert and hit delete, duplicate and change then blend mode to screen. Go to selections-invert to undo the invert then go to modify and expand by 3 then flood fill with a color of choice I used white and added some noise to it. Close off the original rounded rectangle layer. Add a drop shadow of H 2 V 2 Opacity 60 Blur 4.00 Color Black.
On the circle layer go to selections-select all-float-defloat now open up a paper of choice I used paper 16 from the kit copy and paste it as a new layer arrange it to your liking then go to selections-invert and hit delete. Change the blend mode of this layer to Luminance. Again go back to selections and hit invert to undo it then go to modify and expand by 3 flood fill with a color of choice I used pink and add the same noise and drop shadow as above. Close off the original circle layer.
On the bottom and top round rectangles we're going to do the same thing go to selections-select all-float-defloat then open up a paper I used paper 21 from the kit copy and paste it as a new layer then go to selections-invert and hit delete. Close off the original rectangle layers and add the same drop shadow as above.
Top and bottom rectangle layers selections-select all-float-defloat add a new layer and flood fill with a color of choice then I added some lines in it using blinds in PSP. Add the same drop shadow as you did earlier. Close off the original layers.
Repeat the above steps minus the blinds to the bottom and top square layers as well as the top and bottom circle layers.
Now we can decorate! YAY!
I put the splatter from the kit on the bottom and top circle layers that you flood filled with a different color.
Same as the Lick this word-art then added a fat gradient glow and the same drop shadow used all along this tutorial.
Flower 1 from the kit re-sized and added to the bottom right of the tag.
The Bat element near the top left of the tag of coursed re-sized so it fits there nicely.
Bow 3 re-size to fit nicely at the corner of the first rounded rectangle we worked with first.
The Cupcake re-sized and placed near the bottom left of the tag.
Now copy and paste your main tube as a new layer arrange and re-size to your liking then duplicate it and go to adjust-blur-gaussian blur set to 3 change the blend mode to soft light and lover the opacity to 32. Add the same drop shadow as earlier to the bottom tube.
Now in a font and color of choice add your name now go to selections-select all-float-defloat-modify-expand by 2 add a new layer and flood fill with a color of choice I used the same gradient as earlier then modify it again by 2 add a new layer and flood fill with the original color of the font arrange it to the bottom of the other font layers. Add your drop shadow same settings to the bottom layer. You can add some noise to the middle layer if you like, its up to you. Then I changed the blend mode to Hardlight but this depends on where you place your name.
Finally add your copyright and license number if applicable save as png or jpeg whichever you prefer and we're done!
I hope you enjoyed this tutorial and found it easy to follow.
I would LOVE to see your results to any tutorials that you do, you can email results to me or post them on my page on face-book if you have a face-book account.
Sunday, August 26, 2012
Sexylicious

*Click the tag for full view*
This tutorial was written by Brunette on August 26th 2012.
Any similarity to any other tutorial is purely coincidental.
Do not copy and paste my tutorials or claim as your own you may link to them for group challenges.
What you'll need:
You'll need a tube of choice I am using a gorgeous tube by Wendy Gerber. You can purchase this tube at her store HERE.
Be sure to check out all her other great stuff as well as other designers there!
A gorgeous kit by Wendy Gerber called Blue Jeans which you can get at her store HERE.
Mask of choice - mine is by Vix PSP HERE.
I used mask number 147 :) which is in the 10th May 2008 post
Make sure you leave some love when you download!
Fonts of choice - I am using a pixel font for the copyright and Origin for the name.
Ready?
Let's get started!
Open up a 700x700 canvas we can always re-size/crop later.
I like my tags BIG LOL.
Open up the jean frame from the kit copy and paste it as a new layer re-size it a little so it fits nicely. Take your magic wand and click inside the frame hole then go to selections-modify and expand by 5 add a new layer and flood fill with a color of choice I used a foreground/background gradient. Now open up your tube mirror it then copy and paste it into the frame mine is a close up so if yours has one you can use that. Arrange it to your liking then go back up to selections-invert and hit delete.
Now take your pixel font and write out a word I used sexylicious then align it so its in the center of the canvas and convert it to raster layer. Then go to MuRa's Meister Copies and use these settings shown below. My screen-shot shows the color black but I used white you can use whatever color you'd like. Now once you get that done apply your mask again then merge group. Change the blend mode of this layer to Soft light.
This tutorial was written by Brunette on August 26th 2012.
Any similarity to any other tutorial is purely coincidental.
Do not copy and paste my tutorials or claim as your own you may link to them for group challenges.
What you'll need:
You'll need a tube of choice I am using a gorgeous tube by Wendy Gerber. You can purchase this tube at her store HERE.
Be sure to check out all her other great stuff as well as other designers there!
A gorgeous kit by Wendy Gerber called Blue Jeans which you can get at her store HERE.
Mask of choice - mine is by Vix PSP HERE.
I used mask number 147 :) which is in the 10th May 2008 post
Make sure you leave some love when you download!
Fonts of choice - I am using a pixel font for the copyright and Origin for the name.
Ready?
Let's get started!
Open up a 700x700 canvas we can always re-size/crop later.
I like my tags BIG LOL.
Open up the jean frame from the kit copy and paste it as a new layer re-size it a little so it fits nicely. Take your magic wand and click inside the frame hole then go to selections-modify and expand by 5 add a new layer and flood fill with a color of choice I used a foreground/background gradient. Now open up your tube mirror it then copy and paste it into the frame mine is a close up so if yours has one you can use that. Arrange it to your liking then go back up to selections-invert and hit delete.
Now take your pixel font and write out a word I used sexylicious then align it so its in the center of the canvas and convert it to raster layer. Then go to MuRa's Meister Copies and use these settings shown below. My screen-shot shows the color black but I used white you can use whatever color you'd like. Now once you get that done apply your mask again then merge group. Change the blend mode of this layer to Soft light.
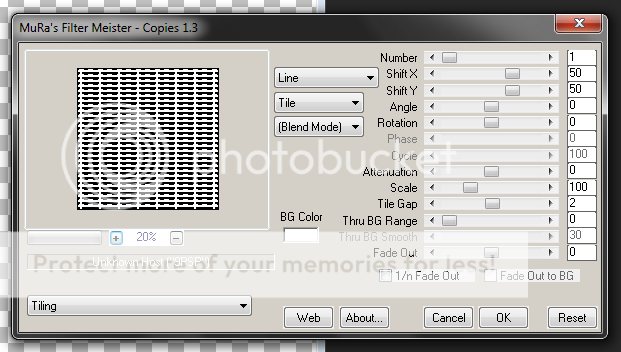
Now copy and paste your main tube as a new layer re-size it a little if you need to then duplicate it change the blend mode of the duplicated layer to soft light and go to adjust-blur-gaussian blur set to 5 lower the opacity to 24. Add a drop shadow to the bottom layer I used H 2 V2 Opacity 60 Blur 4.00 Color Black.
Open up element 55 from the kit it should be a pink flower copy and paste it as a new layer re-size it so it fits nicely up in the corner of the frame where the bows are then duplicate it. Add the same drop shadow as you did earlier.
Open up element 24 from the kit it should be two cute little hearts copy and paste them as a new layer arrange them near the bottom left side of the frame.
Open up element 31 from the kit this is a pretty side banner element copy and paste it as a new layer and move it below the frame and sticking out the side a bit. Duplicate, mirror and flip it arrange the other side the same. We're going to do the same with element 8 and then add the same drop shadow to these layers ONLY as you did earlier.
Now open paper 5 copy and paste it as a new layer move it below everything and add your mask then merge group.
Now in a font and color of choice add your name now go to selections-select all-float-defloat-modify-expand by 2 add a new layer and flood fill with a color of choice then modify it again by 2 add a new layer and flood fill with the original color of the font arrange it to the bottom of the other font layers. Add your drop shadow to the bottom layer. You can add some noise to the middle layer if you like, its up to you.
Finally add your copyright and license number if applicable save as png or jpeg whichever you prefer and we're done!
I hope you enjoyed this tutorial and found it easy to follow.
I would LOVE to see your results to any tutorials that you do, you can email results to me or post them on my page on face-book if you have a face-book account.
Gothic

*Click the tag for full view*
This tutorial was written by Brunette on August 26th 2012.
Any similarity to any other tutorial is purely coincidental.
Do not copy and paste my tutorials or claim as your own you may link to them for group challenges.
What you'll need:
You'll need a tube of choice I am using an awesome tube by Jose Cano. I bought this tube at PTE which has now closed
You can now purchase his art at Scraps and the City.
FTU Scrap Kit by Purples Kreations from Pink Candy Designs called "Goth Girl"
You an download this awesome kit HERE.
Mask from HERE I used number 218 they're downloadable in packs.
Don't forget to leave a thank you when downloading!
Fonts of choice - I am using a pixel font for the copyright and Weimar for the name.
Ready?
Let's get started!
Open up a 700x700 canvas we can always re-size/crop later.
I like my tags BIG LOL.
Open up frame 4 take your magic wand and click inside the frame. Go to selections-modify and expand by 3. Open up a paper of choice I used paper 7 copy and paste it as a new layer then go to selections-invert and hit delete. DO NOT deselect yet. Open a different paper I used paper 4 hit delete again. Now we're going to copy and paste your tube and do the same but move it between the two paper layers. Duplicate and mirror it. Change the blend mode to screen for the top paper layer and your tube layer. I also added the lights element from the kit in there re-sized it so it fit nicely.
Copy and paste your tube, arrange it to your liking.
Open up a ribbon I used number 6, a cupcake I used number 2, a singlerose I used number 1 and skull 4 .Copy and paste your cupcake re-size it so it fits nicely now your rose do the same thing. The ribbon copy and paste it but move it below the cupcake and rose. Move the skull where you like on the frame and re-size it a little.
Open up another paper copy and paste it as a new layer, move it below everything and add your mask then merge group.
Open up the wire element I used number 1 copy and paste it arrange it so its showing at the top duplicate mirror and flip it.
Open up the star cluster element I used number 1 copy and paste it as a new layer duplicate and mirror.
Now you can go through and give everything a drop shadow of
H 2
V 2
Opacity 60
Blur 4.00
Color Black
Now in a font and color of choice add your name now go to selections-select all-float-defloat-modify-expand by 2 add a new layer and flood fill with a color of choice then modify it again by 2 add a new layer and flood fill with the original color of the font arrange it to the bottom of the other font layers. Add your drop shadow to the bottom layer. You can add some noise to the middle layer if you like, its up to you.
Finally add your copyright and license number if applicable save as png or jpeg whichever you prefer and we're done!
I hope you enjoyed this tutorial and found it easy to follow.
I would LOVE to see your results to any tutorials that you do, you can email results to me or post them on my page on face-book if you have a face-book account.
This tutorial was written by Brunette on August 26th 2012.
Any similarity to any other tutorial is purely coincidental.
Do not copy and paste my tutorials or claim as your own you may link to them for group challenges.
What you'll need:
You'll need a tube of choice I am using an awesome tube by Jose Cano. I bought this tube at PTE which has now closed
You can now purchase his art at Scraps and the City.
FTU Scrap Kit by Purples Kreations from Pink Candy Designs called "Goth Girl"
You an download this awesome kit HERE.
Mask from HERE I used number 218 they're downloadable in packs.
Don't forget to leave a thank you when downloading!
Fonts of choice - I am using a pixel font for the copyright and Weimar for the name.
Ready?
Let's get started!
Open up a 700x700 canvas we can always re-size/crop later.
I like my tags BIG LOL.
Open up frame 4 take your magic wand and click inside the frame. Go to selections-modify and expand by 3. Open up a paper of choice I used paper 7 copy and paste it as a new layer then go to selections-invert and hit delete. DO NOT deselect yet. Open a different paper I used paper 4 hit delete again. Now we're going to copy and paste your tube and do the same but move it between the two paper layers. Duplicate and mirror it. Change the blend mode to screen for the top paper layer and your tube layer. I also added the lights element from the kit in there re-sized it so it fit nicely.
Copy and paste your tube, arrange it to your liking.
Open up a ribbon I used number 6, a cupcake I used number 2, a singlerose I used number 1 and skull 4 .Copy and paste your cupcake re-size it so it fits nicely now your rose do the same thing. The ribbon copy and paste it but move it below the cupcake and rose. Move the skull where you like on the frame and re-size it a little.
Open up another paper copy and paste it as a new layer, move it below everything and add your mask then merge group.
Open up the wire element I used number 1 copy and paste it arrange it so its showing at the top duplicate mirror and flip it.
Open up the star cluster element I used number 1 copy and paste it as a new layer duplicate and mirror.
Now you can go through and give everything a drop shadow of
H 2
V 2
Opacity 60
Blur 4.00
Color Black
Now in a font and color of choice add your name now go to selections-select all-float-defloat-modify-expand by 2 add a new layer and flood fill with a color of choice then modify it again by 2 add a new layer and flood fill with the original color of the font arrange it to the bottom of the other font layers. Add your drop shadow to the bottom layer. You can add some noise to the middle layer if you like, its up to you.
Finally add your copyright and license number if applicable save as png or jpeg whichever you prefer and we're done!
I hope you enjoyed this tutorial and found it easy to follow.
I would LOVE to see your results to any tutorials that you do, you can email results to me or post them on my page on face-book if you have a face-book account.
The Darkest Night

*Click the tag for full view*
This tutorial was written by Brunette on August 26th 2012.
Any similarity to any other tutorial is purely coincidental.
Do not copy and paste my tutorials or claim as your own you may link to them for group challenges.
What you'll need:
You'll need a tube of choice I am using an awesome tube by Camilla Drakenborg.Which you can purchased at Up Your Art HERE.
Be sure to check out ALL the other AWESOME artists there!
A gorgeous kit by Gothic Inspirations called The Darkest Night which you can purchase at her shop HERE.
Be sure to check out all her other fab kits while you're there!
Mask of choice - mine is by Vix PSP HERE.
I used mask number 349 :) which is in the 15th May 2009 post
Make sure you leave some love when you download!
Fonts of choice - I am using a pixel font for the copyright and Allura Regular for the name.
Ready?
Let's get started!
Open up a 700x700 canvas we can always re-size/crop later.
I like my tags BIG LOL.
Open up frame 7 from the kit copy and paste it as a new layer re-size it so it fits nicely. Now take your magic wand and click inside the frame then go to selections-modify-expand by 3 add a new layer then open up a paper of choice I used paper 14 from the kit paste it into the selection and move it below the frame. DO NOT deselect yet open up your tube copy and paste it as a new layer and arrange it to your liking then go to selections invert and hit delete and deselect. My tubes in the frame were on each side so I mirrored it. Merge them together if you have one on each side, then change the blend mode to screen duplicate and change the blend mode to soft light then go to adjust-blur-gaussian blur set to 5. Add a drop shadow to your frame I used H 2 V 2 Opacity 60 Blur 4.00 Color Black.
Open up the beads element from the kit copy and paste them as a new layer re-size so it fits along the top part of your frame.
Copy and paste your tube as a new layer re-size it if you need to duplicate it and change the blend mode to screen apply the same blur you did earlier then lower the opacity to 32 and add the same drop shadow.
Now the moon element can go behind your tube re-size it so it fits there nicely. Add the same drop shadow.
Copy and paste the fog from the kit behind your tube re-size it so it fits nicely I moved it to one side duplicated and mirrored mine.
Copy and paste the light element from the kit behind your tube but to the side a bit re-size it so it fits nicely.
Take word-art 1 from the kit copy and paste it so its on the frame near the bottom re-size it so it fits there nicely.
Now we're going to take another paper I used paper 9 from the kit copy and paste it as a new layer and move it to the bottom of your layer palette. Then add your mask and merge group. If it doesn't cover where you want arrange the first one to your liking then duplicate and mirror it.
Add your name in your font and color of choice then go to selections-select all-float-defloat-modify and expand by 2 add a new layer flood fill it with white or a color of choice then add some noise by going to adjust-add/remove noise-add noise random checked, 36% noise and monochrome checked. DO NOT deslect yet go to modify and expand by 2 again add a new layer and flood fill with the color you used for your name move it below all the name layers and add a drop shadow. Same drop shadow settings as above.
Finally add your copyright and license number if applicable save as png or jpeg whichever you prefer and we're done!
I hope you enjoyed this tutorial and found it easy to follow.
I would LOVE to see your results to any tutorials that you do, you can email results to me or post them on my page on face-book if you have a face-book account.
Thursday, August 23, 2012
Out of the Blue
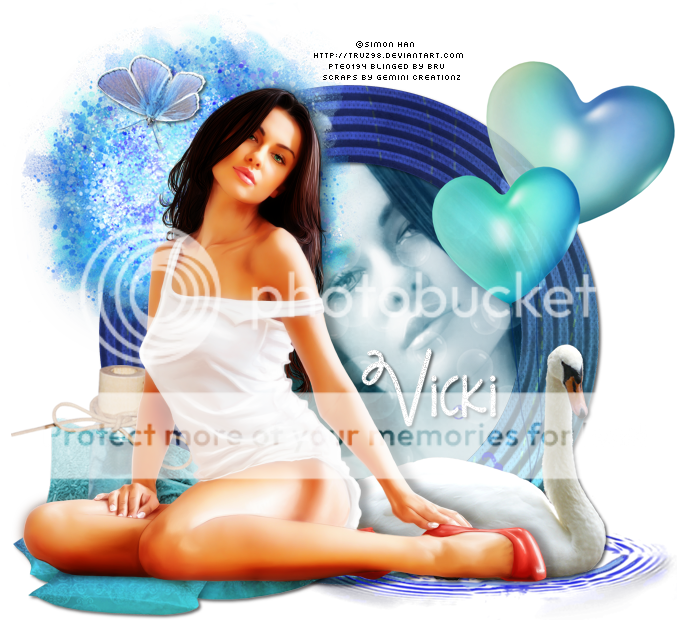
*Click the tag for full view*
This tutorial was written by Brunette on August 23rd 2012.
Any similarity to any other tutorial is purely coincidental.
Do not copy and paste my tutorials or claim as your own you may link to them for group challenges.
What you'll need:
You'll need a tube of choice I am using an awesome tube by Simon Han. I purchased my tube at PSP Tubes Emporium however it has since closed so I am not sure where he is selling currently if anywhere.
A gorgeous kit by Gemini Creationz called Out of the Blue which you can purchase at Scraps and the City
This tutorial was written by Brunette on August 23rd 2012.
Any similarity to any other tutorial is purely coincidental.
Do not copy and paste my tutorials or claim as your own you may link to them for group challenges.
What you'll need:
You'll need a tube of choice I am using an awesome tube by Simon Han. I purchased my tube at PSP Tubes Emporium however it has since closed so I am not sure where he is selling currently if anywhere.
A gorgeous kit by Gemini Creationz called Out of the Blue which you can purchase at Scraps and the City
HERE.
Be sure to check out all her other fab kits as well as other designers while you're there!
Fonts of choice - I am using a pixel font for the copyright and KG Strawberry Limeade for the name.
Ready?
Let's get started!
Open up a 700x700 canvas we can always re-size/crop later.
I like my tags BIG LOL.
Open up element 2 from the kit which should be a frame copy and paste it as a new layer onto your canvas. Take your magic wand and click inside the frame then go to selections-modify-expand by 4 now open up a paper of choice I used paper 6 copy and paste it as a new layer arrange it to your liking then go back up to selections-invert and hit delete move this layer below the frame. DO NOT deselect yet. Open up your tube mine came with a close up so I used that, mirror it then copy and paste it as a new layer above the paper layer and arrange it to your liking then hit delete. Gray scale your tube in the frame and change the blend mode to screen duplicate and change the blend mode to soft light.
Open element 40 from the kit which should be bubbles copy and paste them as a new layer under the frame over the top re-size and arrange them to your liking.
Now we can decorate a bit!
Open up element 9 from the kit which is a gorgeous tree copy and paste it as a new layer move it to the left of your frame. I added element 33 which is a butterfly on the tree re-sizing it to fit nicely.
Open up element 10 which is heart balloons copy and paste them as a new layer arrange them to the right of your frame.
Open element 16 which is a puddle of water copy and paste it as a new layer re-size it a little and place it to the bottom right of your frame. Now open element 30 which is a swan copy and paste it as a new layer re-size it a little and mirror it. Arrange it so its in the puddle.
Open up element 64 which is a bunch of pillows copy and paste them as a new layer re-size a little and place them at the bottom left of your frame.
Open element 45 which is a bag of shells I believe copy and paste it as a new layer re-size and place at the bottom left of your frame behind the pillows you just put there.
Open up element 58 which is a bottle copy and paste it as a new layer re-size it to it fits nicely move it to the bottom left of your frame in front of your bag of shells but still behind the pillows.
Now we can copy and paste our tube as a new layer I arranged mine so it looked like she was sitting on the pillows. Duplicate your tube change the blend mode to soft light and then go to adjust-blur-gaussian blur set to 5 and give your bottom tube layer a drop shadow of V 2 H 2 Opacity 60 Blur 4.00 Color Black.
Add the same drop shadow as above to the frame, pillows, bag of shells, swan and butterfly in the tree.
Now add your name in your font and color of choice I used white then added some noise by going to adjust-add/remove noise-add noise-uniform checked as well as monochrome and at 36% then apply the same drop shadow as above.
Finally add your copyright and license number if applicable save as png or jpeg whichever you prefer and we're done!
I hope you enjoyed this tutorial and found it easy to follow.
I would LOVE to see your results to any tutorials that you do, you can email results to me or post them on my page on face-book if you have a face-book account.
Be sure to check out all her other fab kits as well as other designers while you're there!
Fonts of choice - I am using a pixel font for the copyright and KG Strawberry Limeade for the name.
Ready?
Let's get started!
Open up a 700x700 canvas we can always re-size/crop later.
I like my tags BIG LOL.
Open up element 2 from the kit which should be a frame copy and paste it as a new layer onto your canvas. Take your magic wand and click inside the frame then go to selections-modify-expand by 4 now open up a paper of choice I used paper 6 copy and paste it as a new layer arrange it to your liking then go back up to selections-invert and hit delete move this layer below the frame. DO NOT deselect yet. Open up your tube mine came with a close up so I used that, mirror it then copy and paste it as a new layer above the paper layer and arrange it to your liking then hit delete. Gray scale your tube in the frame and change the blend mode to screen duplicate and change the blend mode to soft light.
Open element 40 from the kit which should be bubbles copy and paste them as a new layer under the frame over the top re-size and arrange them to your liking.
Now we can decorate a bit!
Open up element 9 from the kit which is a gorgeous tree copy and paste it as a new layer move it to the left of your frame. I added element 33 which is a butterfly on the tree re-sizing it to fit nicely.
Open up element 10 which is heart balloons copy and paste them as a new layer arrange them to the right of your frame.
Open element 16 which is a puddle of water copy and paste it as a new layer re-size it a little and place it to the bottom right of your frame. Now open element 30 which is a swan copy and paste it as a new layer re-size it a little and mirror it. Arrange it so its in the puddle.
Open up element 64 which is a bunch of pillows copy and paste them as a new layer re-size a little and place them at the bottom left of your frame.
Open element 45 which is a bag of shells I believe copy and paste it as a new layer re-size and place at the bottom left of your frame behind the pillows you just put there.
Open up element 58 which is a bottle copy and paste it as a new layer re-size it to it fits nicely move it to the bottom left of your frame in front of your bag of shells but still behind the pillows.
Now we can copy and paste our tube as a new layer I arranged mine so it looked like she was sitting on the pillows. Duplicate your tube change the blend mode to soft light and then go to adjust-blur-gaussian blur set to 5 and give your bottom tube layer a drop shadow of V 2 H 2 Opacity 60 Blur 4.00 Color Black.
Add the same drop shadow as above to the frame, pillows, bag of shells, swan and butterfly in the tree.
Now add your name in your font and color of choice I used white then added some noise by going to adjust-add/remove noise-add noise-uniform checked as well as monochrome and at 36% then apply the same drop shadow as above.
Finally add your copyright and license number if applicable save as png or jpeg whichever you prefer and we're done!
I hope you enjoyed this tutorial and found it easy to follow.
I would LOVE to see your results to any tutorials that you do, you can email results to me or post them on my page on face-book if you have a face-book account.
Subscribe to:
Posts (Atom)


