


Sunday, March 20, 2011
Spring Garden

You'll need a tube of choice.
I am using the gorgeous art of Tatjana Willms you can purchase tubes to use for tags here.
Font of choice.
Eye Candy 4000 - Gradient Glow
A kit of choice I am using part of a fab kit from the girls over at Pimp my tags with Scraps called Spring Love. I am using Pimp'd Designz portion.
Ready?
Let's get started!
Open up a new canvas 700x700 we can alway scrop/re-size later.
Now open up frame 4 from the kit copy and paste it as a new layer onto your canvas. Take your magic wand and click inside the frame then go to selections-modify-expand by 4. Now open up a paper of choice I used paper number one then selections-invert and on the paper layer hit delete. Move this layer below the frame.
Open up the rainbow element from the kit copy and paste it as a new layer re-size it so it fits nicely then move it below the frame layer BUT above the paper layer. Erase any bits that over hang then duplicate and mirror it.
Open up the greens element from the kit copy and paste it as a new layer on either side of the frame re-size so it fits nicely duplicate and mirror it. Now open up a flower element from the kit I used number 4 and place it at the top of the greens duplicate and mirror.
I used different elements for the tag and just sort of decorated it. I used the bunny and lady bugs. As well as the glitter circle from the kit I used that for the bottom layer then duplicated it and mirrored it, arranging it to my liking.
Copy and paste your tube as a new layer re-size it if it doesn't fit nicely. Duplicate it and change the blend mode to soft light and add a drop shadow same as the screen-shot below.
Now we're going to add your name in a font of choice and add a gradient glow shown in the screen-shot below as well as the drop shadow used.


Finally add your copyright and license number if applicable save as png or jpeg whichever you prefer and we're done!
I hope you enjoyed this tutorial and found it easy to follow.
Tuesday, March 8, 2011
Darling

*Click the tag to see a larger view*
You'll need a tube of choice preferably one with a closeup.
.
I am using the gorgeous art of Keith Garvey you can purchase his art to use for tags at PTE.
Tag Template 319 by Missy of Divine Intentionz here.
Font of choice
Mask Vix350 by Vix which you can get here.
Eye Candy 4000 - Gradient Glow
Xero - Fritillary
VanDerLee - Unplugged X
A kit of choice I am using a gorgeous kit free by Laura of Cinnamon Scraps called French Kiss which you can download from her blog here.
Ready?
Let's get started!
Open up the template shift + D to duplicate it close out the original.
Delete the copyright layer.
On Circle1 layer selections-select all-float-defloat add a new raster layer and flood fill with a color of choice I used a dark grey, then add some noise to make it stand out. Repeat the same steps for Raster1 layer EXCEPT do not add any noise to this layer. Close off the original layers.
Next on Circle3 layer selections-select all-float-defloat add a new layer and flood fill with a gradient of choice I used a background-foreground gradient. Then add Xero Fritillary settings shown in the screen-shot below. Close off the original layer.

On the Rounded Edges Rectangle layer seletions-select all-float-defloat add a new layer flood fill with a color of choice and close off the original layer.
On the Frame background layer selections-select all-float-defloat add a new layer and flood fill with the gradient we used earlier. Open up your close up and paste it as a new layer then go to selections-invert and hit delete make sure you are ON the tube layer when you do this. Then duplicate it go to adjust-blur-gaussian blur- 3 change the blend mode to soft light and the original layer blend mode to Luminane L. I also added VanDerLee - Unplugged X - Pattern offset, use the settings that fit your tag, on the top layer of the closeup.
On the with passion layer selections-select all-float-defloat add a new raster layer and with your paint brush and a color of choice paint the words to match the tag. Select none and close off the original layer.
On heart 1 & 2 layer add some noise.
On the 3 hearts layer selections-select all-float-defloat add a new raster layer flood fill with a color of choice to match your tag and add some noise. Close off the original layer.
Open up Ribbon Wrap 2 from the kit paste it as a new layer I rotated it and re-sized it to fit nicely around the
frame.
Open up the wordart from the kit paste it as a new layer I placed mine at the top and re-sized it so it fit nicely on the tag.
Now we're going to add our tube so open that up copy and paste it as a new layer I put it over in the cirlces. Now if you have some of the tube hanging over here is how you fix that. Go to the Circle2 layer selections-select all-float-defloat-invert then back on your tube layer and use your eraser brush to erase what is hanging over. Duplicate this layer and go to adjust-blur-gaussian blur-3 and change the blend mode to soft light and add a drop shadow. Settings shown below in the screen-shot.

Now we're going to add a mask layer to the very bottom of the tag just to add something to it so add a new layer and move it to the bottom of the layer pallette. Flood fill with the gradient from earlier and add the mask, then a little noise effect.
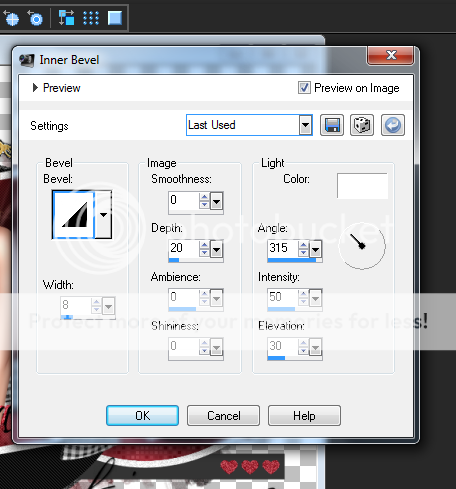
Its time to add your name in a font of choice, I also added some noise, inner bevel,gradient glow and drop shadow. Screen-shot below shows the settings for the gradient glow,inner bevel and the drop shadow the noise setting is whatever fits your tag or tastes.


Finally add your copyright and license number if applicable save as png or jpeg whichever you prefer and we're done!
I hope you enjoyed this tutorial and found it easy to follow.
Friday, February 11, 2011
Love Letters

You'll need a tube of choice preferably one with a closeup.
I am using the gorgeous art of Keith Garvey I purchased my tube when he was selling at MPT. He has now changed places and you can purchase his art at PTE.
Font of choice
Eye Candy 4000 - Gradient Glow
VanDerLee - Unplugged X
A kit of choice I am using a gorgeous kit by Laura of Cinnamon Scraps called Love Letters which you can find out how to purchase from her blog here.
Ready?
Let's get started!
Open up a new canvas 700X700 we can always crop/re-size later.
Open up frame 6 from the kit and paste it as a new layer onto your canvas.
With your magic wand select inside the frame then go to selections-modify-expand by 2 or 3 open up a paper from the kit I used paper 3 then selections-invert and hit delete. Move this layer below the frame layer. DO NOT deselect yet! Copy and paste your close up I mirrored mine before pasting it but thats up to you. Get it to where you want it and hit delete make sure this layer is below the frame layer as well but above the paper layer. Now duplicate the tube then go to adjust-Blur-Gaussian blur set at 3 then change the blend mode to overly and the original tube layer's blend mode to Luminance L. Then I used VanDerLee - Unplugged X - Pattern Offset, I just played around with the settings until I got something I liked.
Next I opened up Ribbon 1 from the kit re-sized it to fit the tag nicely and placed it on the top right corner of the frame. On the other side of the frame I copied and pasted the Love Letters little tag.
Now we're going to do the background behind the frame. Open up a paper of choice, I used paper 21 then added a mask and lowered the opacity a little. I opened up the hearts element from the kit pasted it as a new layer at the very bottom layer of the tag re-sized it so it fit nicely.
In a font of choice add your name, add some noise and a gradient glow (shown in my screen shot below) and of course a drop shadow.


Finally add your copyright and license number if applicable save as png or jpeg whichever you prefer and we're done!
I hope you enjoyed this tutorial and found it easy to follow.
I hope you enjoyed this tutorial and found it easy to follow.
Monday, January 31, 2011
Dangerous

Ready?
My tube was bought when she was selling at CILM but seeing as they are closed she has moved stores.
Font of choice
Eye Candy 4000 - Gradient Glow
Xero - Fritillary
Template by Nicole over on her blog here. Thank you Nicole!
A kit of choice I am using a gorgeous kit by Pimp'd Designz over at Pimp my Tags with Scraps called Wild Child.
Open up the template duplicate, close the original one.
On the template delete the copyright layer, also delete the dotted line layers.
Copy and paste your tube as a new layer in the rectangle deleting what over hangs the rectangle.
Select the gray rectangle layer then selections-select all-float-defloat and add a paper of choice I used paper 1 from the kit. Then go to selections-invert and hit delete. Close off the original grey rectangle layer.
On the pink rectangle layer selections-select all-float-defloat and flood fill with a color of choice I used a pink color. Close off the original pink rectangle layer. Add some noise to the layer you just flood filled.
On the right circle layer selections-select all-float-defloat add a new layer and flood fill with a color of choice then add xero fritillary play with the settings to get the effect you like. Open up frame 1 from the kit re-size it so it fits over the circle. Repeat for the left gray circle layer.
On the right gray rectangle layer selections-select all-float-defloat flood fill with a color of choice then close off the original gray rectangle layer. I added some weave to this layer. Repeat for the left grey rectangle layer.
I added the fence from the kit as well as flower 3 and skull one. Then added a paper 6 as a new layer at the bottom and added a mask.Add your name in a font of choice add a gradient glow mine shown in screen shots below and a drop shadow.


Finally add your copyright and license number if applicable save as png or jpeg whichever you prefer and we're done!
I hope you enjoyed this tutorial and found it easy to follow.
Wednesday, January 12, 2011
Tease


You'll need a tube of choice preferably one with a closeup.
I am using the gorgeous art of Elias Chatzoudis you can purchase his art to use for tags at MPT.Font of choice
Eye Candy 4000 - Gradient Glow
VanDerLee - Unplugged X
A kit of choice I am using a rockin' collab kit by Pimp'd Design and Designs by Sarah over at Pimp my tags with Scraps called Girlz Rock.
Ready?
Let's get started!
New Raster layer 700x700 we can re-size/crop later
Open up Frame 1 from Pimp'd's part of the kit paste it as a new layer.
Take your magic wand and select all the squares in the frame then selections-modify-expand by 3. Now open up a paper of choice I used paper 4 from Sarah's part of the kit then selections-invert and hit delete, move this paper layer below the frame layer but DO NOT deselect yet. Open up your tube closeup paste it as a new layer and hit delete. Duplicate and then mirror that copy.
I changed one copy's blend mode to Luminance L the other one I just colorized it so it was grey. Do what you think looks good for your tag.
Then I used VanDerLee - Unplugged X - Pattern Offset on the tube layers. Play around with the settings to get an effect you like.
Next we can copy and paste the tube duplicate it and change the blend mode of the duplicated copy to soft light then add a drop shadow to the original tube layer.
Now we can decorate your tag!
I used heart 4 from Pimp'd's part of the kit as well as beads1. I rotated the beads so they were vertical along the top and bottom of the tag. Remember to re-size these elements so they fit nicely on your tag. I also used the clipped flower from Sarah's part of the kit placing it at the top left corner then duplicating it, flipping and mirroring it. I used ribbon 5 and the sparklies from Sarah's part of the kit. Add drop shadows to everything but the beads and sparklies.
Add your name in a font of choice I used Velvenda Cooler its one of my favs!
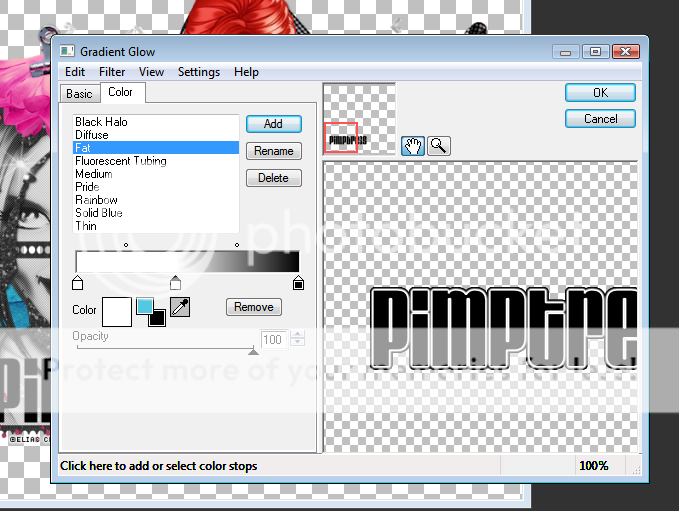
Add a gradient glow my settings shown in the screen shot below then add a drop shadow.

Finally add your copyright and license number if applicable save as png or jpeg whichever you prefer and we're done!
I hope you enjoyed this tutorial and found it easy to follow.
Saturday, November 20, 2010
Pink Angel

You'll need a tube of choice I am using the gorgeous art of Keith Garvey you can purchase his art to use for tags MPT.
Font of choice
Mask of choice
Eye Candy 4000 - Gradient Glow
A kit of choice I am using a gorgeous kit by Cora over at Pimp my Tags with Scraps called Pink Holiday.
Ready?
Let's get started!
Make a new canvas 700 x 700 you can always crop/re-size later.
Open up a paper of choice from the kit I used paper 4 then add a mask of your choice. I duplicated my mask layer to make it a little darker but that is totally up to you.
Next open up the window from the kit paste it onto your canvas re-size it so it fits nicely. I added the wreath, and ribbon to the window to decorate it a little.
Open up the holiday cheer element from the kit, paste it as a new layer and move it below the window you can erase the parts that over hang past it with your eraser tool.
Next we're going to open up the tree from the kit paste it onto your canvas and re-size it so its fits nicely. I added one of the start elements from the kit at the top to make it look like a tree top.
Copy and paste your tube of choice then duplicate it change the blend mode to soft light and add a drop shadow to the original tube layer.
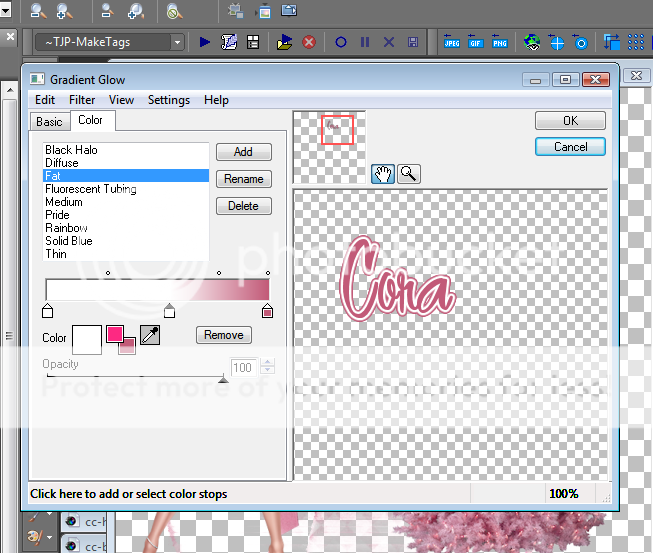
Add your name in a font of choice and add a gradient glow my settings are shown in the screen shot below.

Finally add your copyright and license number if applicable save as png or jpeg whichever you prefer and we're done!
I hope you enjoyed this tutorial and found it easy to follow.
Friday, November 19, 2010
Tag Ho Christmas

This tutorial was written by Brunette on November 19th 2010. Any similarity to any other tutorial is purely coincidental.
Do not copy and paste my tutorials or claim as your own you may link to them for group challenges.
You'll need a tube of choice I am using the gorgeous art of Keith Garvey you can purchase his art to use for tags MPT. This image was part of the FAB gift the artist at MPT put together for us this year. Thank you MPT and artists!
Font of choice
A kit of choice I am using a gorgeous collab kit by Sarah, Cora and TammyKat over at Pimp my Tags with Scraps called Naughty List.
Ready?
Let's get started!
Open up the template duplicate it close out the original. Delete the copright layer.
I closed out the gradient circle, black circle and text layers.
Select the gradient rectangle layer selections-select all-float-defloat and add a new layer flood fill with a color of choice. Add some noise and a drop shadow, close off the original rectangle layer.
Next open up the tree from Sarah's folder of the kit copy and paste it as a new layer and add a drop shadow. Open up the naughty list scroll re-size so if fits nicely and paste it as a new layer rotate it a little then add a drop shadow. I added one of the holly elements from Tammy's folder of the kit to the scroll and added a drop shadow. Decorate your tag how you see fit adding a drop shadow to whatever you add.
Next we're going to add our tube. Once you have the tube you want to use copy it then paste it as a new layer, move it below the tag ho xmas and ho ho ho layers. Then on the oval frame layer selections-select all-float-defloat back on the tube later delete the part that is in the frame itself with your eraser tool. Go back on the oval frame layer then selections-invert back on the tube later delete the parts that over hang the frame with your eraser tool. Duplicate the tube layer and change the blend mode of the top one to soft light and add a drop shadow to the original layer.
In a font of choice add your name I put it on the naughty list scroll to make it look like it was a name on the naughty list. I used the color white then added some noise and a drop shadow.
Add a new layer below the black circle layer either copy and paste a paper of flood fill with a color of choice and add a mask.
Finally add your copyright and license number if applicable save as png or jpeg whichever you prefer and we're done!
I hope you enjoyed this tutorial and found it easy to follow.
Subscribe to:
Posts (Atom)


